Berries and Peaches with Mint Syrup

Berries and Peaches with Mint Syrup | A Couple CooksBerries and Peaches with Mint Syrup | A Couple CooksBerries and Peaches with Mint Syrup | A Couple CooksBerries and Peaches with Mint Syrup | A Couple CooksBerries and Peaches with Mint Syrup | A Couple CooksWhy should we all use our creative power…? Because there is nothing that makes people so generous, joyful, lively, bold and compassionate, so indifferent to fighting and the accumulation of objects and money. ~Brenda Ueland

Some people ooze creativity, but I would contend after my 33 years on this earth that we are all born with a creative spirit. Maybe it’s not easily visible in some people, but instead of singing or dancing perhaps it’s creative problem solving skills. Or, I’ve met engineers who are closet painters or sculptors. And I’ve learned from teaching cooking that once people have the tools of how to create a meal, they are creative and inventive beyond what they thought possible.

I identify as a creative: I was a writer and played classical piano and French horn throughout my childhood, then ended up majoring in music and journalism in college. Since I chose a career in the business world (I’m part owner of a technical writing firm), I’ve had to determine how to balance an intense creative passion with a demanding career. How’s that for a challenge? I’d imagine many of you reading this have had similar experiences. Cooking became that creative outlet for me, and along with that this blog.

Many times, the stress of running two businesses while trying to be a loving boss / wife / daughter / friend / sister / aunt / niece / etc. has left me on less than a full tank. A few weeks ago, I was thrilled to be approached by a dear friend to try out a book called The Artist’s Way that focuses on creative renewal. One of the challenges in the book was to take an “artist’s date” each week, where you do something to indulge your inner artist. For me, it was playing a Chopin waltz I hadn’t touched in years. It felt so good, I cried (ha!). Creative healing central, here. If any of you readers are creatives or wanting to tap into more creative potential, I’d highly recommend the book.

And now, the food. To me, a simple recipe that highlights interesting flavors with minimal effort is #1 in creativity in my book (at least, in the home cooking realm!). A dear friend made this for a picnic and I couldn’t get over the simple beauty of vibrant, ripe fruit against the minty sweetness of a light drizzle of syrup. Our variation with this local fruit from our farmer’s market was beyond stellar. Like eating the best kind of candy possible.  And if you struggle with work / life balance as I do, it’s also a super simple dessert for a summer evening. Whip up a bit of the syrup (which mainly involves hands off wait time) and store it in the refrigerator for the next occasion.

We’d love to hear in the comments below if any of you have thoughts on creativity, creative renewal, work / life balance, etc. Hope your summer is going well! 

Mint Syrup
 
by:
Serves: 1½ cups

What You Need
  • Large handful of mint stems
  • 1 cup water
  • 2 cups sugar

What To Do
  1. Remove the leaves from the mint and reserve for a garnish. Roughly cut the mint stems so they fit in a medium saucepan. In the saucepan, add 1 cup water and 2 cups sugar Bring to a simmer and simmer for a few minutes until thickened.
  2. Remove from the heat and cool for about 1 hour while the mint seeps. When cool, strain into an airtight container. (Makes 1½ cups syrup; store in the refrigerator for up to 6 months.)

Berries and Peaches with Mint Syrup
 
by:
Serves: 4

What You Need
  • ½ pint blackberries
  • ½ pint raspberries
  • 2 peaches
  • Mint leaves
  • Mint syrup (above)

What To Do
  1. Slice the peaches. Place the berries and peaches on a plate and drizzle syrup over fruit. Garnish with mint leaves.


A Couple Cooks | RSS Feed

Beet & Greens Tart

Beet_tart_01

When I tell my friends that I like to watch tv-series on my phone and movies on my computer – simultaneously – they often give me that ”you-are-weird” look. It doesn’t matter that I try to explain that it can be very stressful to be the father of two kids, run a family business and have a blog, so watching tv-series and movies is a nice way to de-stress. And since I don’t have much time to myself, I try to make the most of it, hence the double screens. For many years, I just fast-forwarded through movies (don’t judge) but I have realised that this is a much better way. When I fast-forwarded I often missed essential parts of the plot so I had to rewind several times, and that kind of defeated the purpose. I of course realise that one of the points of movies and tv series is to relax, but in some upside-down way I just feel like I get twice as much relaxation done. Imagine how effective I could be if I learned to multitask while sleeping! (I have already tried watching movies while sleeping and unfortunately it’s just not my thing, even if I’m a fan of the idea.)

Luise isn’t very understanding either, I have explained to her that Sherlock Holmes (the one living in New York with Lucy Liu as an assistant) can watch 10 different televisions at the same time, but she told me that I am being ridiculous (I still don’t understand if she means that I’m ridiculous for making Sherlock Holmes references or because Sherlock Holmes is a pretty awesome guy and I’m ridiculous for even trying to compare myself with him?).

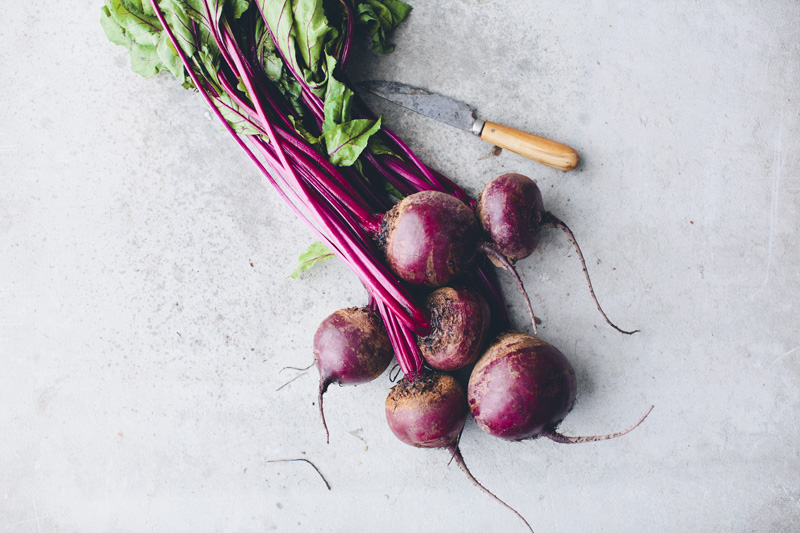
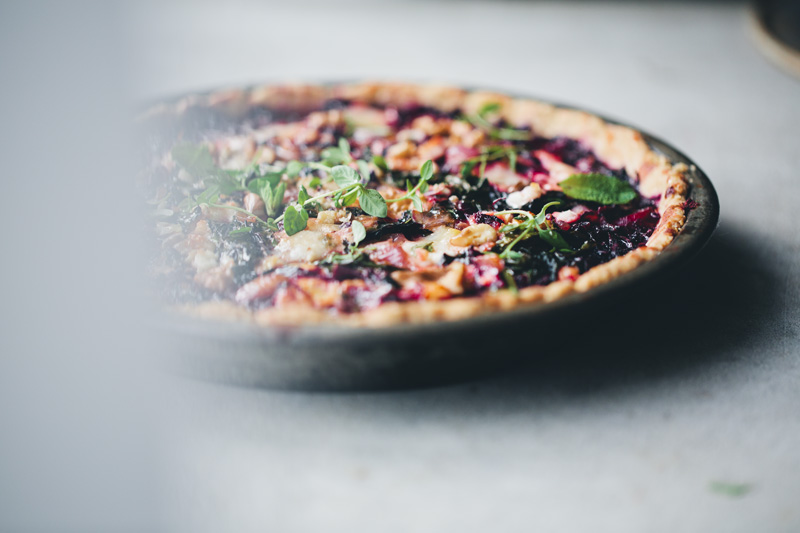
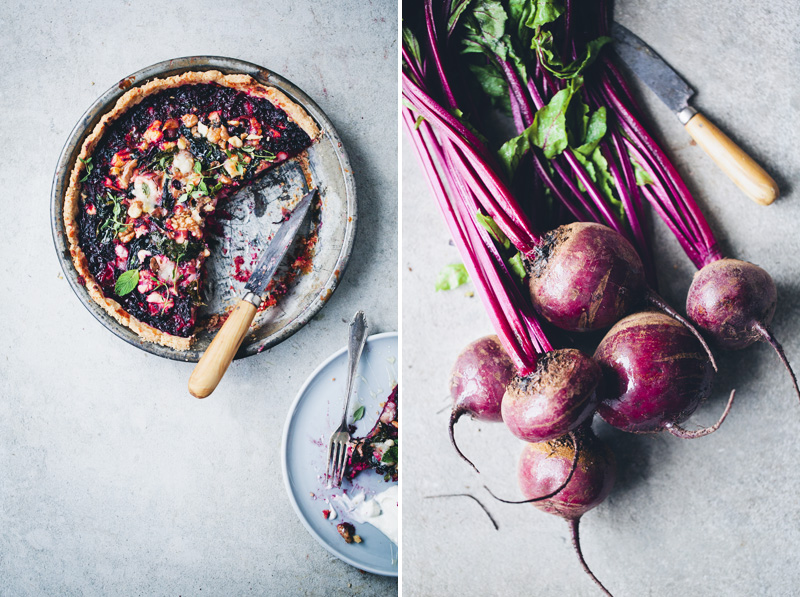
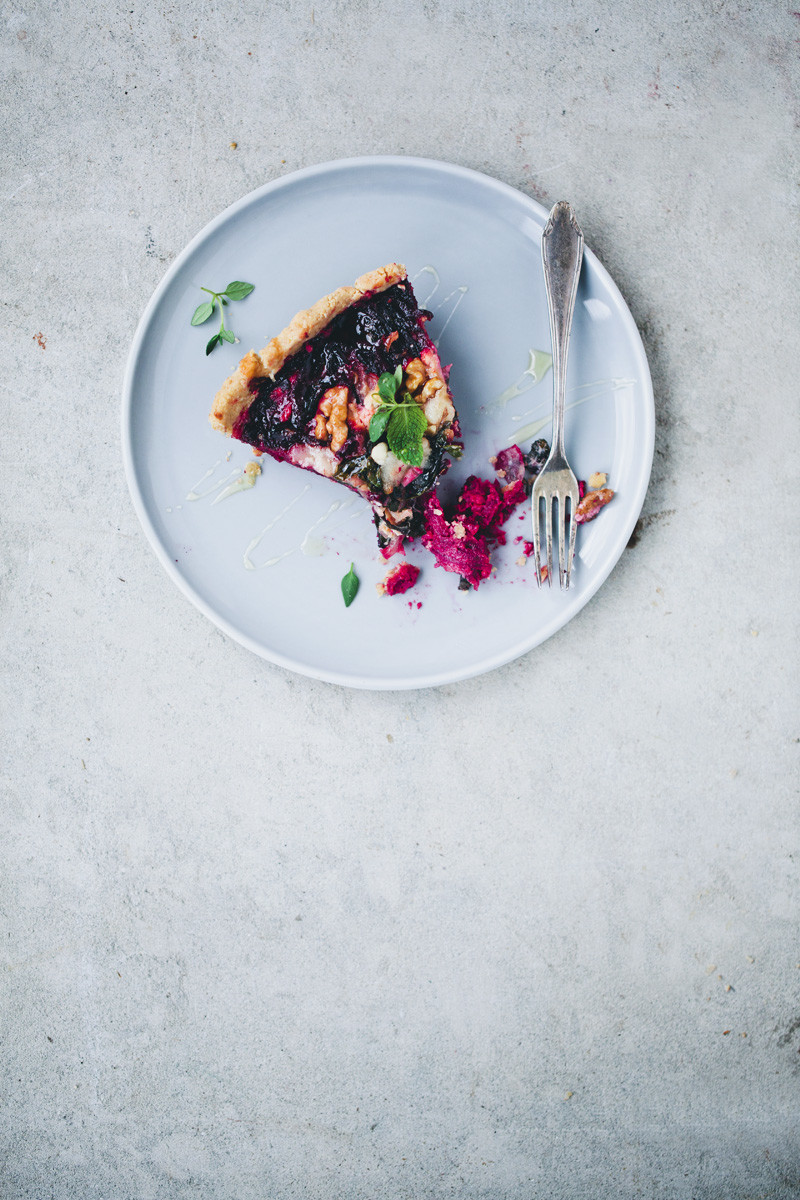
Anyway, today’s recipe is a beet tart. It’s not very complicated to make and it’s really delicious. Perfect for a lunch or a picnic. You can probably make it while watching Sherlock Holmes, but I wouldn’t recommend to simultaneously watch another movie. It’s a one-screen kind of recipe. Mostly because you need to grate beets and I have had enough accidents with the box grater to know that two screens and a box grater is more than even I can handle. I am sure Sherlock could pull it off though.

Beet_tart_02

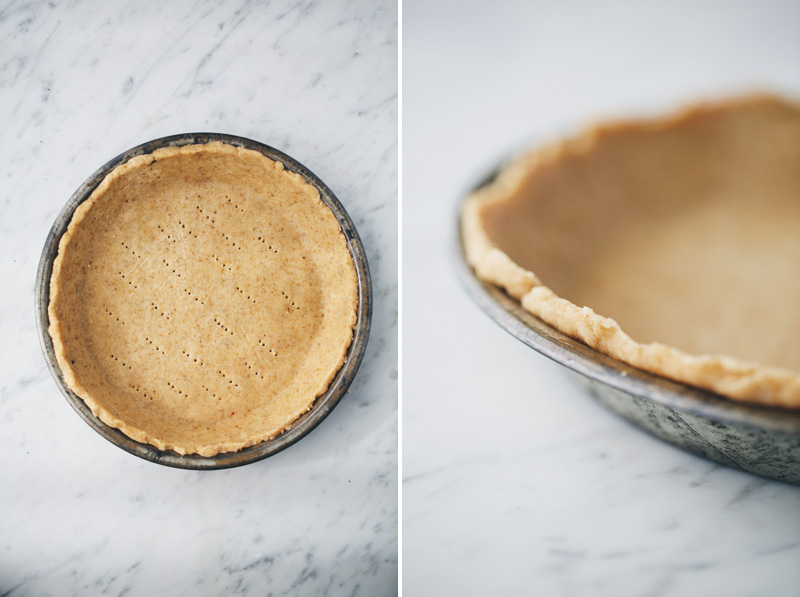
The tart crust is gluten free and really easy to handle, in fact, it might be our best tart crust ever. I usually just press the dough into a case without using a rolling pin, but this time I rolled it out between two sheets of baking paper and it came out real pretty and easy to handle. However, you need 3 different types of flour and if you think that’s too much, feel free to replace it with your own favourite tart crust recipe.

Beet_tart_03

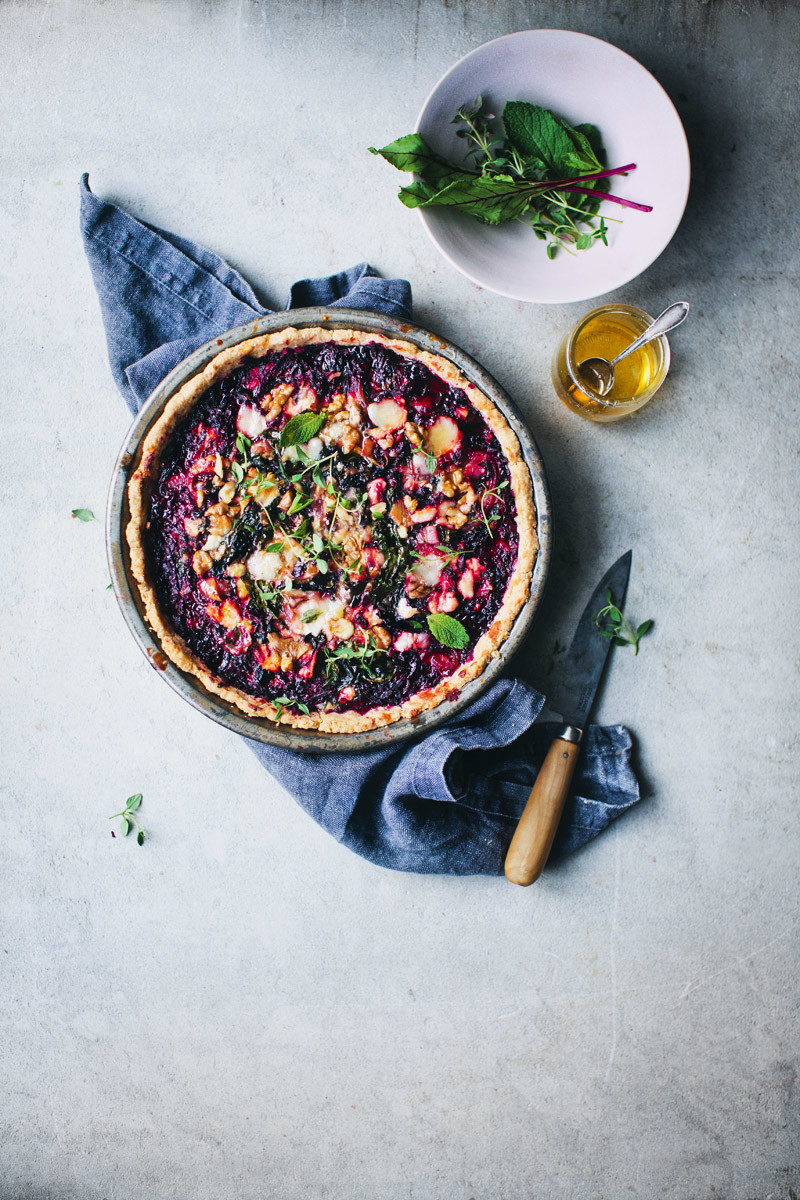
Given that I’ve been talking about beetroots and Sherlock Holmes, I could easily make some references to blood stains in our kitchen, but I’m going to talk about the flavour and method instead. We went classic with the beet pairings. The idea is to fill up the bottom of the tart with raw grated beetroots, then we top it with sautéed onion and beet greens that are mixed with beaten egg, plant milk, crumbled goat’s cheese, mint and walnuts. And right before we eat it, we usually drizzle some raw honey on top because the sweetness is really nice together with the goat’s cheese. Sherlock has bee hives on his roof so I’m sure he would appreciate the use of honey.

Enough with Sherlock. Now, let’s get cooking.

Beet_tart_04 Beet_tart_05

Beet, Goat’s Cheese & Walnut Tart
8 servings  (Loosely inspired from this recipe)

If you find beetroots with fresh and good looking greens, go ahead and use them. They are usually pretty easy to find during the spring and summer. If not, just use the beetroots and replace the beet greens with spinach, chard or kale instead.

Tart crust
1 cup / 100 g / 3.5 oz rolled oats (or 3/4 cup / 200 ml oat flour), choose certified gluten free if you are intolerant
1/3 cup / 50 g rice flour

1/3 cup/ 50 g almond flour
2 tbsp linseeds (optional)
1/2 tsp salt
75 g / 5 tbsp cold butter or coconut oil, cut into dices

4 tbsp ice-cold water

Filling
2-3 beetroots (approx 1 lb/450 g), 

1 red onion, peeled
3 garlic cloves, finely chopped
1 tsp fresh or dried thyme
salt & pepper

2 large bunches beet greens (or spinach)
1-2 tbsp apple cider vinegar (or lemon juice)

3 large eggs
1/2 cup / 140 ml milk of choice, we used rice
3.5 oz / 100 g goat’s cheese / chèvre
10 fresh mint leaves

10 walnuts, lightly crushed

2 tbsp honey

Preheat the oven to 350°F / 180°C. Add rolled oats, almond flour, rice flour, linseeds and sea salt to a food processor and pulse until the oats have been mixed into flour. Add the diced butter and pulse a few times until you get really small pieces of butter evenly distributed in the flour. (These steps can also be made by hand.) Add the water, pulse until everything comes together. Try to form a ball with your hands. If it feels crumbly, add 1-2 tbsp extra water. Gather the dough into a ball, wrap in clingfilm and chill for about 30 minutes.

When done, place the dough between two baking papers and use a rolling pin to roll out the dough until you got a rough circle, about 1/8 inch / 5 mm thick. Carefully transfer it to a 10 inch / 27 cm tart pan. Trim off any excess dough then use a fork to prick it a few times. Blind-bake for 10 minutes to prevent the crust from getting soggy.

Peel the beetroots and grate them coarsely on a box grater or in a food processor.

Cut the onion thinly. Place a large frying pan on medium heat. Add a slab of coconut oil or butter and, when melted, spread out the onion slices evenly in the pan. Fry for 4-5 minutes and then shake the pan and fry them on the other side. Add garlic and thyme and fry for about 30 seconds before adding half of the beet greens (or spinach) together with apple cider vinegar, salt and pepper. When the greens have wilted down, add the rest, stir around and then take the pan off the heat. Beat the eggs together with the milk and then crumble in the goat’s cheese finely. Add sautéed vegetables and mint leaves and stir around.

Arrange the grated beets at the bottom of the tart, reserve some for the top. Pour the egg and greens mixture over the center, make sure that the cheese is somewhat evenly distributed. We usually leave about an inch / 2 cm of beetroot untouched towards the edges (just because it’s pretty) but it’s not necessary. Make sure the filling is all moist from the liquid. Tuck in walnut pieces here and there at the top and drizzle over the remaining beetroot shreds. You can drizzle some honey on top before baking if you prefer a bit of caramelised top, or just save it for after it’s baked (or do both if you prefer ir a bit sweeter). Bake for 30-35 minutes or until golden and firm. Serve with a dollop of Turkish yogurt and some drizzled honey on top.

Beet_tart_06

*************
Oh, one other thing, completely unrelated to Sherlock Holmes and Beet Tarts. We’re going to Milan next week to talk about the Italian edition of our (first) book. We will be talking, cooking a recipe and have a book signing at Corriere della Sera’s food event Cibo a regola d’arte on Thursday 21st May at 5.30pm. The event is free and will take place in Triennale – salone d’Onore. Hope to see some of you there!

Green Kitchen Stories

Minted Summer Couscous with Watermelon and Feta- Simply Ancient Grains

Minted Summer Couscous with Watermelon and Feta- Simply Ancient Grains

I have a pile of cookbooks sitting on my side table that I’ve been wanting to share with you. This year has been a big year for books by people I admire (and the fall is showing no sign of a slow down). It feels like such a wonderful time for fresh, seasonal cooking in terms of books. This is exciting and slightly bad- I’m going to need a bigger book shelf (because I’m still a physical book lover- none of these ‘ebooks’!)

The book I wanted to share with you today is by one of my favorite authors. I first learned about Maria from her first cookbook. My mom had picked it up and sometimes when I’m at her house, I raid her cookbook collection (and by raid, I mean borrow for an extended period of time).  I had just started my path down whole grains when I picked up Ancient Grains for Modern Meals. I fell in love with Maria’s creative use of grains and she is one of the biggest proponents of ancient grains.

Minted Summer Couscous with Watermelon and Feta- Simply Ancient Grains

Her newest book, Simply Ancient Grains, is a wonderful follow-up to her first book. The cookbook spans breakfast through mains and to desserts. It’s a good sign when I flip through a cookbook and want to make nearly every recipe. I started with the giant spelt pancake with squash blossoms (not only creative but beautiful too) and followed it up with this summer couscous. Fruit and grains has been a theme for me this summer (starting with this cherry and quinoa salad). The salad is light, refreshing, and perfect for any picnic or cookout.

If you’re a grain lover like myself, I highly recommend checking out both Maria’s books. They are both a wonderful inspiration to really dive into the world of Ancient grains!
See the Recipe.

The post Minted Summer Couscous with Watermelon and Feta- Simply Ancient Grains appeared first on Naturally Ella.

Naturally Ella

Making Fitness Work for You: How to Exercise at Home

Making FItness Work for You...How to Exercise Without A Gym | A Couple Cooks

As passionate as we are about food and health, we know simply eating a whole foods diet is only one piece of the puzzle. Staying fit and leading an active lifestyle is just as important to overall wellness. Here’s the secret we’ve found to fitting in regular exercise: making it work in your lifestyle and with your personality. In this next post in our Healthy + Whole series, here’s a bit about where we’ve come, and what our fitness routine looks like now. 

Like many Americans, my life is non-stop. Weekdays are packed minute-by-minute between running a business, running a blog, running to social commitments…ironically leaving little to no time for actual physical running! Until about 10 years ago, regular fitness often took a back seat in my life to professional or artistic pursuits, socializing, or, well, anything to give me a good excuse.

I must confess: I’ve never been a gym person. I don’t feel inspired around exercise equipment and mirrors and big muscles. Instead, I feel inspired when I’m in my home, walking in my neighborhood, dancing, or hiking up a mountain. After some ill-fated attempts at becoming a gym regular, I realized a gym membership was not the answer.

Instead, several years ago as an experiment, I started using some Pilates DVDs. To my surprise, within a few months I started to slim down and build muscle without even having to leave my home, which was perfect for my busy schedule. A tradition of waking up early before work to do Pilates began. While I didn’t look forward to the early mornings, I felt great and it left my evenings free. After we got married, Alex encouraged me to start some new videos, partly because I could recite Denise Austin by heart but mostly to start working some new muscle groups. We decided it was time for some cardio as well, and purchased elliptical machine for our home. I started alternating cardio (while listening to my favorite podcast) with strength training workouts on weekday mornings, but left the weekend free for “rest” from my weekday workouts. 7 days a week sounded burdensome, but 5 weekdays: that was doable.

What started as an experiment turned into a tradition of exercise that Alex has now joined me on. He’s pushed to prioritize strength training, so we’ve moved to using You Tube videos in our attic workout space. And for cardio, we’ve started jump rope (surprisingly difficult), and just purchased a stationary bike to replace our elliptical, since it’s smaller and can provide an even more targeted workout. And when he doesn’t want to get up, we carve out some time in the evening.

Overall, we’ve found that creating a fitness plan in our home has worked surprising well. We’re able to exercise doing what we want, when we want — and even better, it’s working! Our new strength training regimen has allowed us to build some serious muscle while enjoying some time together.

Below are a few tips on how to start a workout routine in your home, as well as a plan of what we do and some links to equipment we use. We’d love to hear your thoughts on exercise, how you’ve made it work for you, or where you’re looking to grow!

1. Embrace your identity. Before I became interested in cooking, I had a very strong identity about who I as not. “I’m not a cook. I’m not a crunchy granola hippie who loves health food and wears yoga pants.” In the same way, I had the same prejudices about being into fitness. “I’m not a body builder. I’m not a runner. I don’t wear spandex and sports bras.” But guess what? You don’t need to change your identity or your personality to start integrating fitness into your life. Same with cooking healthy foods. You can still be you, even if your habits might start to look different.

2. If it doesn’t work, ditch the gym. With the craziness that is my life, there’s just not enough time in the day to drive to a gym, exercise, shower, and drive home. To make working out work for me, I get up 30 minutes early before work to exercise in my home. This saves the time of taking a trip to the gym, and I have my evenings free to catch up at the office or go for a walk with a friend. I started out with just an exercise mat, and have since purchased some free weights to go along with our exercise videos.

3. Work out, then rest. Making a goal of working out 7 days per week for the indefinite future is daunting. We’ve found that aiming to work out every weekday works for us, since we’re able to be more naturally active on the weekends, especially in the summer. This also gives your muscles a break and a chance to rebuild.

4. Give yourself grace. Lots of it. Working out regularly is hard work, and it takes diligence to build up a routine and find what works for you. If you have some rough patches and stop/starts, it’s ok! Give yourself the grace to move forward, and try not to guilt-trip yourself into giving it up altogether. (We’ve been there.)

What We Do: In-Home Workouts

  • Daily: Walk as much as possible during the day (I use a Fitbit to track my steps and shoot for 8,000 to 10,000)
  • Weekly (~30 minutes total on weekdays):
    Strength training + light cardio You Tube videos, 20-30 minutes / 4-5 times per week
    Cardio on elliptical or stationary bike, ~20 minutes / 3 times per week (to keep your interest, try listening to podcasts!)
  • Weekend: 
    Bike rides
    Walking dates with friends
    Dancing! (I love it, he hates it)

What We Use


A Couple Cooks | RSS Feed

Almond Butter Toast with Honey & Strawberries

Almond Butter Toast with Strawberries & Honey | A Couple CooksAlmond Butter Toast with Strawberries & Honey | A Couple CooksAlmond Butter Toast with Strawberries & Honey | A Couple CooksAlmond Butter Toast with Strawberries & Honey | A Couple Cooks

Here’s another in the “not really a recipe, more of an idea” category, but honestly, those are my favorite. When I’m stuck in a rut with meals, it’s nice to have a little inspiration even if it’s just to put almond butter on toast. Or tomatoes with spaghetti and fresh basil. Or yogurt with cherries and honey — those easy combinations that are somehow easily forgotten.

This meal is an easy breakfast / snack idea using all local goodies from our local farmer’s market: bread from Amelia’s, almond butter from Pure Good Foods (hi, new friend Rachel!), strawberries from Annabelle’s Garden, and honey from Wildflower Ridge. It’s fun to stretch your imagination to combine local goods together, which is actually how we got into cooking in the first place. When we first began learning about food, we found it was easier to be creative within parameters, the sort of Iron Chef approach of making something with what’s on hand (basil, tomato, zucchini – go!). We hope this simple idea sparks some inspiration for you; we’ve included our friend Ashley’s almond butter recipe below if you’re ready to give it a go yourself.

On a more personal note, it’s almost the middle of summer in the blink of an eye! Next week, we’re headed off to Alaska for a summer vacation with my family. I’m especially excited to see my sister, who lives in Burma, since visits are few and far between when you’re halfway across the world. We’ll be spending most of our time in Juneau and the surrounding area. Let us know if you have any travel tips, and we’d love to know if we have any readers in that part of the country?

Hope you are all well and enjoying your summer–let us know what you’re up to in the comments below. (Seriously, we’d really love to hear from you.) And if you’d like, follow along on our travels / kitchen on Instagram – we love to share life and hear from you over there too!

Almond Butter Toast with Honey & Strawberries
 
by:
Serves: 1

What You Need
  • 1 slice whole grain, artisan bread
  • 2 tablespoons almond butter (homemade or purchased)
  • 6 local strawberries
  • ½ teaspoon local honey (optional if almond butter contains sweetener)

What To Do
  1. If desired, make the almond butter.
  2. Slice a thick piece of artisan bread and toast it.
  3. Core and thinly slice the strawberries.
  4. When the toast is done, spread liberally with almond butter and drizzle with honey. Place strawberry slices on top and enjoy.


A Couple Cooks | RSS Feed

Matcha Eggs Benedict

Matcha Eggs Benedict | A Couple CooksMatcha Eggs Benedict | A Couple Cooks

Here’s a final recipe to round out our latest breakfast kick. We’ve been wondering: do you eat breakfast? Most days our breakfasts are simple with peanut butter toast or oatmeal, but on the weekends we like to mix it up when time allows. How abut weekend breakfasts or brunches? There’s something so comforting about the concept, like a little reward for making it through the week!

This recipe is a twist on an old standard: eggs Benedict, healthy style (we couldn’t help it). This “healthy hollandaise” sauce is made mostly of Greek yogurt, with a little lemon, touch of butter, and some green tea for an unexpected kick. We’ve been working with a green tea powder company to come up with some creative savory uses for the green stuff, and this is one of our favorites. Don’t expect it to taste quite like a true hollandaise, but the tart yogurt and lemony zest goes quite well with the eggs and makes for a satisfying, savory breakfast. The matcha brings a vibrant green color to the dish, and after tasting many formulations of the green sauce, this one ended up as the winner. We hope you enjoy it – cheers to weekend breakfasts!

(And don’t forget brinner. On many a busy weeknight, brinner saves us.)

If you’re interested in the nutritional benefits of matcha, check out this post for a brief description and a link for more information.

Our Latest for Breakfast/Brunch/Brinner
Almond Butter Toast with Strawberries and Honey
Scrambled Eggs with Matcha and Lime
Dippy Eggs with Cheese Fried Toast Soldiers

Strawberry Rhubarb Hazelnut Muffins
Soft Scrambled Eggs with Goat Cheese and Asparagus
Breakfast Parfait with Roasted Strawberries
Waffle Party

Matcha Eggs Benedict
 
by:
Serves: 4 (2 stacks per person)

What You Need
  • ¼ cup melted butter
  • 1 cup Greek yogurt
  • Juice from 1 lemon (~ 3 tablespoons)
  • 1 ½ teaspoons matcha (we used Aiya Cooking Grade Matcha)
  • ½ teaspoon garlic powder
  • ½ teaspoon cumin
  • 1 teaspoon honey
  • ¼ teaspoon kosher salt
  • ~¼ cup warm water
  • 8 eggs
  • 4 whole grain English muffins
  • Chives for garnish
  • Edible flowers for garnish, if desired (we used nasturtium flowers from our garden, only because we had them onhand)

What To Do
  1. Melt ¼ cup butter. In a bowl, mix together ¼ cup melted butter, 1 cup Greek yogurt, juice from 1 lemon (~ 3 tablespoons), 1 ½ teaspoons matcha, ½ teaspoon garlic powder, ½ teaspoon cumin, 1 teaspoon honey, and ¼ teaspoon kosher salt. Mix thoroughly to combine. Add warm water a few tablespoons at a time to thin out the sauce, up to ¼ cup.
  2. Poach 8 eggs. Toast 4 whole grain English muffins. Thinly slice the chives.
  3. To serve, place poached eggs on English muffin halves, drizzle with sauce and garnish with chives.

This recipe was developed for Aiya Matcha.

A Couple Cooks | RSS Feed

Summer Pasta with Smashed Tomatoes, Peaches & Mozzarella

Smashed_tomato_pasta_1

We have been cooking this quick little dinner recipe rather frequently during the summer. At a first glance, it might seem like it’s just a classic/boring fresh tomato pasta. But when you consider the context: hot summer days, family time, ripe tomatoes in season, everyone is hungry but no one feels like cooking … you’ll realise that it’s exactly the kind of simple dinner that we all need more of. We have of course given this dish our own schwung. Instead of just serving tomatoes fresh, we squeeze/punch/smash them up a bit so they get softer and release some of that lovely juice that gets mixed with olive oil, a splash of the hot pasta water, fresh basil, garlic and pickled capers. Already there, you got yourself a pretty great flavor combo. But then we throw in a handful of peach slices for extra sweetness, delicious toasted pine nuts and some large chunks of creamy buffel mozzarella, which makes it Italian-grandmother-kind-of-awesome.

Smashed_tomato_pasta_2Smashed_tomato_pasta_3

You can serve this with any type of pasta. In our home we usually use various sorts of gluten free (buckwheat is a favourite) or whole grain pasta or spiralized/shredded zucchini (also known as zoodles), but here we are using bean linguine, made entirely from dried beans and therefore naturally vegan, gluten free and high in protein. This pasta has a delicious flavour and a nice chewy texture. We have seen various sorts of bean pastas starting to pop up in supermarkets and health food stores – soybean pasta, chickpea pasta and black bean pasta – so keep an eye out for those next time you are out shopping for pasta.

Smashed_tomato_pasta_4

Smashed_tomato_pasta_5

In this dish the quality of the ingredients is everything. Use only fresh, ripe tomatoes and peaches and make sure to choose your favourite olive oil.

If you want a creamier sauce, you can sub the mozzarella for ricotta cheese + some lemon juice, which also is really awesome. You can of course also add parmesan cheese if you prefer. For a vegan option, I think it’d be interesting to work with a softer type tofu instead of the cheese. Perhaps pre-marinate it for a while in olive oil and fresh Italian herbs.

Smashed_tomato_pasta_6

Pasta with smashed raw tomatoes, peach & mozzarella
Serves 4

1 clove garlic
2 tbsp pickled capers
500g ripe tomatoes
3-4 sprigs fresh basil, leaves picked and chopped, save some for garnish
a few lugs of cold-pressed olive oil
a pinch sea salt and black pepper
200 g bean pasta or other gluten free pasta alternative or zucchini noodles
30 g pine nuts
2 peaches or nectarines
200 g / 7 oz mozzarella cheese
1 handful rucola/aragula/rocket salad

Mince the garlic very finely. Mash the capers with the back of a knife. Divide the tomatoes in half. Chop the basil. Place everything in a large serving bowl and add a few glugs of olive oil, salt and pepper. With your hands, squeeze or punch the tomatoes until soft and juicy. This tecnique creates a delicious pasta sauce. Cook the pasta in lightly salted boiling water according to the instructions on package. Meanwhile, lightly toast the pine nuts in a skillet on medium heat. Slice the nectarines and tear the mozzarella in smaller pieces. When that pasta is done, reserve about 1/2 cup / 100 ml of cooking water and drain the rest. Add the pasta immediately to the serving bowl while it’s still hot, toss with the tomato ‘sauce’ and rucola until well mixed, add some of the cooking water if you want to make it a little juicier. Decorate with peaces, mozzarella cheese, pine nuts, arugula, a few whole basil leaves and an extra drizzle of olive oil. Ready to serve.

Smashed_tomato_pasta_7

Green Kitchen Stories

Baked Falafel Salad Bowl

Baked Falafel Salad Bowl | A Couple CooksBaked Falafel Salad Bowl | A Couple CooksBaked Falafel Salad Bowl | A Couple CooksBaked Falafel Salad Bowl | A Couple CooksCultivating a wholehearted life is not like trying to reach a destination. It’s like walking toward a star in the sky. We never really arrive, but we certainly know that we’re heading in the right direction. ~Brené Brown

At some point in life, you begin to realize that everything is a journey. I lived in Madrid for a while in college, and my heart pined after becoming fluent in Spanish. After the semester was over, I realized fluency was not so much an arrival, but a place on a sliding scale. Was I fluent? I certainly didn’t feel it, but I could make my way around. I realized then that fluency would be a lifelong process, and whether I was really “there” would be different based on how I viewed myself or how I was viewed by others around me.

This concept seems to hold true for many skills or roles we have in life. I’m certainly much further along on the journey of cooking and eating than when we started dabbling seven years ago, but I’m still overwhelmed by how much there is to learn. So instead of chasing after “I can cook” or “I eat healthy”, at this point in life I’m content with simply walking towards those places.

And with those baby steps, we’re inching forward. Case in point: we’ve made countless failed falafel recipes over the past five years, so many that we stopped even trying. Falafel is one of my favorite foods (get some here if you’re even in Paris), but I had resigned to only eating it at restaurants. We decided to try one more time the other day with some baked falafel, and miraculously, it worked! Of the many variables, we found dried, soaked chickpeas for the dough holds together much better than canned. The baked version doesn’t taste quite like the decadence of fried falafel, but the flavor and texture work in this bowl version. We enjoyed this with some dear friends the other night (check their blog here) and it was delicious. It’s a great option to please vegetarian, vegan (with our substitution dressing below), and gluten-free diets.

Cheers to you on your own journeys, whatever they may be…

PS Do you know Brené Brown’s work? I’m a huge fan and am reading The Gifts of Imperfection now, which is where I found the quote above. The tagline of the book is spot on: Let Go of Who You Think You’re Supposed to Be and Embrace Who You Are. Our philosophies of embracing whole foods and cooking eating mesh well with her work on wholeheartedness and vulnerability.

Baked Falafel Salad Bowl
 
Tip: For a vegan or plant-based option, use Lemon Tahini Dressing. Use only kosher salt; do not substitute table salt in this recipe.
by:
Serves: 4

What You Need
  • 4 cloves garlic
  • ½ large or 1 small red onion
  • 1 ½ cups dried chickpeas
  • ½ cup fresh parsley
  • ½ cup fresh cilantro
  • ½ teaspoon ground cumin
  • ¼ teaspoon ground coriander
  • ¼ cayenne pepper
  • 1 ½ teaspoons kosher salt (do not substitute table salt)
  • 3 tablespoons olive oil
  • ¼ head large red cabbage
  • 1 cucumber
  • 1 pint cherry tomatoes
  • 12 to 16 cups lettuce or salad greens

What To Do
  1. Soak chickpeas at least 1 hour. Preheat oven to 375F.
  2. Peel 4 cloves garlic; place them in the bowl of a food processor and process until fully chopped. Peel the onion and cut it into rough chunks; add to the bowl and process again until fully chopped. To the bowl, add soaked chickpeas, ½ cup fresh parsley, ½ cup fresh cilantro, ½ teaspoon ground cumin, ¼ teaspoon ground coriander, ¼ cayenne pepper, 1 ½ teaspoons kosher salt, and 3 tablespoons olive oil. Process until smooth and a dough comes together, stopping occasionally to scrape down the sides.
  3. Line a baking sheet with parchment paper. To form the falafel patties, take a few tablespoons of dough, roll it into a ball between your palms, then pat it flat. Try to keep the patties as uniform as possible to have a similar thickness. Bake the patties for 24 minutes, flipping halfway through.
  4. While the patties bake, make the dressing (Creamy Cilantro Dressing below, or this plant-based option).
  5. Thinly slice the red cabbage and cucumber. Cut the cherry tomatoes in half. Clean the salad greens.
  6. To serve, place greens in a large bowl. Top with falafel patties, cabbage, cucumber, and tomatoes. Drizzle with dressing and serve.

Creamy Cilantro Dressing
 
by:
Serves: 2 cups

What You Need
  • 2 cloves garlic
  • 1 ½ cups Greek yogurt
  • 2 tablespoons lemon or lime juice
  • 1½ tablespoons tahini
  • 1 tablespoon olive oil
  • ½ teaspoon kosher salt
  • ½ cup cilantro leaves
  • 2 tablespoons water

What To Do
  1. Peel the garlic cloves. Place all ingredients into a blender and blend until smooth.


A Couple Cooks | RSS Feed

Baked French Fries with Curried Ketchup

Baked French Fries with Curried Ketchup | http://naturallyella.com

One of the things I love and hate about blogging is the progress I make throughout the years. My ability to write recipes well and to photograph them has gotten much better. The progress is good, the part I love but the old, crusty content makes me cringe, the part I hate. When one blogs for 8+ years, the early stuff is bad. And so, I felt it was time to redo some of the older post with updated photos, videos, and techniques.

These baked french fries are one of my most popular recipes. Sometime in the early days of the site, they went viral on StumbleUpon and Yummly. But, the recipe was poorly written and the photos were less than stellar. I felt it was time to do a refresh on a recipe we use at least once a week in our house.

Baked French Fries | http://naturallyella.com

If you’ve never made baked french fries before, now is the time to start. They are beyond easy and I made you a short video to convince you if you’re really still not sure. All it takes is a potato, knife, and some seasoning. My original recipe called for using Russet potatoes but thanks to my mom, I’m a convert to Yukon. Yukons don’t make the longest baked french fries but they crisp up nicely without having to soak them first. However, you can always use Russets for more traditional baked french fries.

And finally, if you’ve never added a touch of curry powder to your ketchup, you’re missing out. It’s a fun way to dress up this traditional condiment and if you plan on making ketchup from scratch, it’s easy to add the curry right in with your other ingredients.

Baked French Fries with Curried Ketchup
 
Prep time

Cook time

Total time


Author:
Serves: 2 to 3 servings

Ingredients
  • Baked French Fries
  • 1 lb yukon gold potatoes
  • 1 tablespoon olive oil
  • 1 teaspoon garlic powder
  • ½ teaspoon smoked paprika
  • ¼ teaspoon salt
  • ¼ teaspoon black pepper
  • Curried Ketchup
  • ¼ cup homemade or pre-made ketchup (see note)
  • ¼ to ½ teaspoon good curry powder

Instructions
  1. Preheat oven to 400˚ and line a baking tray with parchment paper.
  2. Rinse the potatoes well. Taking one potato at a time, cut the ends off the potato to create a level surface. Stand up on one end and cut down the potato in ¼” thick slices.
  3. Stack half the slices on the flat side down and cut again into ¼” thick strips. Repeat with remaining potatoes. Place the fries on one or two baking trays and toss with the olive oil, spices, salt, and pepper. Spread the fries out so that the are mostly not touching.
  4. Bake the fries for 30 to 35 minutes until crisp and golden. While the fries are baking, stir together the ketchup and curry powder. Serve fries hot with your favorite sauce or the curried ketchup.

Notes
If you want to use traditional russet potatoes, I recommend soaking the cut fries in cold water for at least 30 minutes then rinsing before tossing with olive oil.

If I’m making my homemade ketchup, I’ll add the curry powder into the cooking process.

My original fry recipe called for adding dried oregano, parsley, and a pinch of mustard powder. Try playing around with the spices to find your favorite combination.


Crispy Baked French Fries with Curried Ketchup

continue reading

The post Baked French Fries with Curried Ketchup appeared first on Naturally Ella.

Naturally Ella

Hit the Reset Button with this 2-Day Plant-Based Meal Plan!

veganmealplan

I’m so excited for today’s post! Many of you have been asking me to put together some plant-based meal plans or menus – What does a full day of plant-based eating look like? How do I combine easy, healthy recipes into a full day of eating? It’s something I struggled with in the beginning too – and even now, on occasion – so I totally get it. With the summer season in mind, this 2-day meal plan below is filled with healthy, energizing, quick-to-prepare options. All of the recipes (except the avocado sauce and smoothies) can be made in advance and keep well in the fridge. Yes!

This post was also crafted for a selfish reason too; I tested cake and frosting all last week for the next cookbook. The end result turned out pretty mind-blowing, but to say I was looking for a bit of a “reset” is an understatement. I try my best to eat balanced, but that doesn’t always happen as a recipe tester. When the dessert chapter needs to be wrapped up, the dessert chapter needs to be wrapped up! So in an effort to bring back balanced meals, I came up with this easy, veggie-packed menu to get back on track. I think we can all relate to this desire now and then, especially after summer holidays and traveling. After just half a day, my energy levels returned and I had a kick to my step again! The power of plants. I hope you enjoy it too whether you follow it to a tee or just mix and match some recipes into your normal routine. If you are just making these for yourself, you’ll likely have leftovers that carry over into day 3…never a bad thing.

Note: All the recipes are linked in the chart below. From there, you can print the recipes if desired.

Oh She Glows 2-Day Summer Reset Button Meal Plan

Day 1

Day 2

Breakfast

Lemon water and/or White Tea (see tip)

Hidden Greens Chocolate Protein Smoothie

Lemon water and/or White Tea

Vegan Overnight Oats

Lunch

Gazpacho

Chickpea Salad with

 Endurance Crackers (or Mary’s Crackers)

Gazpacho

Black Bean Quinoa Salad with Cumin and Lime

Snack

Sliced apple with almond or sunflower seed butter

Classic Green Monster Smoothie

Dinner

Black Bean Quinoa Salad with Cumin and Lime

15-Minute Creamy Avocado Pasta

Dessert

Basic Chia Seed Pudding with fresh berries

Basic Chia Seed Pudding with fresh berries


Tips:

– Lately I start my morning with white tea and I drink it until about 2-3pm. I find it gives me really consistent energy throughout the day (without the crash that coffee often gives me, but feel free to drink what YOU prefer). If I’m on the ball I will also try to have some warm lemon water (squeeze half a lemon into a couple cups of warm water – sweeten to taste if desired) first thing in the morning or I simply add lemon slices into a 1-litre mason jar filled with water and sip on it throughout the day. Between outdoor summer workouts and breastfeeding, it’s a constant effort for me to stay hydrated.

– See here for a printable grocery list!

– All recipes can be made in advance except for the smoothies (I always prefer those fresh as the flavours start to change as they sit) and Avocado pasta sauce.

– Be sure to try out my Hidden Greens Chocolate Protein Smoothie – it’s a new recipe to the site and is bursting with nutrients! Not to mention…chocolate for breakfast. You can thank me later.

– Please keep in mind that this meal plan is not intended to be a one size fits all plan; tweak and personalize it as you see fit! I often have a mid-morning snack such as hummus and crackers to get me through to lunch.

– You can serve the 15-Minute Creamy Avocado Pasta with whole-grain pasta or zucchini noodles. I use this spiralizer to make zucchini noodles. It’s a great summer option!

~~~

Well, this was a beast of a post to put together so if I’ve forgotten anything feel free to let me know. Do you like these kinds of posts? I’m open to your feedback as always.

Wishing you boundless energy this week and all summer long!

Oh She Glows