Glacier Bay and Skagway, Alaska

Two rugged, beautiful places stole our hearts this year: Utah and Alaska. Neither were originally on our radar, but we’re now singing the praises of both. Our last post on Juneau showed our time in the Juneau area; we took two day trips from there to Glacier Bay National Park and the tiny town of Skagway. Here are some shots from both — again, we’ll let the photos do most of the talking.
Glacier Bay was a one-of-a-kind adventure: we took a boat ride through a glacier-filled national park with wildlife sightings at every turn.

Within minutes, we saw our first whale flukes, and Alex nabbed this picture. It was one of the highlights of the day, for sure.

We also saw seals, puffins, orcas (killer whales), mountain goats, grizzly bears, and all sorts of birds, all in their natural habitat. A bit surreal.


Snack time was salmon chowder, which was perfect after standing out on the chilly upper deck.


And then, the glaciers! This is mile-wide Margerie Glacier. As we sat and stared, chunks of the glacier would break off and fall into the water (called “calving”).


The next day, we were ready for another adventure, this time to the mining town of Skagway with my family and my sister’s fiancé’s family, who are Juneau natives. They must have been trying to show off, and it worked — at their request, the pilot of our tiny plane flew directly over the glaciers and ice fields to get to Skagway. We looked down on amazing IMAX-style views that few people have seen so closely. Here’s what we saw (the paths that look like roads are actually made by glaciers.).


After that ride, Skagway was a liiiitle bit of a let down (agreed upon by all), but it was a sweet little mining mountain town. We stayed the night in a quaint hotel, went hiking on a peat moss trail, and took a ride on the old train that carried gold-rushers to the Klondike in the 1890’s.


After all that hiking and train riding, fish and chips was in order. This halibut was delicately-breaded perfection.


The way home to Juneau was a bit harried, jumbled about by the turbulence of a rainstorm in a tiny 5-seater plane. Luckily we made it back to solid ground and I still had time to catch my fish (though during that flight I’d already decided my life had been long and fulfilling and I was ready, if need be!).
Alaska is a gem and we couldn’t have asked for more. Thanks again to my parents for arranging everything, to my sister for coming home, and for her fiancé and his parents for being the best tour guides we could imagine. Let us know if you have any questions about the area! There is so much more of Alaska to explore – we can’t wait!
Other Travel Posts
Juneau, Alaska
Arches National Park + Monument Valley, Utah
Flagstaff, Arizona
Traverse City, Michigan
Santorini, Greece
Amalfi Coast: Positano, Capri, & Ravello, Italy
Rome and Naples, Italy
Cambodia and Laos
Chipotle Cilantro Pesto Black Bean Summer Pasta

| Disclosure: This recipe was created for Ancient Harvest. See below for more details. |


One of the things I love most about cooking vegetarian is the color. It is almost impossible to create a dish that isn’t appealing (beyond a few beige items, but even then a few fresh herbs can help!) I sometimes create meals based on the contrast of colors to make the meal more appealing. One of those dishes that comes to mind is this Pesto Polenta with Smokey Chickpeas.
When I was playing with flours for The Homemade Flour Cookbook, I fell in love with black bean flour. It had a fairly mild flavor profile and the color, after cooking, had this beautiful purple hue. I loved the color so much, I even made black bean tofu. In the cookbook, however, I made black bean pasta. Since then, it’s become a staple in my kitchen.
Of course, I know not everyone is as ambitious as I am when it comes to grinding their own flour (or making homemade pasta). I am excited to share this recipe with you using Ancient Harvest’s Black Bean Pasta. Their pasta contains three simple ingredients: black bean flour, brown rice flour, and quinoa flour and has a gorgeous color after cooking. This color makes for such a unique spin on any dish. Of course, you can always make this with any pasta- regular or gluten-free.
In this case, it’s a summer pasta dish topped with one of my favorites, a chipotle cilantro pesto. It’s a bit spicy and packed full of flavor. Plus, by using AH’s pasta, this dish is gluten-free and vegan! I usually make extra of the cilantro pesto to use on tacos, in quesadillas, and on breakfast egg skillets as well.
The post Chipotle Cilantro Pesto Black Bean Summer Pasta appeared first on Naturally Ella.
Coleman RoadTrip® LXE Propane Grill – Blue Review
Find More Grill Products
Sweet Corn Pasta with Goat Cheese

Every season I gravitate towards one item. Some summers it’s been zucchini while others it’s tomatoes. This year, I’ve been a sweet corn fiend. Sweet corn has been my go-to salad topping, filler for grain bowls and now this sweet corn pasta.
I love using soft cheeses as a cheater way to make a sauce. The goat cheese in this sweet corn pasta dish creates a silky sauce that isn’t overpowering. However, and this is especially true if you stick to the whole wheat pasta, plan on no leftovers. If the pasta is allowed to sit, all the sauce soaks in and you’re left with some dry pasta!
The post Sweet Corn Pasta with Goat Cheese appeared first on Naturally Ella.
Presto 03510 FlipSide Belgian Waffle Maker Review
Toasted Coconut Apricot Muesli


Growing up, I had an intense passion for breakfast cereal. At breakfast, I would create a small fort with two cereal boxes separated by a carton of milk, and I’d hide in my fortress and read the back of the boxes while slurping down at least two large bowls in a sitting. And it wasn’t just breakfast. After school snack? Cereal. And as I grew, mindless study snack in college? Cereal. Weeknight dinner in my first apartment out of college? Cereal.
When Alex and I started eating all whole foods, I resolved it was time to kick the cereal addiction. Not that cereal is “bad”, but I wanted to decrease my dependence on this food group and work on replacing it with whole grains instead. (Also, I was tired of grocery store clerks saying “You like cereal, huh?” when I checked out massive quantities of the stuff.) Switching to an entirely new breakfast tradition helped immensely, but I still found myself craving the cereal experience as a comforting treat.
So how to make non-processed, whole foods breakfast cereal at home? Oats, the original breakfast cereal. Oatmeal and granola are two of my favorites, but I started getting lazy and eating raw oats with milk and a bit of maple syrup. Turns out this is a real thing called muesli: a mixture of raw oats, dried fruits, seeds, and nuts. Instead of toasting the ingredients like in granola, they’re eaten raw with milk (regular, almond or soy). It might sound odd to those accustomed to breakfast cereal, but it is one of my favorite foods on the planet, probably because of the tradition of my cereal past.
Granted, I typically throw random oats and seeds in a bowl, but a fancy muesli like this one is well worth the time for a flavorful breakfast treat. This recipe combines dried apricots (since our pantry was abounding), crystallized ginger, and pumpkin seeds with oats, toasted almonds and toasted coconut for an unexpected mix of flavors. The recipe is completely customizable so feel free to sub in your favorite nuts, seeds, or dried fruits. We top it with almond milk, and if they’re on hand, some fresh berries. If you’d like, you can add a bit of maple syrup, but this mix is sweet enough that it doesn’t need it. I also like to add a small pinch of kosher salt to enhance the flavors. It’s so simple to put together, it’s almost a “non-recipe”, but I love that it’s a thing; and the perfect thing to satisfy my sentimental cereal+milk cravings.
We used Califia Farms almond milk and fresh blackberries from Broad Ripple Farmer’s Market. Another way to eat muesli is soaking it in milk overnight; we prefer the texture fresh. This is a great option for vegan / plant-based, vegetarian, gluten-free, and dairy-free breakfasts.
Toasted Coconut Apricot Muesli
by: a Couple Cooks
Serves: 5½ to 6 cups
What You Need
- 1 cup sliced almonds
- ½ cup coconut flakes
- 3 tablespoons crystallized ginger, chopped
- 1 cup dried apricots
- 3 cups old fashioned oats
- ⅓ cup pepitas (roasted, if possible)
- ½ teaspoon cinnamon
- A few pinches kosher salt
- Almond milk, to serve (we used Califia Almond Milk)
- Fresh berries, to serve (optional)
What To Do
- In a large skillet over moderately low heat, toast 1 cup almonds until fragrant and lightly browned, stirring frequently, about 5 minutes. Remove from the pan, then wipe the pan with a paper towel to remove any almond skin.
- Add ½ cup coconut flakes to the warmed pan and toast until golden, stirring constantly, for a minute or two. Cool the almonds and coconut flakes.
- Chop 3 tablespoons crystallized ginger and 1 cup dried apricots.
- When the almonds and coconut are cool, mix together with ginger, apricots, 3 cups oats, ⅓ cup pepitas, ½ teaspoon cinnamon, and a few pinch kosher salt. Store in an airtight container; stores a few weeks, but is best fresh. Serve with almond milk. If desired, top with fresh berries.
This recipe was developed for Califia Farms.
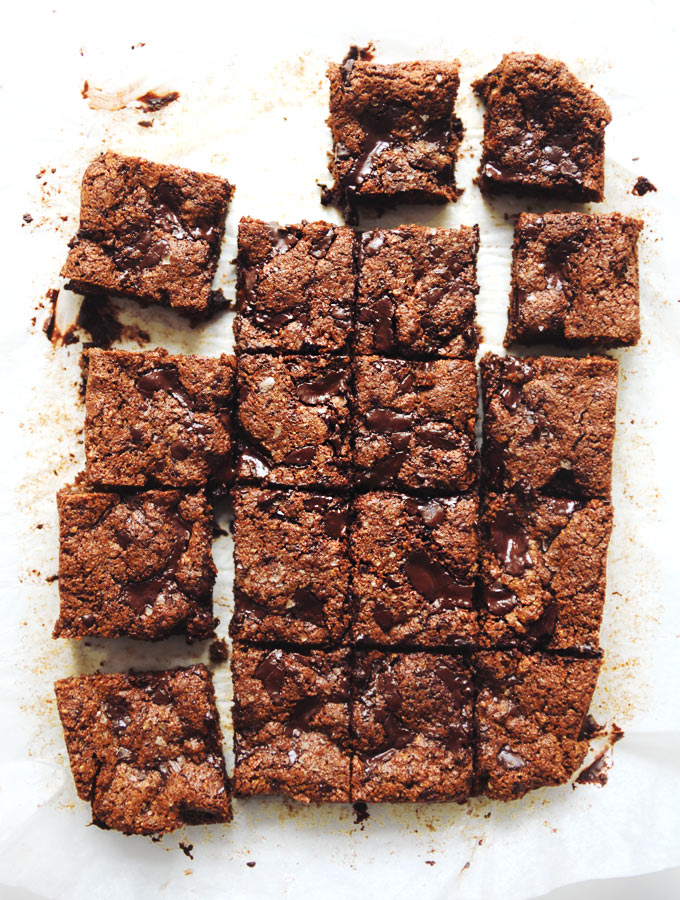
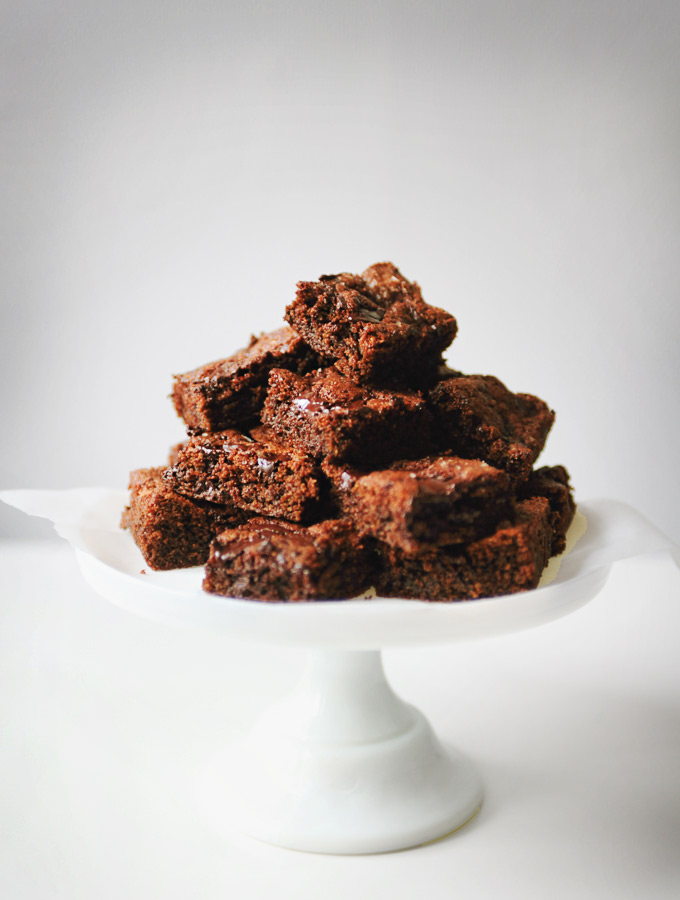
Chocolate Chunk Nut Butter Blondies
My friend Adam is a serious health-foodie. He teaches sprouting workshops, is part of a vegetarian soup club, and appreciates a good sourdough as much as I do. He’s also quite fearless in the kitchen, combining tastes and textures I would never dream of, most often successfully. There was that one time however he put peppermint oil in a batch of his granola, and it tasted like breakfast and toothpaste all at the same time. I admire his gumption, but he will never live that one down.
One day while I was over at his place, I was really craving a cookie. He lives near a very high-vibe bakery so I was nearly out the door when he said, “wait! I have something you should try”. He proceeded to tell me that his experimental cookies were flour-free, grain-free in fact, and contained only six ingredients. I was scared – this sounded like a treat from wrong town. But when I took my first skeptical nibble, I was shocked. This cookie was everything I had ever wanted: rich, moist, not-too-sweet and deeply satisfying. Then he told me that it was just almond butter, eggs, maple syrup, chocolate, baking soda and sea salt. Um, what?! No flour? How was this even possible? Inexplicable, culinary wizardry at its best, that’s for darn sure, and an experiment gone absolutely right.
After googling almond butter cookies, I discovered that this kind of recipe had been floating around the interwebs unbeknownst to me. Anyway, I got Adam to make them for me again this past summer at his cottage, posted them on Instagram, and many of you asked for the recipe. I tinkered with them a lot to make sure they were just right, changing up the nut butters, using different sweeteners, various add-ins etc. (it’s a tough job, I tell ya). Then it dawned on me: what if I put the dough into a pan and made blondies?! For the win.
Now I don’t know about you, but I take my indulgences seriously. When I crave something sweet, I definitely don’t mess around with mousses, flaky pastries or light-n’-airy items. Heck no. I want to sink my teeth into something substantial, for it to announce its presence to my stomach with a fulfilling thud, and feel like I actually ate something. These blondies are just that. Aside from their incredibly rich, satisfying flavour, the texture of them is ultra chewy and have that dense brownie quality I love so much. It still baffles me that there isn’t any flour in the recipe, since it just feels like there is, from a “this-must-be-really-bad-for-me perspective. Like I said, there is some serious alchemical conjuring taking place, proving that the universe loves us, so don’t ask any questions.

Being choosey about your Chocolate
Yes, yes, we’re talking about blondies here, but don’t all blondies have chocolate in them? I’m no expert, but I do believe this is a necessary addition. How do we go about choosing our chocolate though? Is there really a difference between cocoa mass percentages? Does organic really matter? Does milk chocolate count? Here are my top four tips for making sure your chocolate isn’t total junk food.
4 Tips for Choosing the Healthiest Chocolate
Choose dark chocolate varieties. The darker the bar, the higher the cocoa mass percentage will be. When a bar says it is 70% cocoa that means it has a relatively high concentration of health-promoting compounds, like polyphenols and antioxidants. It also means that there is less room for schwaggy stuff like refined sugar, processed oils, and flavourings. Always choose a bar with a minimum of 70% cocoa solids for maximum benefits. If the chocolate bar does not list a cocoa percentage, don’t buy it.
Read the ingredients. High quality chocolate should only contain three to four ingredients: chocolate, cocoa butter/ cocoa mass, and/or cocoa liquor, plus sugar. If the bar contains any oil, milk or milk products, soya lecithin, emulsifiers, ‘natural flavour’, or preservatives don’t buy it.
Buy Organic whenever possible. Cacao plants are some of the most heavily sprayed crops in the world. As pesticide residues can end up in the final product, choose chocolate that has been made from organically grown beans.
Learn about the process. Although it will require a little reconnaissance work, finding out how your chocolate was manufactured is important in determining how healthy it is. Drying cacao beans in the sun instead of roasting them preserves many of the chocolate’s delicate nutrients. Make sure that their processing temperature is not over 110°F. Avoid chocolate whose processing includes “Dutching”, an alkalization method that actually removes the polyphenols, as they lend characteristic bitter flavour to the finished product.
I also encourage you to purchase Fair Trade Certified chocolate whenever possible, as it makes a huge difference to the lives of cacao farmers and their families. Fair Trade is an international certification that ensures that farmers are guaranteed a minimum price for their product, decent working conditions, and that the processes they use protect the natural environment.
The blondies are not overly sweet, which I appreciate. If you like your desserts on the more saccharine side, I believe that swapping out ¼ cup of coconut sugar and replacing it with maple syrup would work very well. This would also help keep the blondies moist on the second and third day (although they won’t last that long. Trust.). You could also choose a chocolate with a lower cocoa mass, such as 70%, but don’t go lower than that, as the sugar in it will outweigh the health benefits of the chocolate itself. I chose a bar at 85%, which tends to be a little bitter, but I find it pairs well in this dessert.
As far as nut butter goes, anything goes. I used a homemade almond and hazelnut butter blend in these, which was unreasonably delicious (for a blended nut butter recipe, check out my post here). Because my nut butter was a deep caramel brown, my blondies turned out more like brunettes (tee hee), so the colour of your finished product depends on the nut butter you use. I tried a homemade sunflower butter in my experiments and it worked really well. I would also like to try tahini and pumpkin seed butter, although I know the colour in that case may be a little weird! I have a feeling cashew butter would taste out of this world, and pecan or walnut as well. And I definitely recommend roasted nut butter over raw for depth of flavour, and because you’ll be baking these anyway.
I will say that I really tried making these darn things vegan, but guys, it just didn’t work! Eggs in this case are crucial because they not only bind the ingredients, but they give the blondies air and volume. Using chia and flax works to bind, but you’ll end up with a tasty puddle. If that’s okay with you, go for it! I obviously ate all of my experiments, and quite happily indulged in many yummy, almond butter “pancakes”. I did not try vegan egg replacers though, and that may work better. If you have success in this arena, let me know.
And can we take a minute to talk about my favourite part of all? The corner pieces. If you actually own one of those funky all-corners brownie pans, you get where I’m coming from friend, and this is the time to use it. The edges are extra dense and chewy, slightly crisp and oooohhhhh my goodness I can’t even write about this anymore. On to the recipe.
Grain-free Chocolate Chunk Nut Butter Blondies
Makes 20 blondies
Makes 20 blondies
Ingredients:
2 large, organic eggs
2 tsp. vanilla extract
1 cup unsalted nut butter (I used almond-hazelnut)
¾ cup / 100g coconut sugar
1 tsp. baking soda
¼ tsp. fine grain sea salt
3.5oz / 100g dark chocolate (70% or higher), roughly chopped
a pinch flaky sea salt (such as Maldon), optional
Directions:
1. Preheat oven to 325°F / 160°C.
2. In a small bowl whisk eggs and vanilla extract together. Set aside. In a measuring cup, combine coconut sugar, ¼ tsp. fine grain sea salt, and baking soda.
3. Measure out the nut butter and place in a large bowl. Add the egg mixture, stir thoroughly to combine. Add the coconut sugar mixture and fold together. The dough will be very thick. Add about half of the chopped chocolate, using your hands if necessary to incorporate.
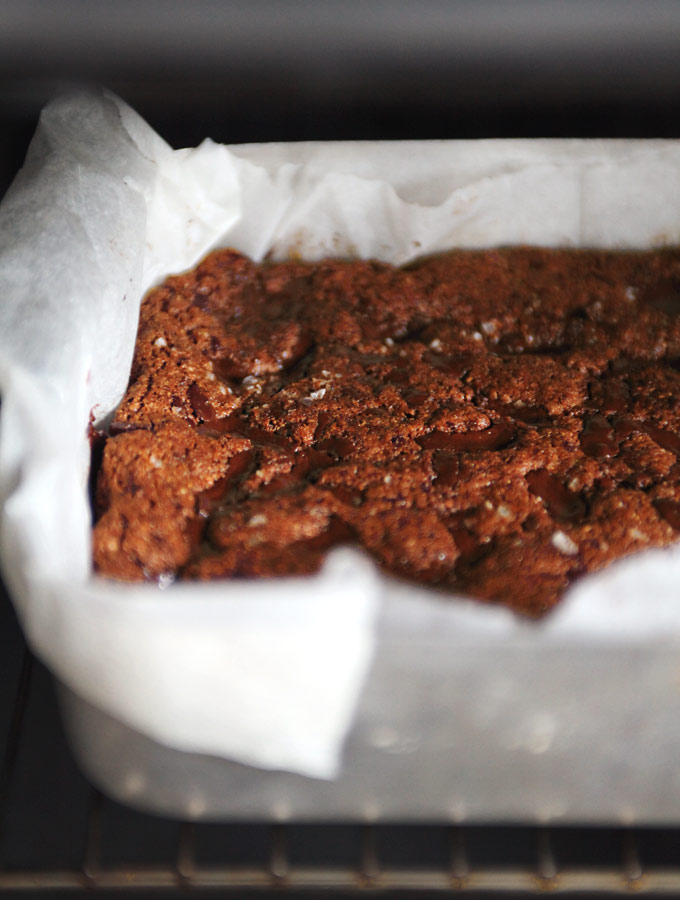
4. Press the dough into a parchment-lined 8×8″ (20x20cm) brownie pan. Sprinkle the remaining chocolate over the top and press each piece slightly into the dough. Sprinkle with a pinch of flaky sea salt and place in the oven.
5. Bake for 25-30 minutes until the blondies are golden brown. Remove from the oven and let cool in the pan completely before cutting.
Seeing as it’s February and we’ve been so very behaved since the first of January (right…?) I thought it was time to pull out the big guns and celebrate with these ladies. I hope you drop everything you are doing right now and go make them. It’s true, blondies have more fun!
xo, Sarah B
Show me your Blondies on Instagram: #MNRblondies
illy, Ground Espresso Coffe, Dark Roast, 8.8-Ounce Tins (Pack of 2) Review
More Espresso Products
Super Thick Coconut Yogurt (the shortcut method!)

Hi, my name is Angela and I’m in love with coconut meat. I also like shortcuts, so discovering frozen bags of coconut meat made me a bit giddy…

When I first tried coconut meat I wasn’t sure if I liked it, but it totally grew on me. It’s lightly sweet, super filling (it packs 8g fibre per 1/2 cup!), and has this irresistible silky, smooth texture. I love just eating it on its own as well as making it into this shortcut “yogurt”. Adriana on the other hand…well let’s just say when I let her try some of the yogurt (a version with just coconut and water), she made a dramatic gagging face while sticking her tongue out. I guess it’s not for everyone. haha! Maybe she’ll come around.
These bags of frozen coconut meat are more expensive than buying the young Thai coconuts and retrieving the meat yourself, so it’s something I splurge on once in a blue moon when I’m craving a fuss-free homemade coconut yogurt. But it can be whirled up in seconds! And no risk of hacking my hand off with a cleaver (I’m working on my cleaver skills…still not quite there yet). This shortcut recipe isn’t a true yogurt because it’s not fermented, but that’s partly why I love it so much. No wait time, no fuss. I empty a couple probiotic capsules in the yogurt, but you can totally leave the probiotics out if you wish. We’ll call this a “cheater’s” yogurt. A gotta-have-it-now yogurt. For those of you in the GTA, I find these frozen bags of coconut meat at Organic Garage..I think Whole Foods carries it too. If you want to do it the old-fashioned way, you can do that too of course! I link to a Youtube tutorial in the recipe below.

Hello dreamboat! As I mentioned, this version is super thick! It has a similar consistency to Greek yogurt. You can make it however thick or thin you wish just by adjusting the liquid amount. I find 1/2 cup of coconut water and 2 cups of coconut meat = a lovely thick yogurt…no straining required. Likewise, you can make it as sweet or tart as you want by adjusting the sweetener. I don’t like super sweet yogurt so I only add a tablespoon of sweetener into the blender. If I don’t want the yogurt to change colour, I use cane sugar (such as in these photos), but I also like to use maple syrup or raw coconut nectar too (which will dim the bright white yogurt a bit). You can also get creative and try making different flavours by adding fruit, chia jam, etc. I think I might try a coconut-mango-lime version next!

I made parfaits with strawberry-raspberry chia seed jam paired with a granola that I’m testing for my next cookbook (in the meantime, check out my Lightened Up Summer granola and the granola clusters in the Oh She Glows Cookbook). This yogurt is also awesome in vegan overnight oats, smoothies, and I hear you can make raw ice cream with it too.
Here is my batch of strawberry-raspberry-vanilla chia seed jam below. As a general rule of thumb for making chia seed jam, I use about 300-450 grams of fruit, 3 tablespoons of pure maple syrup (adjust depending on tartness of fruit), 2 tablespoons of chia seeds, and a pinch of pink salt. You can flavour it with vanilla, lemon, orange, etc. For how to make it, see this post.


© copyright 2015 Oh She Glows. All Rights Reserved.