Golden Red Lentil Dal with Cilantro-Speckled Basmati

goldenredlentildal3

Asking for help isn’t something that comes to me naturally as I’ve always been a fiercely independent worker. My previous supervisors always commented on this trait almost immediately whether it was in an academic or business setting, and I often took a lot of pride in the fact that I could do things on my own. I never considered that this trait could potentially hold me back from growth. I guess I feared that asking for help would be a sign that I was incompetent, so I avoided it as much as possible. And I often thought that if I could just figure out how to manage my time better, I could do it all on my own. Case in point: In the 7 years that I’ve grown this blog, I’ve yet to hire a team member. 

However, this past year has helped me realize otherwise, at least in some areas of my life (I still have a long way to go). Working with Ashley on the photography for the next book has allowed me to focus more on my biggest passions – the writing and recipe creation – not to mention finish on time! Our working relationship has really opened my eyes to what I could achieve if I just asked for a bit more help. It has been a total light bulb moment. You know what else I realized? Collaboration is so darn fun. So much more fun than trying to do it on my own!

One of my many goals for this blog is to post at regular intervals once again. An idea I’ve had is to step back from food photography, so I can streamline my workflow and focus on recipe development and writing. I often have recipes in cue waiting to be shared with you all, but the one thing that holds me back is often the fact that I haven’t shot the photography for the post. I adore photography and really grappled with this idea, but in the end I also know that something needs to change if I’m going to be able to grow. So in spirit of collaborating with other talented people, I’m excited to tell you that Ashley will be shooting the food photography for my upcoming blog recipes! It kicked off last week with my Pumpkin Spice Latte with Homemade Pumpkin Spice Syrup post, as some of you already noticed. This doesn’t mean that I won’t do food photography in the future, but it’s definitely working for this stage in my life. For the first time in a very long time, I have the next 2 blog posts already in the works and scheduled in my calendar. It feels awesome to be getting into a groove again and I know this is only the beginning. I will be sure to keep you posted with my other plans!

goldenredlentildalveganglutenfree

Golden Red Lentil Dal with Cilantro-Speckled Basmati

Vegan, gluten-free, nut-free, refined sugar-free, soy-free

This easy, flavorful curry is a great one to whip up during the workweek, and leftovers only get better the next day. Light coconut milk makes this curry so luxuriously rich and decadent-tasting, while still feeling quite light and energizing. It definitely won’t weigh you down, but I can promise it’ll warm and comfort you on a chilly day. While it’s lovely all on its own (enjoyed like a rich, thick stew), I love it even more spooned overtop my cilantro-speckled basmati rice with toasted pepita seeds, sliced green onion, cilantro, and a squeeze of lime juice. The amount of broth called for yields for a very thick consistency; if you’d like it thinner and more “soup-like” feel free to thin it out with a bit more broth (if so, you might need to also increase the spices and seasonings as the extra broth will dilute the flavours). This comforting curry recipe is adapted from Super Fresh: Super Natural, Super Vibrant Vegan Recipes by Jennifer Houston and Ruth Tal (2015, Penguin Canada) which is a new cookbook featuring the recipes from Fresh (!), one of my favourite vegan restaurants here in Toronto.

Yield
Serves 4 (makes 5 1/2 cups)
Prep Time
15 Minutes
Cook time
25 Minutes
Total Time
40 Minutes

Ingredients:

For the curry:
  • 2 tablespoons virgin coconut oil or grapeseed oil
  • 1 1/2 cups diced onion (about 1 medium onion)
  • 3 large or 4 medium garlic cloves, minced
  • 2 tablespoons freshly grated ginger
  • 1 1/2 cups peeled and finely diced carrots (about 2-3 large)*
  • 2 teaspoons curry powder, or to taste**
  • 1 teaspoon ground cumin
  • 1/2 teaspoon ground turmeric
  • 1 1/2 cups dried red lentils
  • 1 (14-oz/398ml) can light coconut milk
  • 2 cups low-sodium vegetable broth, plus more if desired to thin the broth
  • 1/2-3/4 teaspoon fine sea salt, to taste
  • 1 (5-oz) package baby spinach
For the rice:
  • 1 cup dry basmati rice
  • 1 tablespoon virgin coconut oil or vegan butter
  • 1 3/4 cups low-sodium vegetable broth, or as needed
  • 1 cup unpacked fresh cilantro, large stems removed and finely chopped***
  • Fine sea salt and black pepper, to taste
  • Squeeze of fresh lime juice, to taste
Suggested toppings:
  • Green onions, thinly sliced
  • Fresh cilantro leaves, chopped
  • Toasted pepita seeds (shelled pumpkin seeds)
  • Squeeze of lime juice, optional

Directions:

  1. For the curry: Add the oil in a large pot and increase heat to medium. Add the onion, garlic, and a pinch of salt. Stir to combine. Saute over medium heat for 4-5 minutes, stirring occasionally, until softened.
  2. Stir in the ginger and carrots, and continue sauteing for another few minutes over medium heat.
  3. Add the curry powder, cumin, and turmeric. Stir well. Cook for a minute, until fragrant.
  4. Pick over and rinse the lentils in a fine mesh sieve. Stir in the entire can of coconut milk, red lentils, broth, and salt. Bring to a simmer and reduce heat to medium-low. Cook, covered with the lid ajar, for about 15-20 minutes, or until the lentils and carrots are tender. Stir occasionally to prevent the lentils from sticking to the bottom. Stir in a touch more broth if you’d like a slightly thinner consistency. After cooking, stir in all of the spinach until wilted.
  5. Meanwhile, prepare the rice. Add the rice into a medium pot along with the oil and broth. Increase heat to medium-high and bring to a simmer. Reduce heat to medium, cover with a lid, and cook for 12-16 minutes, until the rice is soft and tender. Fluff with a fork and stir in the cilantro. Season to taste with salt and lime juice. Keep the lid on until ready to serve.
  6. Add a generous scoop of rice on a plate or bowl and top with a couple ladlefuls of curry. Add your desired toppings and serve immediately. Leftovers will keep in an air-tight container in the fridge for up to 4-6 days. The curry can also be frozen for up to 4 weeks, possibly longer. For easy freezer-storage, add the cooled curry into a freezer-safe bag, press out the air, and freeze on a flat surface. Thaw overnight in the fridge, or simply leave on the counter until mostly thawed.

*The smaller you dice the carrots, the faster they cook! I opt for thinly sliced carrots here to hasten cook time. You don’t have to dice quite as small as in the recipe photos though.

**Be sure to use a good-quality curry powder (one you enjoy the taste of) as a poor-tasting one can throw the flavors off. I am quite fond of Simply Organic curry powder.

***Not a cilantro fan? Simply leave it out and prepare the rice without it. No biggie!

redlentildal

Photography credit: Ashley McLaughlin Photography

Last but not least, I want to wish all my fellow Canadians a very Happy Thanksgiving! We’ve been blessed with gorgeous, warm weather this weekend, and I hope you are too. Thank YOU for coming back to this blog time and time again, and for making this career so personally rewarding. 

Oh She Glows

Golden Sauerkraut – Wild Fermentation

Fermented_vegetables_start

Before we start this post, we want to introduce a new little feature here on the blog. We call it Homemade Whole Food Staples. Unknowingly, we actually already started it a few weeks ago, with our post about homemade nut butter. Some of you got in touch and told us that this was the first time you’ve made nut butter at home, so we realised that this could be a good opportunity for us (and you) to learn more about classic methods, recipes and pantry staples that are popular in whole food kitchens. There is nothing wrong with cutting a few corners and buying jars and cans of staples from the store, but if you want to save some money, learn what really is in those jars and get a better hum about the kitchen basics, you might find this new feature interesting. Our hope is that we can show how recipes that many find too intimidating to try at home, really isn’t complicated at all.

We are discussing sharing how to make your own vegetable stock, the ultimate pomodoro passata, mastering a sourdough and how to make homemade coconut yogurt. But we are also really interested to hear what you want us to try/share. Leave us a comment and let us know if there is something specific that you are curious to learn more about.

Golden_krauts_1

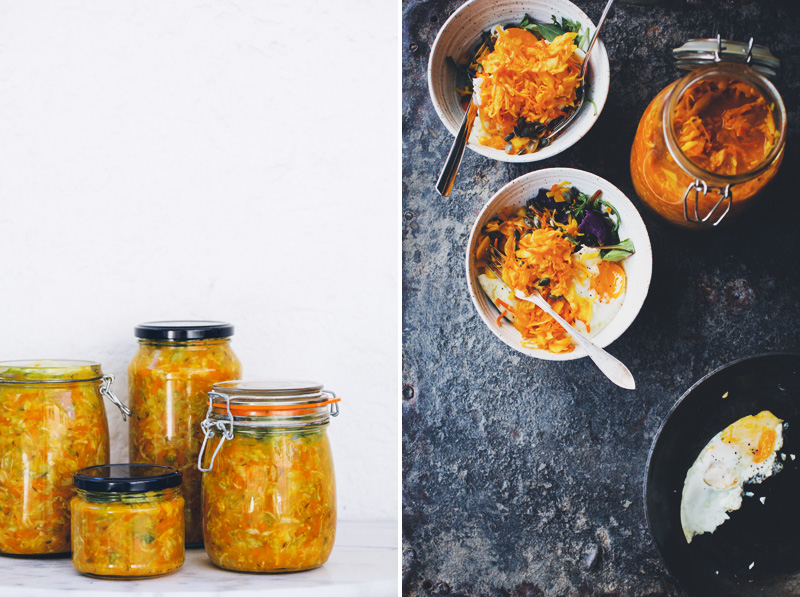
Today we are talking fermented vegetables. It’s one of the healthiest thing you can eat but the whole idea of food that needs 3 weeks before its ready, scares most people from even trying to prepare it. Right? But please folks, stay with us on this one. Not only are fermented/cultured vegetables on most top-lists of trendy food 2015, but a large spoonful of homemade Sauerkraut is also TRULY delicious on top of a salad or inside a sandwich. Furthermore, the natural occurring probiotics in fermented food are great for your stomach and body. The whole 3-weeks-to-prepare-issue is more like 20 minutes of active work and then 3 weeks of waiting. Best of all, we are going to show you the most natural way of doing it, without any starters at all. It’s called wild fermentation, only 2 ingredients are needed and the method has been around for hundreds of years. But you can also add a bunch of different flavourings to it, like caraway seeds, ginger, garlic, beetroot, chilli, fennel or turmeric. Does this project still sound impossible?

Golden_krauts_2

Golden_krauts_3

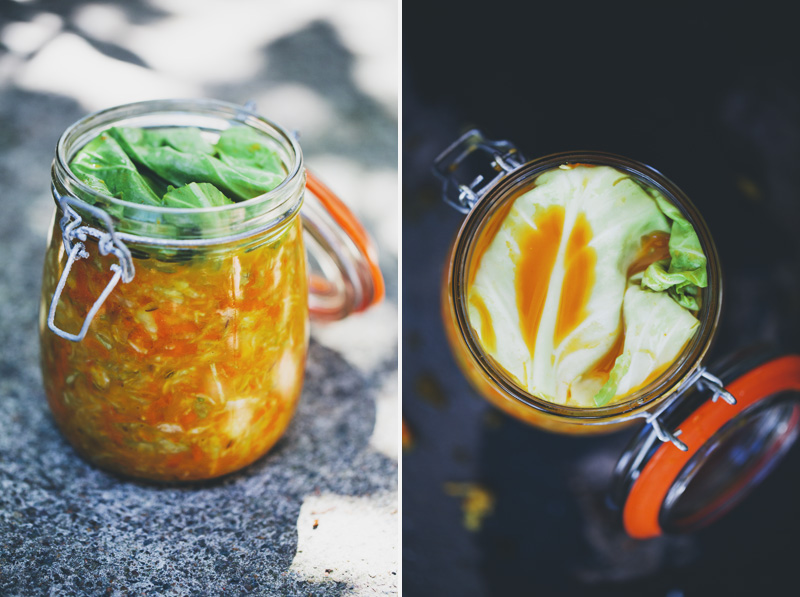
Here in Scandinavia, we have quite the tradition of pickling, preserving and fermenting. But weirdly enough, Luise’s and my interest for fermented vegetables actually sparked during our recent trip to Australia. Almost all the cafes we frequented had at least one salad or bowl that was topped with fermented vegetables or sauerkraut. And the health food stores there have whole isles with different brands of organic raw fermented/cultured vegetables. It didn’t take long until we were hooked. The flavours were just so fresh and the acidity added a real kick to whatever we paired it with. And in a strike of unbelievable luck, we met Vivianne on our potluck picnic in Sydney, she is one of the founders of Raw Sisterhood, a Bondi based company that makes incredibly tasty fermented vegetables, raw crackers and raw granola. She promised to teach us some of their secrets and now we get to share one of their recipes here. We made the first batch together in her house and we have continued making it now when we are home. They call this version Golden Goodness and it’s basically wild fermented cabbage and carrots flavoured with turmeric and garlic

Golden_krauts_4

Before we get on to the recipe, we wanted to let Brenda and Viv from Raw Sisterhood explain the magic behind Wild Fermentation and healthy bacterias:

Why wild fermentation: Wild fermentation is a natural process in which we provide the perfect environment for nature to do its thing, so no starter is needed.  All fresh fruits and vegetables contain enzymes and bacteria (lacto bacilli) which allows them to break down (ripen). As fruits and veggies ripen they go through an enzymatic process, essentially they digest themselves.  When foods go off or rot, they have been exposed to oxygen. In a wild ferment, we allow the vegetables to digest themselves, in an oxygen free environment.  The lacto bacilli in the vegetables, eats the naturally occurring sugars and then produces lactic acid and more lacto bacilli….and the cycle continues. 

Why eat healthy bacteria: Lactic acids can kill many strains of parasite and many other pathogens in the body purifying the intestines. Fermented veggies increase the healthy flora in the intestinal tract by creating the type of environment for them to flourish in. Increases nutrient values in the vegetables especially vitamin C. The high fiber content in cultured vegetables help to clean the digestive system, removing undigested food and unwanted toxins. Fermented foods also facilitate the break down and assimilation of proteins.

Golden_krauts_5

Golden Sauerkraut – Wild Fermented Cabbage, Carrot & Turmeric
Makes about 2 huge jars.
You can easily half this recipe if you prefer. Be sure to sterilise your jars before your start.

2 green cabbages (3 kg) Save some of the outer layers of the cabbage for packaging on the top
800 g / 7 cups carrots (6 medium size carrots) or beetroot
15 g / 1,5 tbsp grated ginger
15 g / 1,5 tbsp minced garlic
15 g / 1 tbsp fresh grated turmeric (optional)
30 g / 3 tbsp ground turmeric
5 g / 1 tbsp caraway seeds
5 g / 1 tbsp fennel seeds
2 tbsp / 30 g himalayan sea salt (optional, you can do it without salt, but it speeds up the process)

Wash the cabbage and scrub the carrots, then finely slice the cabbage and grate the carrots. Or use a food processor with a fine slicer attachment for the cabbage and rough grating attachment for the carrots. Place all ingredients in large mixing bowl. Use your hands (you might want to wear rubber gloves to prevent your hands to get stained by the turmeric) to mix and massage until it starts to get soft and juicy. The vegetables should release quite a lot of juice, if not, just add some more salt. Use a spoon or a tong to spoon the mixture into 2 large clean jars. Pack it really tight to leave out all air, keep packing until the jar is full of veggies and the veggies are covered in juice (important). Leave some space at the top to place a whole folded cabbage leave on top, this is to prevent any oxidation. Close with an air-tight lid. During the fermentation process the veggies will expand and the liquid will try to come out, we put our jars in a bowl or a plastic bag for any juice that might drip from the sides. Leave the jars to ferment in room temperature for 2-4 weeks (depending on room temperature), 3 weeks is usually perfect. When ready, it should be softly textured but not mushy and have a fresh, spicy and acidic flavour. Discard the cabbage leave at the top and store the jars in the fridge. We usually divide the fermented vegetables in smaller jars and hand out to friends and family or keep it in the fridge.

Tip:
• If your veggies are stinky and leaky, then place the jars in a bowl and place everything in a plastic bag and close it. Then place in a cupboard and drain the water after about 3 days.
• If the top is discolored or has a bit mould, don’t be alarmed just remove it and wipe around or just change the jars.
• Use organic vegetables for fermenting and don’t wash or scrub to much, it can destroy the natural enzymes on the vegetables.

Green Kitchen Stories