Post sponsored by Cascadian Farm. See below for more details.
In a world where there’s artificial coloring in so many of the prepackaged foods, it’s easy to forget that nature provides an array of beautiful natural coloring. If you go to a restaurant and order a salad with raspberry vinaigrette, most likely what you will get is a dressing with more ingredients than need be with a few drops of coloring for good measure. It doesn’t need it. This strawberry salad showcases the beauty that is a homemade raspberry vinaigrette. It’s pink and delicious, perfect for pairing with other berry salads. Read more and see the recipe.
The post Strawberry Salad with Raspberry Vinaigrette appeared first on Naturally Ella.
Beyond spring being a wonderful time of year due to weather and produce, it’s also a great time for new cookbooks. There are so many wonderful cookbooks coming out this spring that it’s hard to know what to share. However, The Love and Lemons Cookbook is one you should definitely add to your list. These carrot waffles are the creation of Jeanine and just one of the many recipes I have on my list to try from the cookbook. The waffles are crisp on the outside, tender on the inside, all without any dairy or eggs. Jeanine hit it out of the park with these waffles (and carrots were the featured produce ingredient in this week’s newsletter!) Read more and see the recipe.
The post Vegan Carrot Waffles from The Love and Lemons Cookbook appeared first on Naturally Ella.
You may have noticed that things have been quiet around here. Maybe record-setting quiet? Either way, I think I have some ‘splanin to do!
In my last post I mentioned that we’ve been busy as bees behind the scenes building something really special. If you subscribe to our newsletter, you were the first to find out that we’re getting ready to launch the gorgeous Oh She Glows recipe app! The dream we’ve had in the works for years and years is finally happening and I can’t wait to share it with you guys. Keep your eyes peeled for our official launch in the very near future!
What I haven’t shared yet is that I’ve been creating something else, too. As grueling as the app work has been, this work has been even more exciting, exhausting, and life-changing. I’ve been lying awake for hours at night thinking about it. During the day, my thoughts are filled with vinegar-soaked cucumbers (seriously), these fruit chews, and 8:30 pm bedtimes.
Any guesses?
You got it: we’re expecting our second baby this September! That’s right…a second cookbook and a second baby will be dropping (well, hopefully not literally!) in September 2016. Our timing is impeccable, I know. But, joking aside, we always hoped to have our children close in age so we’re very grateful about the spacing; my due date is roughly two years since we brought Adriana home from the hospital. We can’t wait to meet this lil guy or gal!
My main worry right now, aside from the well-being of our little ones and state of this world, is how we’re going to take care of a two-year-old and a newborn. I’m expecting a loss of sanity for the first several months…or decades?! There will be an adjustment period for sure (especially when you add these lovely toddler temper tantrums into the mix), but if Adriana treats her sibling anything like she treats her favourite “baby” doll (lots of doting and kisses), I think it will all work out in the end! We just need to teach her that eye poking and head dropping probably aren’t the best approaches with an actual newborn. Baby steps, people.
I spent the first few months of 2016 revamping and shooting a ton of fan-favourite recipes and photos for our new recipe app. It was an intense few months when I didn’t want to be anywhere near food, but I also enjoyed being distracted with a totally new project! It kept me going. When I wasn’t immersed in the app project (and cookbook editing), I was collapsed on the couch and often feeling down and out (the first trimester blues hit me with both pregnancies, unfortunately). So while things have been quiet on the blog, they certainly haven’t been behind the scenes. Plus, I didn’t think you needed a recipe for salt and vinegar chips, popcorn, dill pickles, mustard-covered veggies (ew), cereal, nut butter and jam toast, or how to convince your husband to pick up a container of vegan caramel chocolate chunk ice cream during a cold snap. (…Or do you?!) Because that’s basically what I lived off of for a month or two. Oh, there was also that day when I decided to drink all the juice from my Bubbies Sauerkraut jar. I didn’t want to eat the actual sauerkraut, just drink the juice. I’m pretty sure Eric was ready to commit me!!! I haven’t touched sauerkraut since. Actually, I think I’ve been banned from buying it in North America.
Now that I’m in the second trimester, I’m slowly getting my mojo back (case in point: I changed out of my sweats for the photo above). Workouts have returned to my life on a regular basis which feels like a damn miracle, and the nausea is starting to fade a bit. The good news is that the app is almost finished, my second cookbook will be heading to the printers shortly, and I’m ready to get back into the swing of things—well, maybe after a much-needed break first.
Of course, I also have some delicious food to share with you soon. Eric strongly discouraged the dill pickle soup recipe I was dreaming up, so with some serious restraint, I moved on to Plan B. This post is already much too wordy, so I’m going to have to share the recipe in a separate post. Stay tuned for the recipe!!! It’s a great one, and I promise it’s worth the wait.
Comments (226) | Share on Facebook | Tweet | Pin It | Stumble
Congratulations! If you are reading this you must have managed to enter our site without running into any database errors. Our site has been pending between offline and hair-tearingly slow this past week, which is why this recipe is somewhat delayed. Our server is apparently tired of us and we are immensely tired of it, so we are planning some construction work to finally speed up this place (a new design is on its way as well!). Please be patient with weird error messages that might pop-up or slow loading times. Things will (hopefully) run much smoother in a very near future. Okay, enough complaining. Let’s talk shrooms!
I think our original plan was to share something bright and spring inspired. But faith intervened with a few cold days, a bag of portobello mushrooms showing up in our CSA box and a sudden calling for soup. So this happened. A warm and comforting vegan mushroom soup with tones of white wine, forest, rosemary and thyme. It’s an ideal dinner soup, especially when served with wholegrain rice and a few pieces roasted sourdough rye slathered with mashed avocado and chili flakes. Think of it like one final winter hug before spring is taking over the kitchen.
Mushroom Soup with Red Rice & Avo Toast Serves 4
Rice 1 cup uncooked red rice 2 cups water sea salt
Mushroom Soup 2 tbsp coconut oil, olive oil butter or ghee 2 garlic cloves 2 sprigs thyme 2 sprigs rosemary 4 (250 g) portobello mushroom, cleaned 8 (250 g) brown button mushroom or champignon, cleaned a large glug of white wine, optional 4 cups / 1 liter water 1 tbsp (or 1 cube) vegetable bouillon sea salt and black pepper
fresh parsley, for serving plain yogurt, for serving (optional)
Cooking the rice: Rinse the rice well in water and drain. Place in a saucepan with the 2 cups of water. Bring to a boil, immediately lower the heat to a bare simmer, let simmer for 45 minutes or until tender. Add salt towards the end of the cooking time. Drain any excess water. Meanwhile make the soup.
Making the soup: Finely chop garlic cloves and slice the mushrooms. Heat oil in a large saucepan and add garlic and cook until fragrant but not browned. Add mushrooms and herbs and cook for about 5-8 minutes until soft and slightly browned, stirring occasionally. Reserve some of the cooked mushroom slices for serving. Add a glug of wine to the saucepan and cook for a few minutes. Now add water, bouillon, salt and pepper. Cover with a lid and bring to a simmer. Use an immersion (hand) blender to mix the soup until completely smooth (or a stand-blender). Season to taste. Serve in bowls with a spoonful of cooked rice, some mushroom slices, fresh parsley, olive oil, a dollop of yogurt if using, and an avocado toast.
Avocado Toast Makes 4 half-slices
2 slices sourdough rye 1 ripe avocado 1 tsp cold-pressed olive oil chili flakes flaky sea salt
Toast the bread in a toaster, a frying pan or in the oven on high heat for a few minutes until golden and crispy. Cut the avocado in half, remove the stone and scoop out the flesh. Use a fork to mash the avocado and then slather it on top of the toast. Drizzle oil on top and sprinkle with chili flakes and salt. Cut in half and serve with the soup.
When spring and spring produce start to show up, I find myself wanting to cook less. I want simple meals with minimal ingredients. This asparagus stir-fry fits the bill. Ready in about 20 minutes, the asparagus is the star of this recipe with the miso sauce a close second. I picked up miso for this veggie ramen bowl and it’s found a home in quite a few sauces. Read more and see the recipe.
The post Asparagus Stir-Fry with Sesame-Miso Sauce appeared first on Naturally Ella.
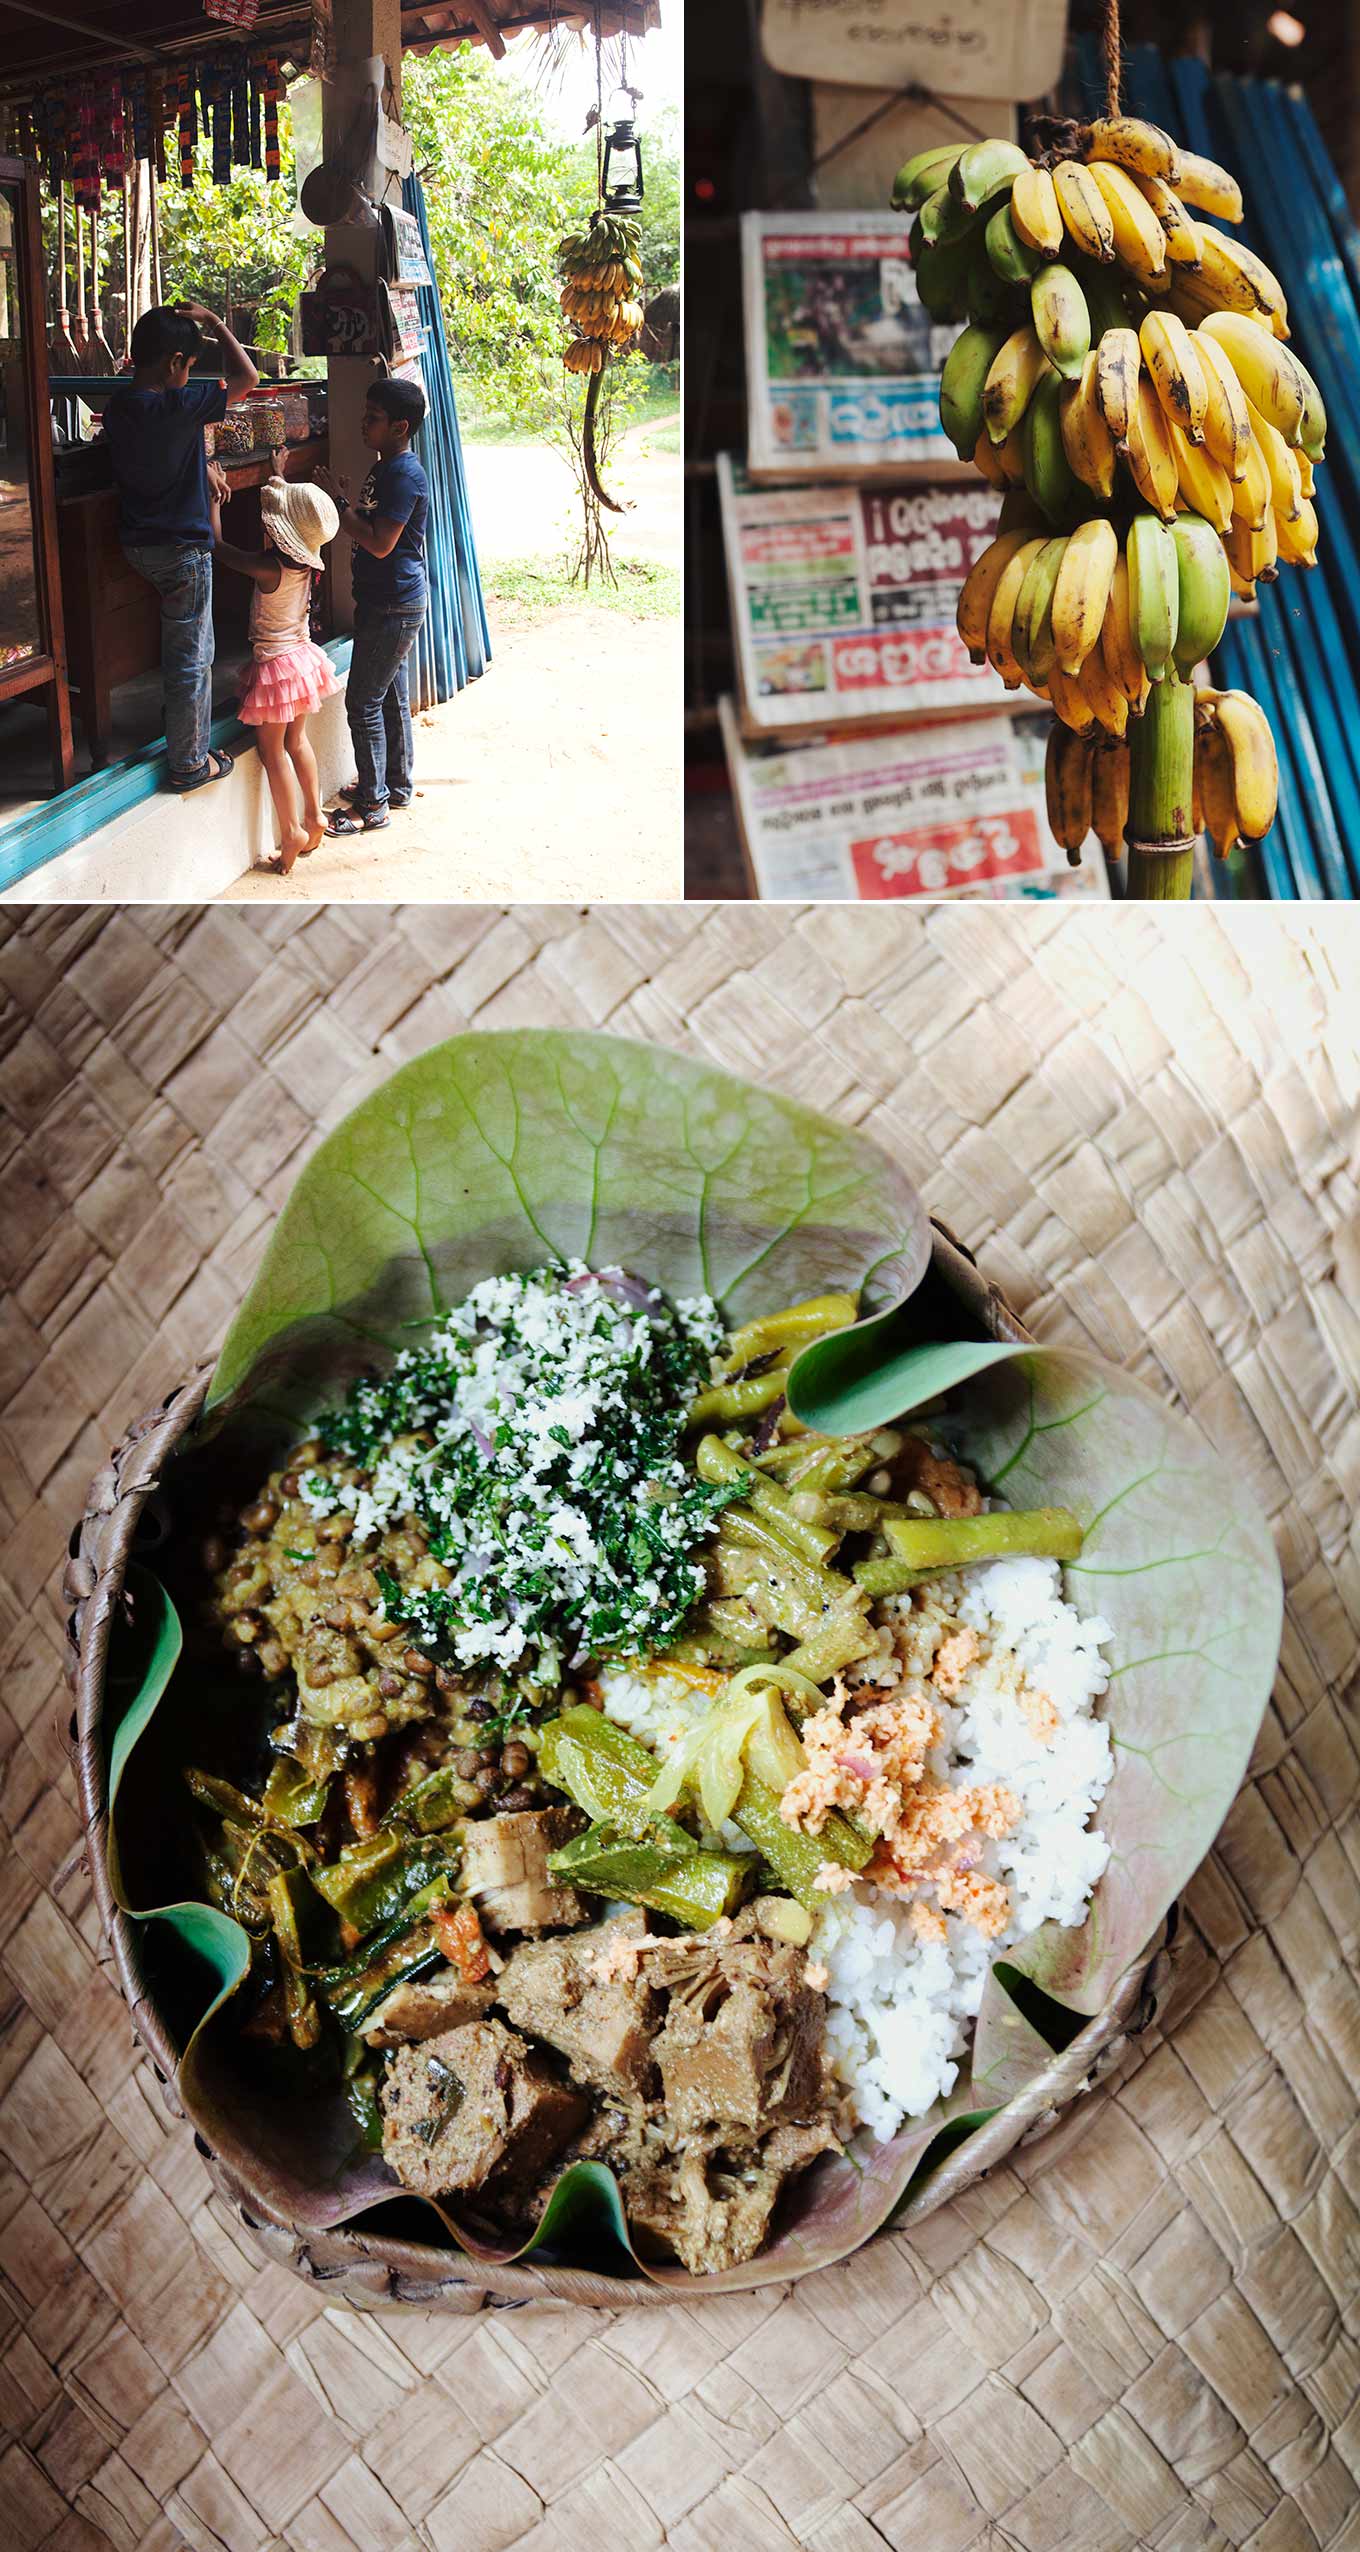
I guess I’ll start by saying that I feel like I am waking up from the most spectacular, flavourful, technicolour dream. Sri Lanka deeply touched me, from its incredible landscape, beautiful people and of course, the food. The food! The food.
When I was first invited by Cinnamon Hotels and Resorts to go on a food tour of Sri Lanka, I was a bit uncertain – to be honest, I didn’t know anyone who had visited Sri Lanka before, and I especially had no idea what the cuisine was like. I assumed that it was probably very much like Indian, but what I discovered is that it has its own totally distinctive flavours and cooking techniques.
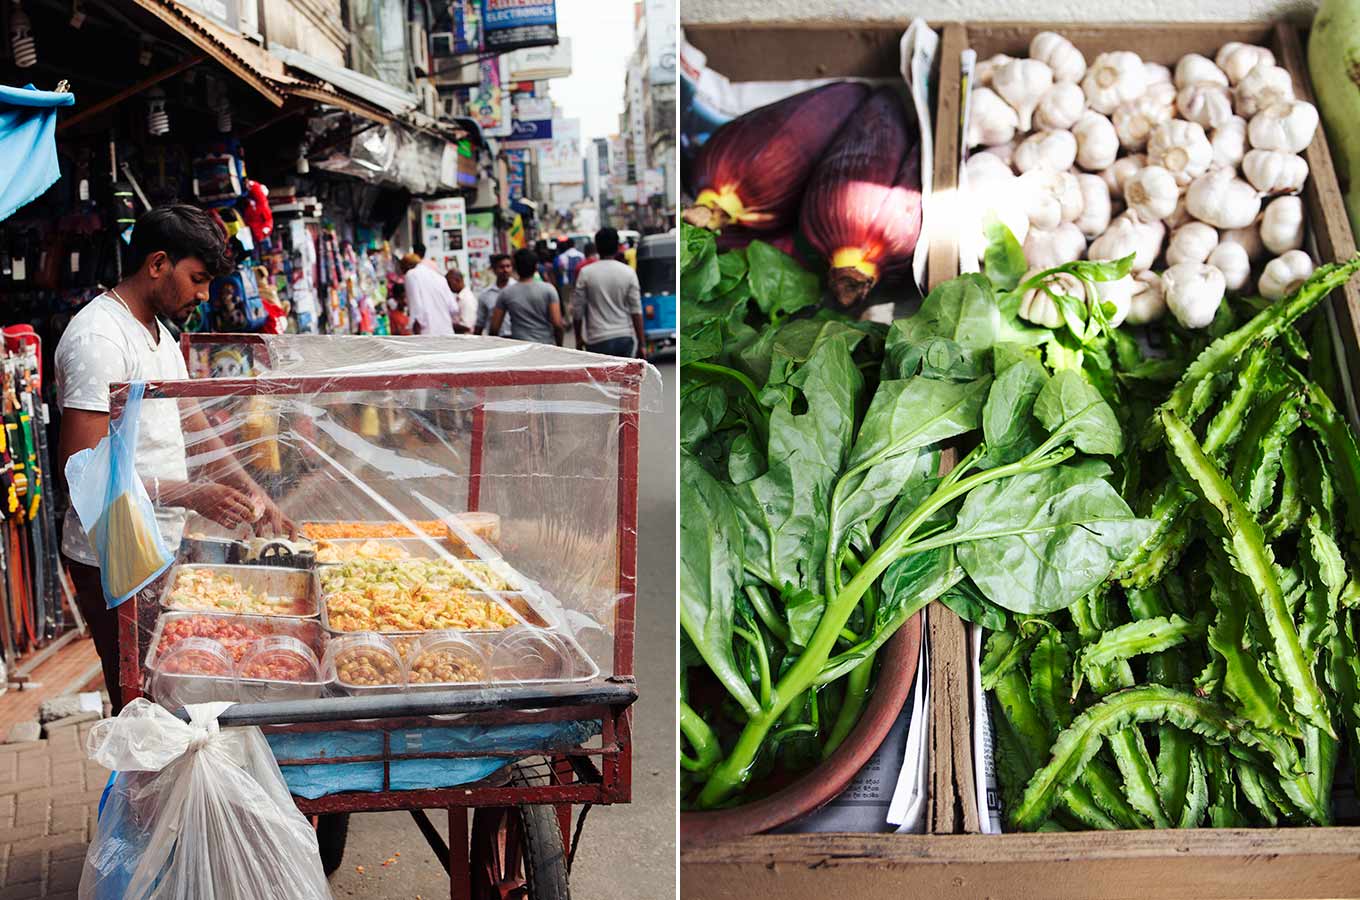
Sri Lankan people are very passionate about their food and the culture around it. From my perspective, they seemed especially connected to the earth and the bounty that springs year-round from their incredibly fertile land. Many of the world’s spices are grown on the island, so you can imagine how rich and complex their traditional dishes are. Sri Lankan food is also hot. Like, crazy hot. Chilies play a dominant role in everything from curries to relish and are accompany every meal of the day – even breakfast. An interesting way to start your morning, I might add, is being startled awake by an explosive plate of food. And with coconuts quite literally dripping from the trees everywhere you look, the backbone of many Sri Lankan dishes, both savoury and sweet, is coconut water, milk and flesh. Heavenly. And a welcome antidote to all that chile.
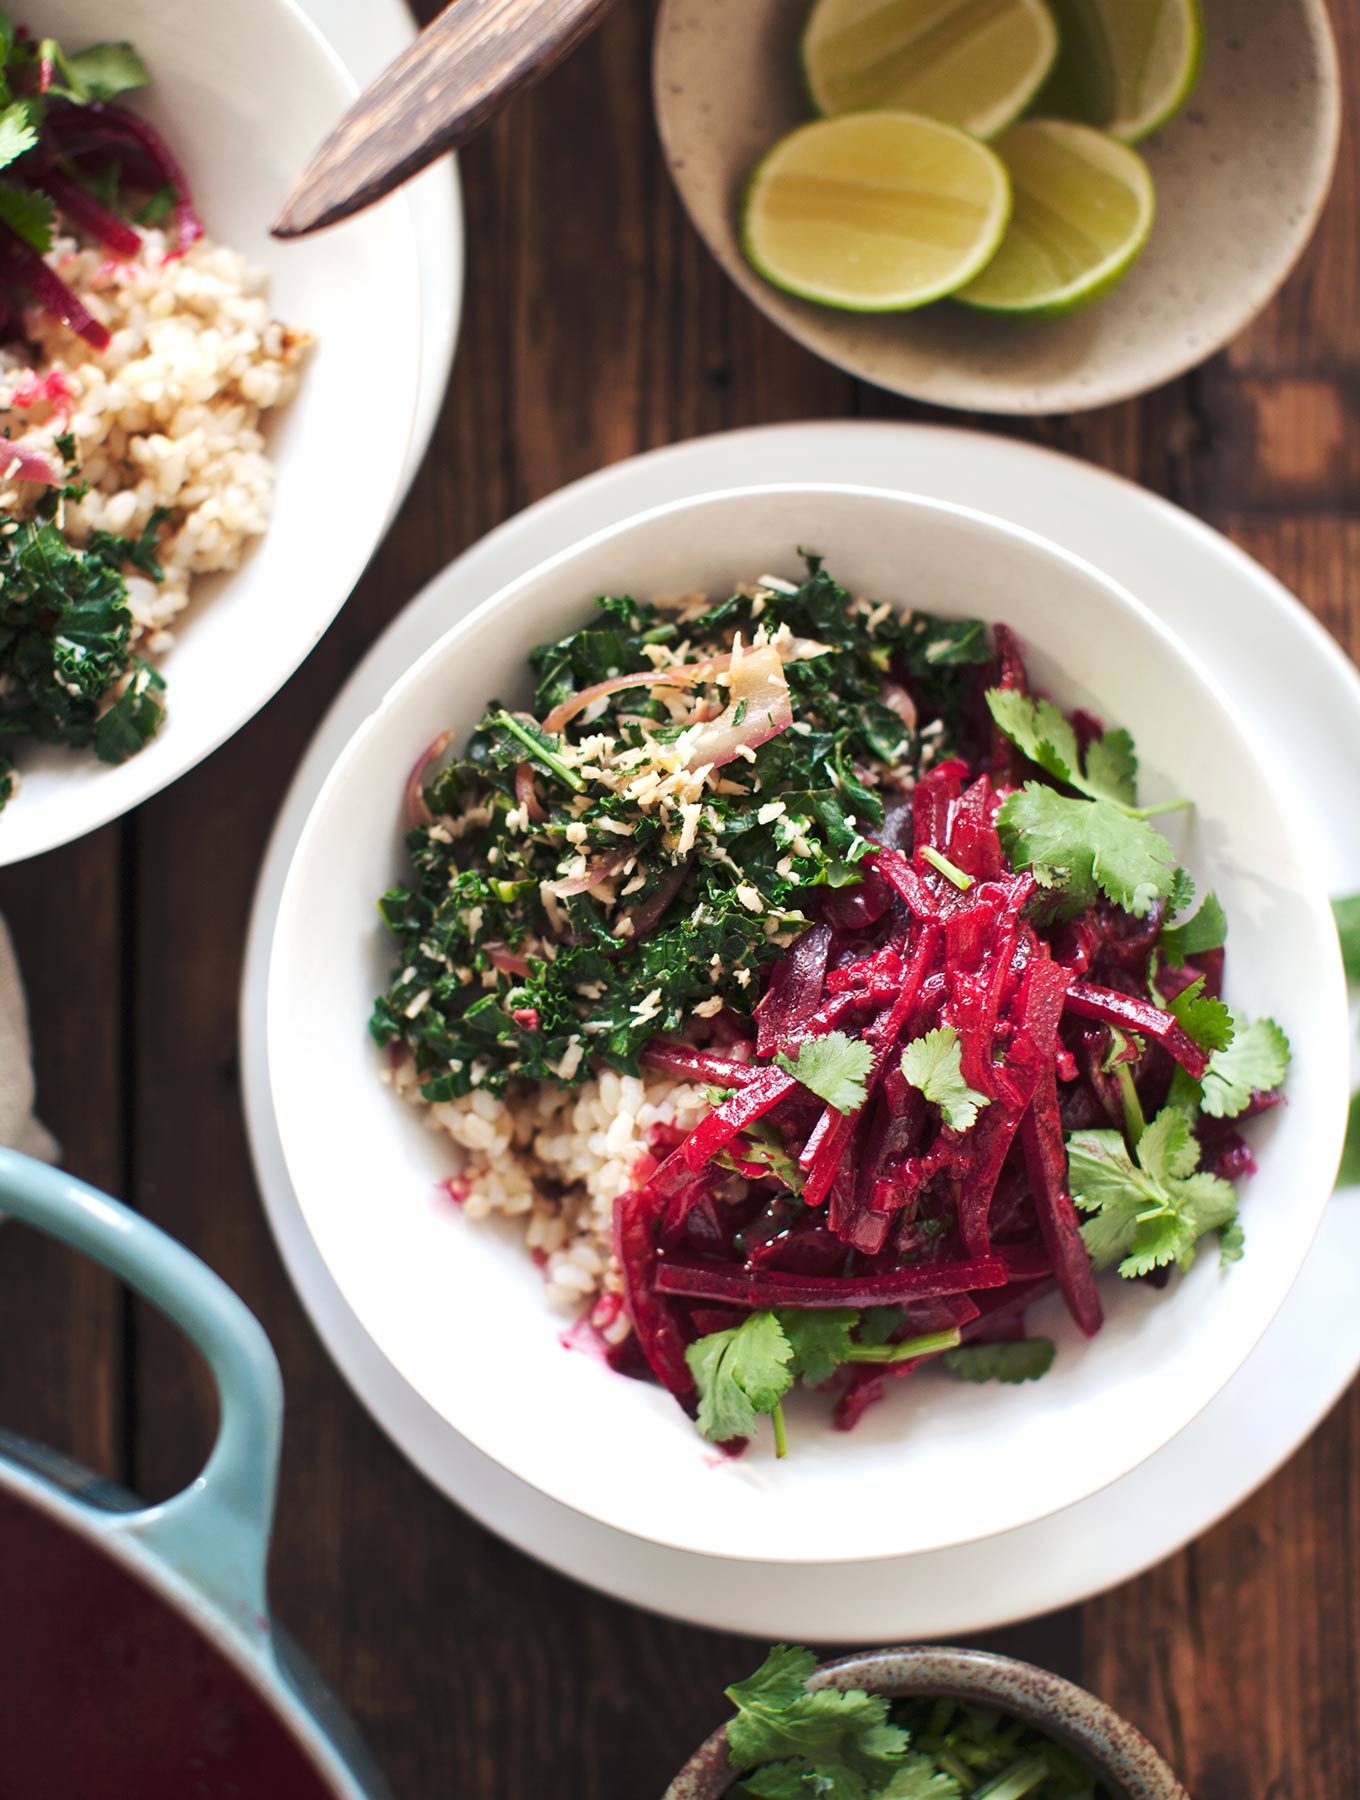
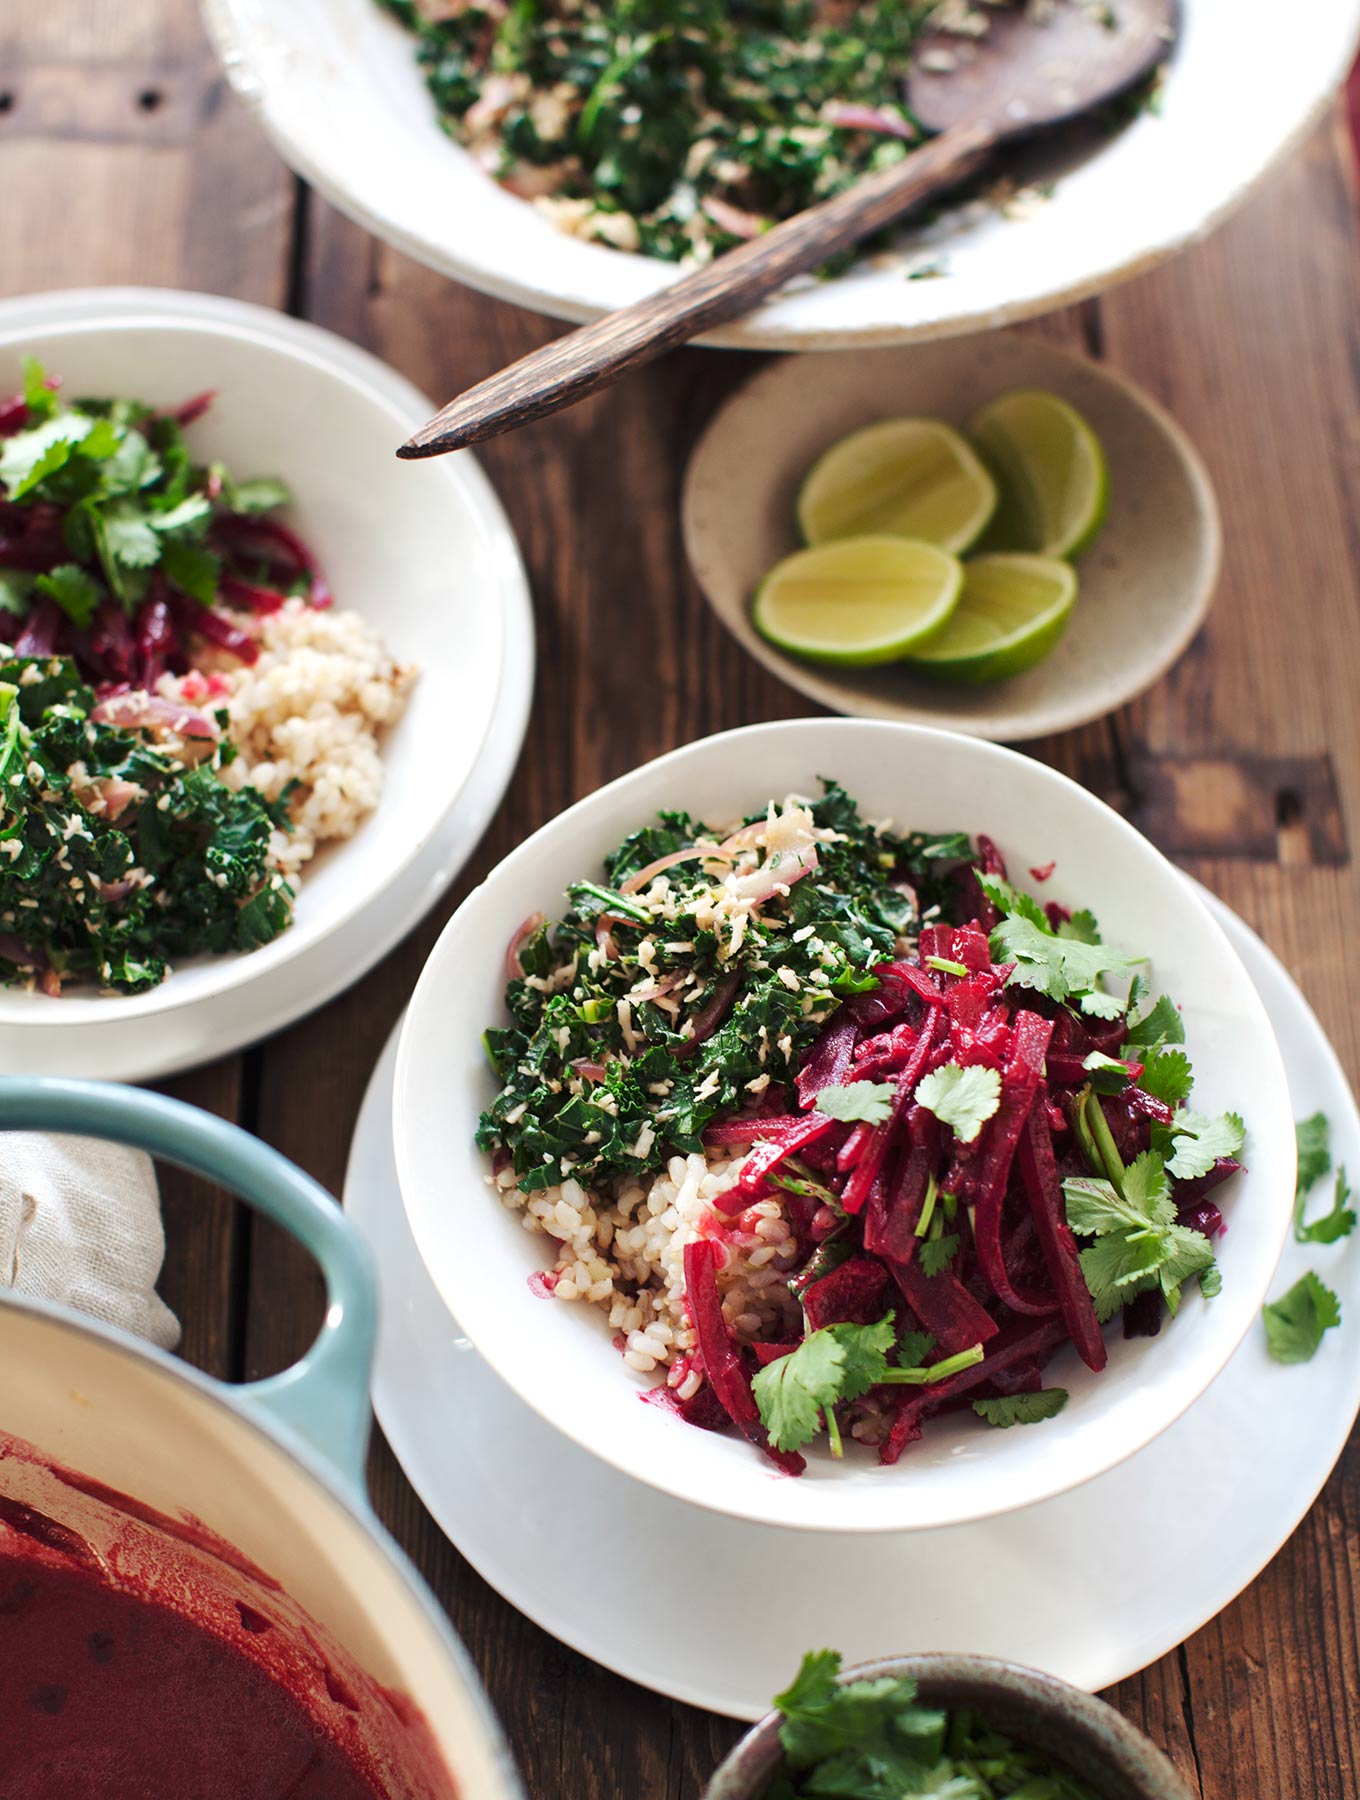
Rice and curry is a Sri Lankan staple, and in fact the word “food” there is synonymous with this combination. Happily for me, there are countless vegetarian and vegan options to choose from. My favourites were jackfruit curry (mindblowing!), cashew curry (yes, a whole pot of cashews cooked in coconut milk), wingbean curry, mung bean curry, eggplant curry, lentil curry, and pumpkin curry. But my favourite curry of all? Beetroot curry. Surprising, eh? The first time I was offered this dish, I kind of thought that it was an accommodating east-west mashup or something, but no! It’s a thing. And a wildly delicious thing at that. I never imagined combining beets and coconut before, but it works incredibly well. The earthiness of the beets contrasts perfectly with the sweetness of the coconut milk, and the beets are neither crunchy or mushy, but a perfectly balanced succulent-tender texture that pairs so well with rice.
The other major love affair I had in Sri Lanka was with all the little side dishes that come with the curries themselves: sambol and mallung (or mallum). Sambol is like a relish, typically based on freshly shredded coconut (but not always), with a featured vegetable, along with chilies and lime. Pol sambol (coconut sambol) is ubiquitous and served at every meal I can remember. It varies in spiciness from table to table, but more often than not I couldn’t eat more than a couple teaspoons with my curry – which was already insanely hot enough, thank you.
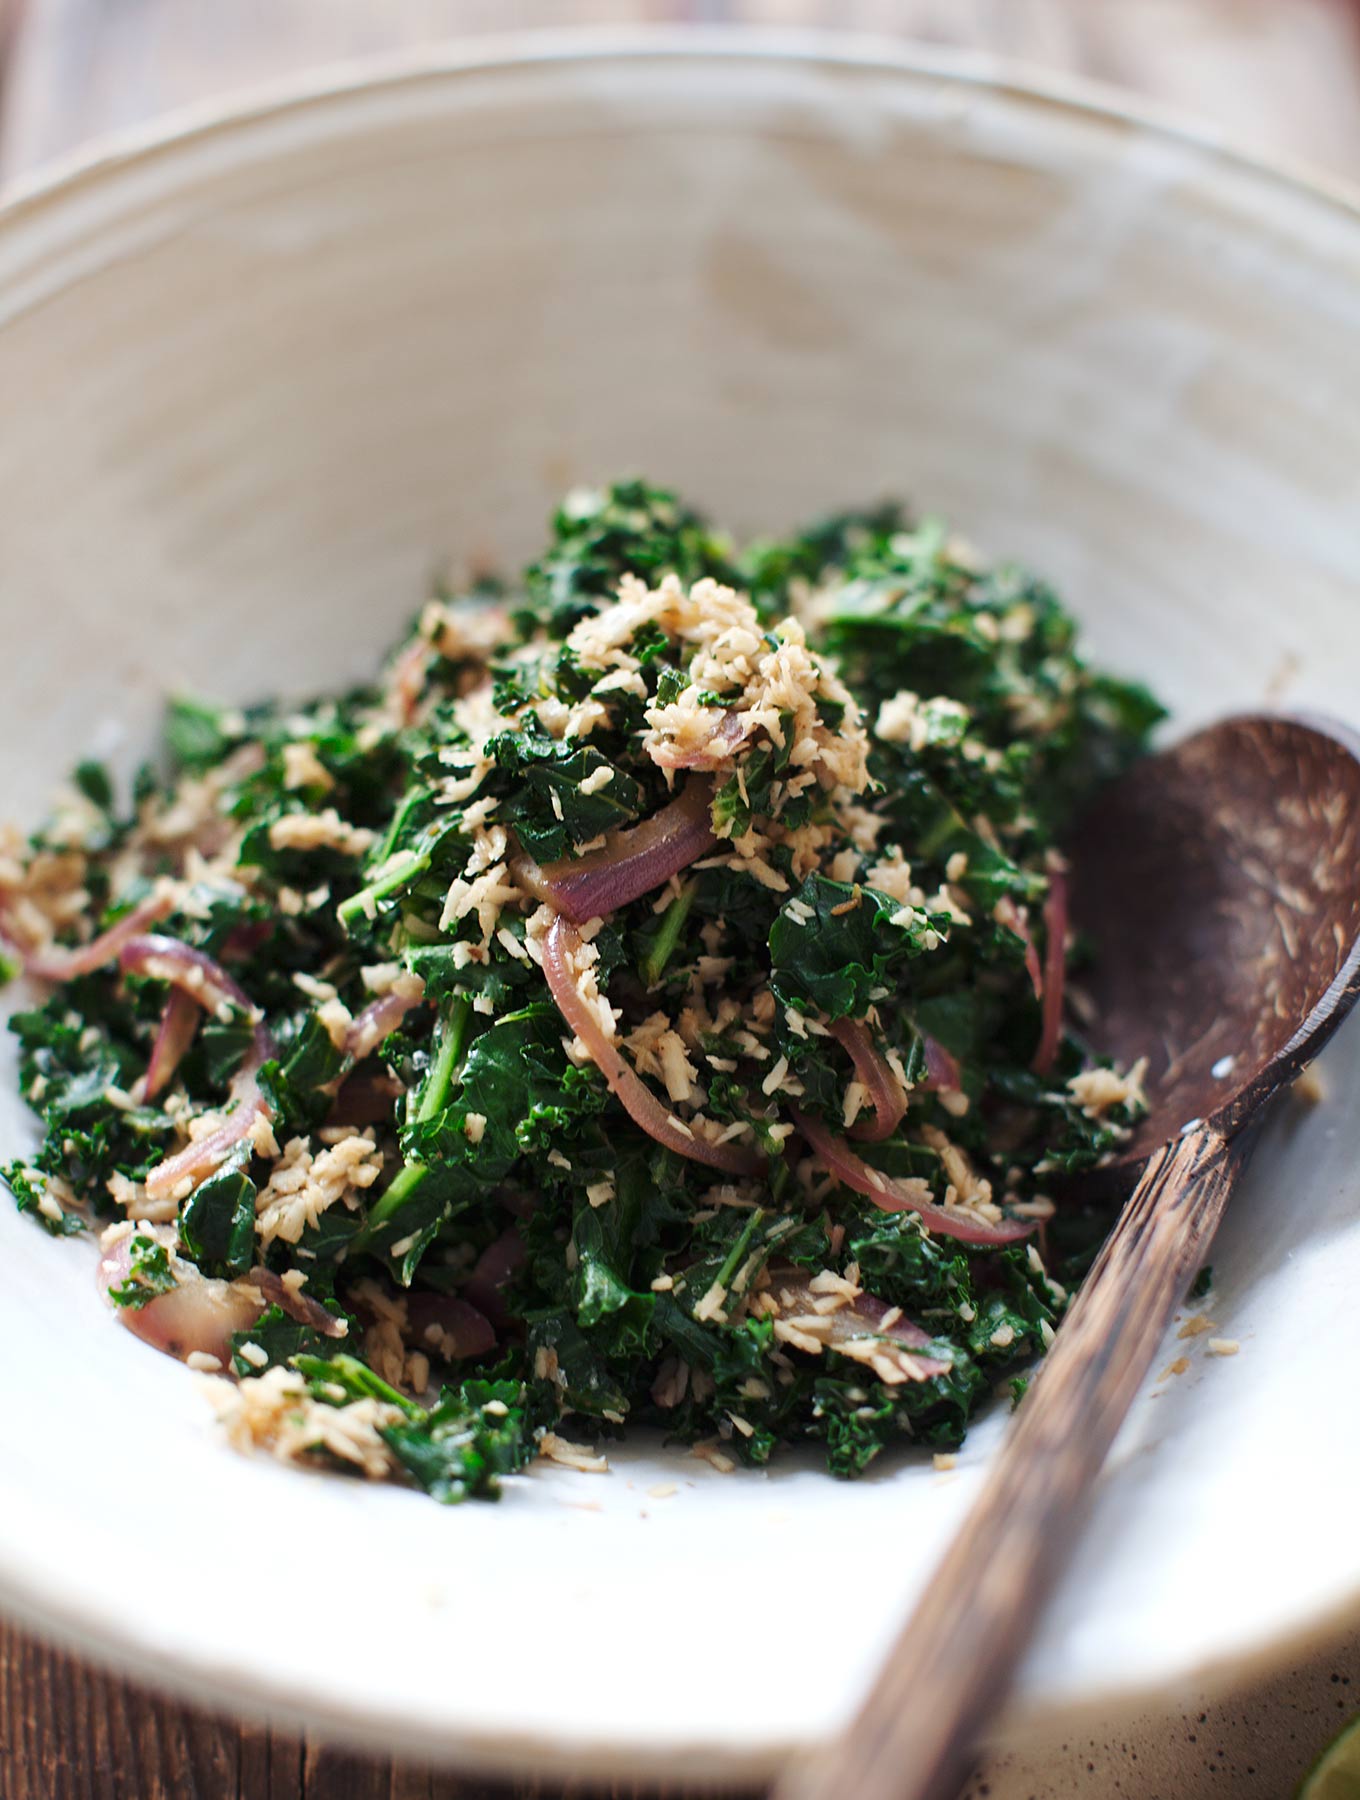
Mallungs are “green dishes” made with cabbage, kale, broccoli, beans or other leafy veg. These are always cooked without any oil, and instead use just the heat of the pan and a little bit of water to steam the vegetable – a groovy technique in my opinion. Spices are used in mallung as well, and vary from recipe to recipe. They can be served warm or at room temperature, almost like a lightly cooked salad.
Curry leaves are an essential ingredient in Sri Lankan food. Many people are confused by this name because they associate curry with a spice blend, and assume that curry powder must then come from dried and ground curry leaves. In truth the word curry vaguely refers to a dish prepared with spices, but means very little to Indian or South Asians, where “curries” originate.
Curry powder is largely a Western creation, and should in fact be referred to as masala, meaning a spice mix. Most curries in Sri Lanka rely on whole spices, not ground or pre-mixed ones, so that the cook can balance flavours according to his / her tastes.
Anyway, back to the curry leaves. Small, dark green and glossy, they are deeply aromatic with a distinctive savoury-smoky scent that is difficult to describe. And no, they don’t smell like curry powder – we’ve already established that. They can be difficult to find fresh here in Copenhagen (and I would imagine, many places in the world!), but dried ones are available at most ethnic grocers or specialty shops. With about half the pungency of fresh curry leaves, the dried ones are an okay substitute if that’s all you’ve got, but do try and seek out some fresh ones – you’ll never look back! Plus, if you find them fresh, you can easily freeze them until your next curry.
It was very difficult to decide what kind of Sri Lankan dish I would post first (oh yea, there’s more to come…) but I chose beetroot curry and kale mallung because they are both relatively seasonal here in Denmark, and because I think that both of these recipes take us out of our comfort zone with familiar veggies, and make use of entirely unique cooking techniques. You’ll find both applications totally surprising, I guarantee that, and I hope that they inspire you to make curry out of things you wouldn’t normally, or try an oil-free, steamy stir-fry. Yum town.
There is so much complexity and diversity to Sri Lankan food and I am forever inspired. I cannot wait to go back to this enchanted island to explore, and eat, once again.
Sri Lankan Beetroot Curry with Kale Mallung Serves 3-4
Ingredients: 1.3 lbs / 600g red beetroots 1 large onion, finely chopped 3 cloves garlic 1 Tbsp. coconut oil 2 tsp. black mustard seeds 1 teaspoon coriander seeds 20 dried curry leaves curry leaves (or 1 sprig fresh) 2-3 small green chilies, finely chopped 1 cinnamon stick 1 tsp. fine sea salt, plus more for finishing 1 14 oz. / 400ml can full-fat coconut milk juice of 1 lime large handful of cilantro
4 portions of cooked red or brown rice (red is more traditional) 1 batch Kale Mallung (recipe to follow) lime wedges to serve
Directions: 1. Peel beets and cut them into matchsticks. Chop onions, slice garlic. Set aside.
2. In a large pot over medium-high heat, melt coconut oil. Add the mustard seeds, stir, and let cook for a couple minutes until they begin to pop (be careful that they do not burn!). Add the coriander, curry leaves, chilies, and cinnamon, stir well, and cook for one minute until fragrant. Add the onion and salt, stir to coat and cook until the onions are translucent, about 5-7 minutes. Add garlic, stir and cook one minute. Add beets and coconut milk, bring to a simmer, reduce heat and cover (make sure that the liquid is simmering very lightly, not boiling. Boiling over high heat will cause the coconut milk to split). Cook until the beets are tender, about 15-20 minutes.
3. While the curry is cooking, wash and roughly chop the cilantro.
4. To finish the curry, squeeze in the lime juice, stir, and add more salt to balance the flavours. Add cilantro and serve immediately over rice with the kale mallung and extra lime wedges.
Kale Mallung Serves 3-4
Ingredients ½ cup / 45g unsweetened desiccated coconut ½ cup / 125ml coconut water 4 cups / 130g shredded + packed kale 1 small red onion 1 tsp. ground cumin ¾ tsp. fine sea salt, plus more for garnish 1 green chilli, if desired Juice of ½ lime, plus extra for garnish
Directions: 1. Combine desiccated coconut and coconut water in a small bowl and let soak for about 30 minutes.
2. Slice onion in thin sections. Mince chili. Wash kale and spin dry. Remove any tough ribs, stack leaves and cut into thin ribbons. Set aside.
3.In a large, dry pot over medium heat, add the onions, salt and cumin. Stir often, letting the onions soften in the pan. Add a couple tablespoons of the liquid from the soaking coconut if the pot becomes too dry (reserve as much liquid as you can, however). After about 8-10 minutes, add the kale and the coconut mixture. Stir to coat, and quickly cover the pot with a lid so that the kale steams inside. Wait just 30-60 seconds – the kale is ready when it is bright green and tender. Remove from heat and squeeze in the lime juice. Season to taste. Serve warm or at room temperature.
A huge thanks to Cinnamon Hotels and Resorts and Sri Lankan Airlines for making this incredible trip possible!
The post Sri Lankan Beetroot Curry & Kale Mallung appeared first on My New Roots.
Post sponsored by Frontier Co-op. See below for more details.
I eat a fair amount of salads throughout the year but during the spring, I eat salads nearly every day. This asparagus salad combines all of my favorites: roasted vegetables, a hearty grain, a scoop of salty cheese, and an easy homemade dressing. Frontier asked me to share how I cook with purpose and one of the ways is that we connect with our food and make homemade when we can. Beyond being better in flavor that store-bought, homemade foods help to keep us mindful of what we are eating.
Over the years, M has picked up a few of these homemade items and one that he will gladly do time and again is make dressing. It’s one of the easy ways for he and I to make a meal together (I chop, he shakes). This particular dressing, in my opinion, makes the salad. The turmeric works well with the tahini and ties in perfectly with the roasted asparagus and Kamut. Plus, it gives you one more way to use tahini outside of hummus making! Read more and see the recipe.
The post Asparagus Salad with Turmeric Tahini Dressing appeared first on Naturally Ella.
My husband and I come from two different worlds: a potato chip world and a tortilla chip world. I distinctly remember the moment we realized this, on our honeymoon, deep in a Whole Foods vortex deciding which chips to buy for our three-week road trip across California. We were undoubtedly surprised and perhaps a little dismayed that we had committed our lives to each other without discussing this one rather important preference, but in the spirit of everlasting love and compromise, we pretended like it was no big deal. We bought two bags of chips and ate them separately. We remain happily married to this day.
I guess growing up in North America has had a real influence on me (shocking, I know). Tortilla chips and salsa was a classic childhood snack, especially at backyard barbeques, birthday parties and sleepovers. We would take a family-size bag out on picnics, road trips, and sometimes my dad would toss a few in my lunchbox, right beside the Wonderbread sandwich and fun fruits. Not joking. Anyway, I don’t really eat a lot of chips these days (another shocker), but that doesn’t mean that the occasional one doesn’t somehow sneak past my lips from time to time. I’m only human.
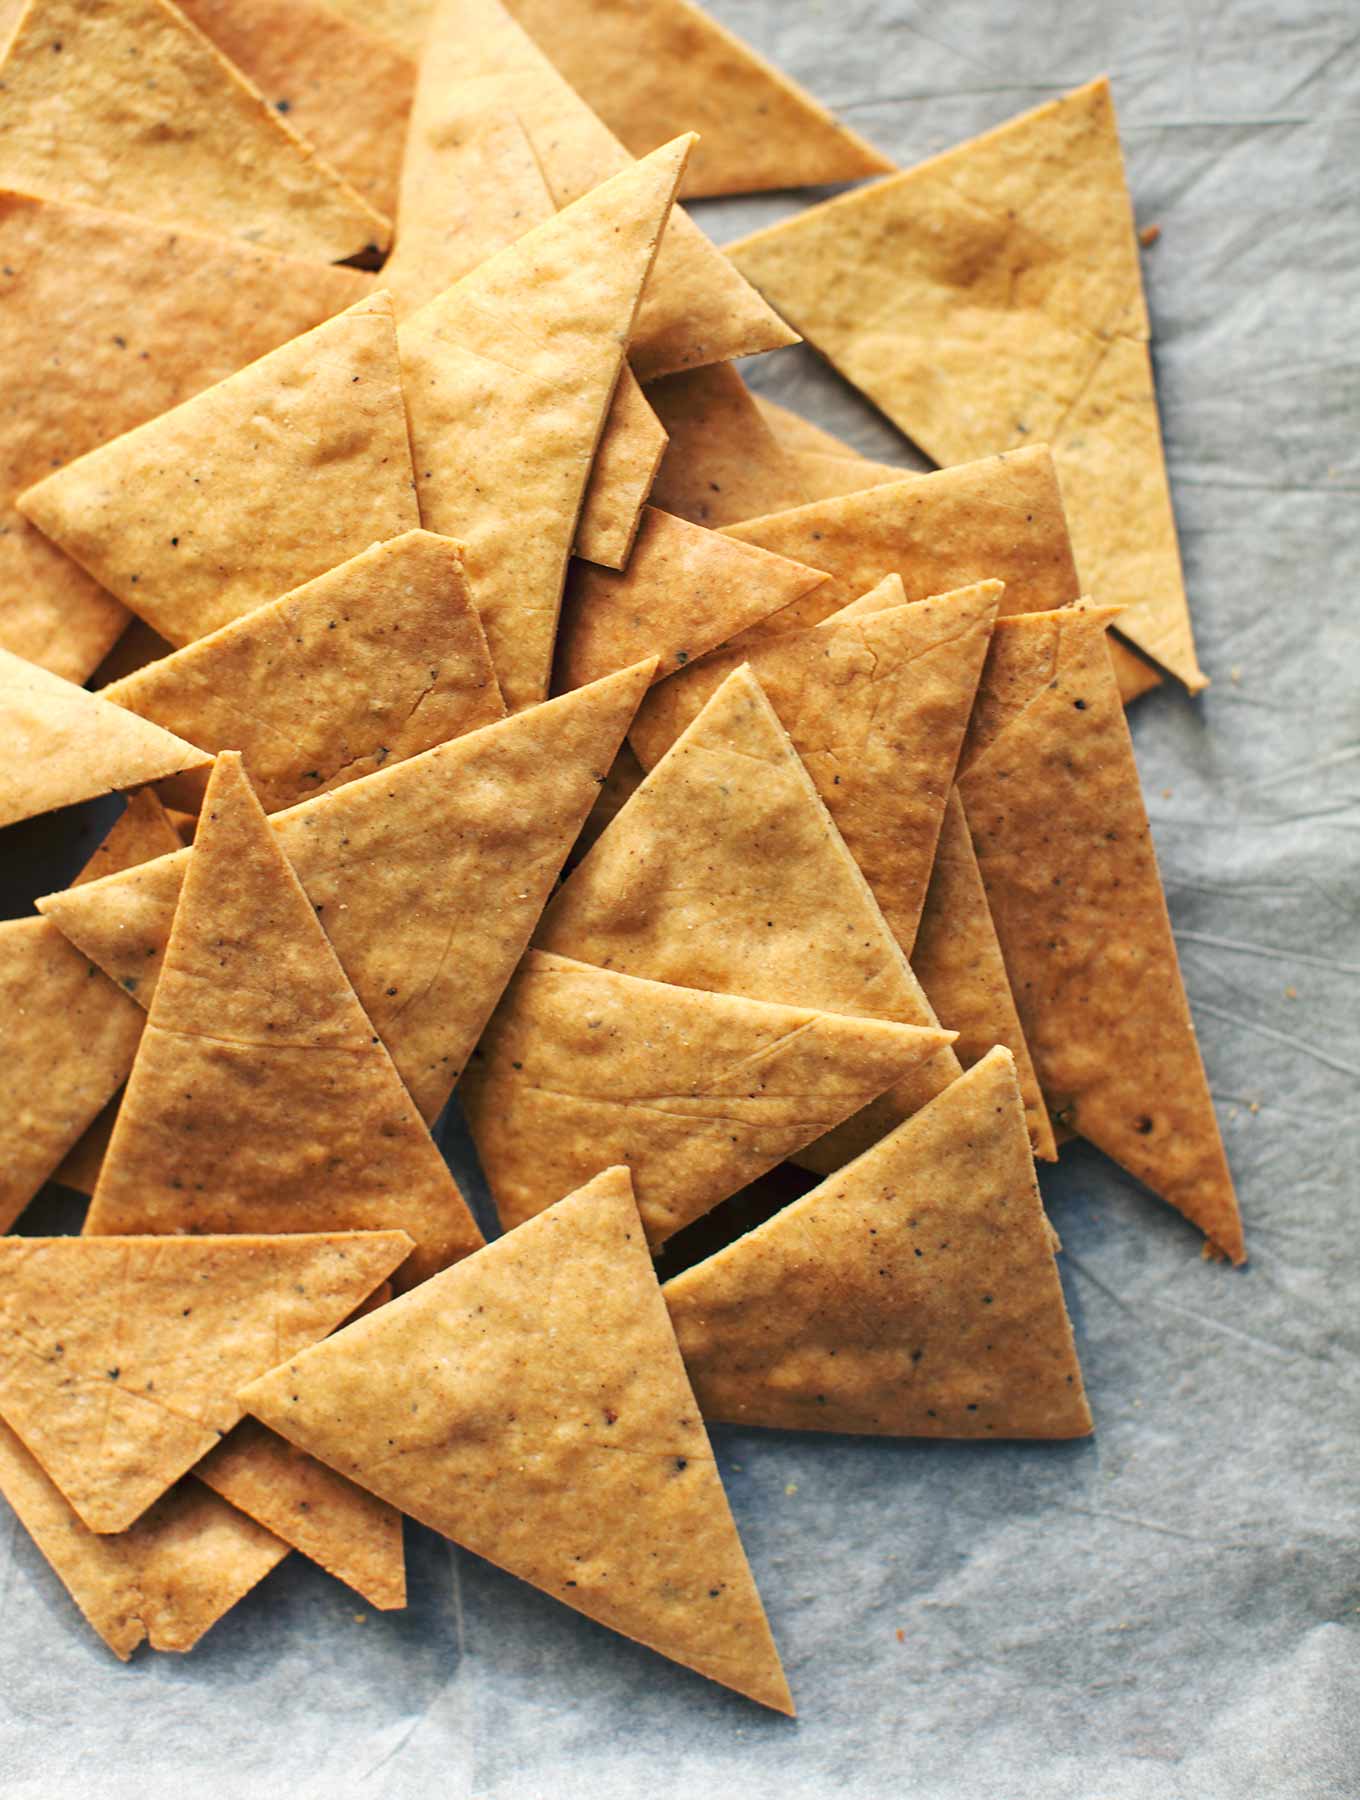
This idea to make tortilla chips from chickpea flour literally came out of nowhere. I don’t even remember what I was doing when the lightening bolt struck me, but it was fast and furious and I dropped absolutely everything to make them immediately, almost like I didn’t want the inspiration to get away on me! Thirty minutes later, the chips were in my belly. So fast and easy, I couldn’t believe it. Which lead my overly-excited mind, hepped on folate and molybdenum, to turn towards nachos. I mean, why wouldn’t I go there?
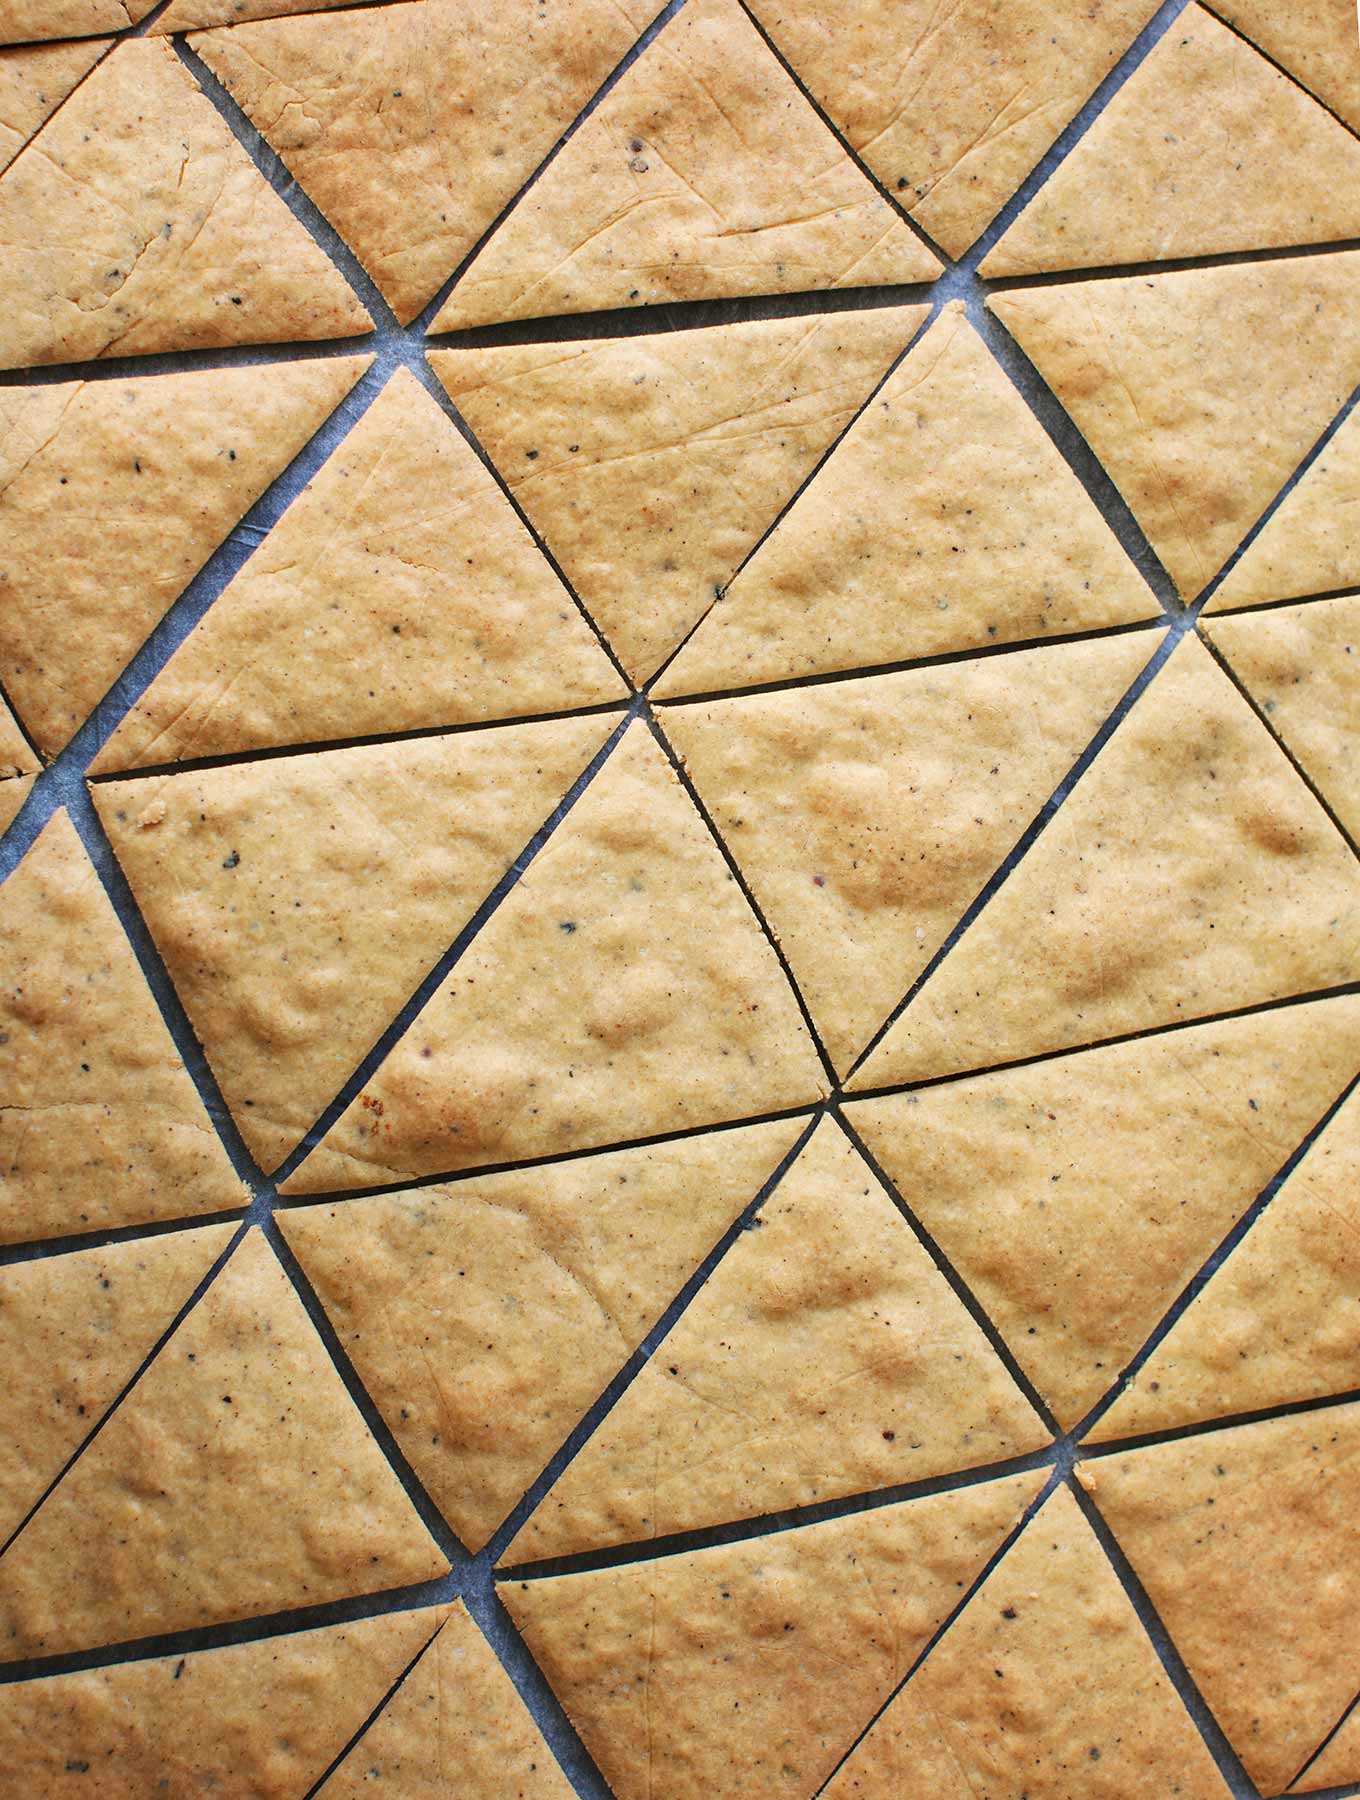
These chips are crisp and golden, just like tortilla chips, but with a more satisfying and substantial heft to them, delivered by pure chickpea goodness. They are so filling and rich that it’s impossible to overeat them (that is not a challenge). And with really just two ingredients, how can you go wrong?! I’m going to experiment with making large rectangular flatbreads out of this dough too, which will be prefect for lunches, maybe with some seedy add-ins, spice blends, and I am dying to try a Doritos knock-off! I have a Cool Ranch makeover itch that needs to be scratched, if you know what I’m sayin’.
Snack smarter! If you’re an enthusiastic snacker like myself, you’ll relate to the challenge in finding snacks that are balanced, healthy, and actually sustain you for some time until the next meal. “Food satiety”, is the measure of how full food makes us feel and how long it keeps our appetite at bay. Although calories definitely contribute to the of feeling fullness, a high calorie count does not always reflect the satiating power a food has. Factors that effect food satiety also include fiber, protein, and water content. And it is surprising that high fat foods, which are typically very caloric, tend to have lower satiating power.
Because of their high fiber and protein content, along with their remarkable ability to stabilize digestion, chickpeas and things made with chickpea flour fall into the category of serious filler-uppers, even though they only contain a moderate amount of calories. It’s a win-win. One serving of these chips (about one-quarter of the recipe / 12 chips) delivers 11 grams of protein (!!!) and 5 grams of fiber for under 300 calories. Not that I am a numbers girl at all, it can be helpful to take note of these things, especially if you are someone interested in weight management.
Other snacks that rank high on the food satiety scale are popcorn, pears, raspberries, oatmeal, beans, avocado, and chia seeds. Fill up on these guys to get, well, full.
If you’re buying chickpea flour for the first time, know that it’s available at most health food stores and natural grocers, where it can sometimes be sold under the names garbanzo bean flour and cici flour. Your most reliable source however, is an Indian grocer or market, where it is typically labeled besan or gram flour.
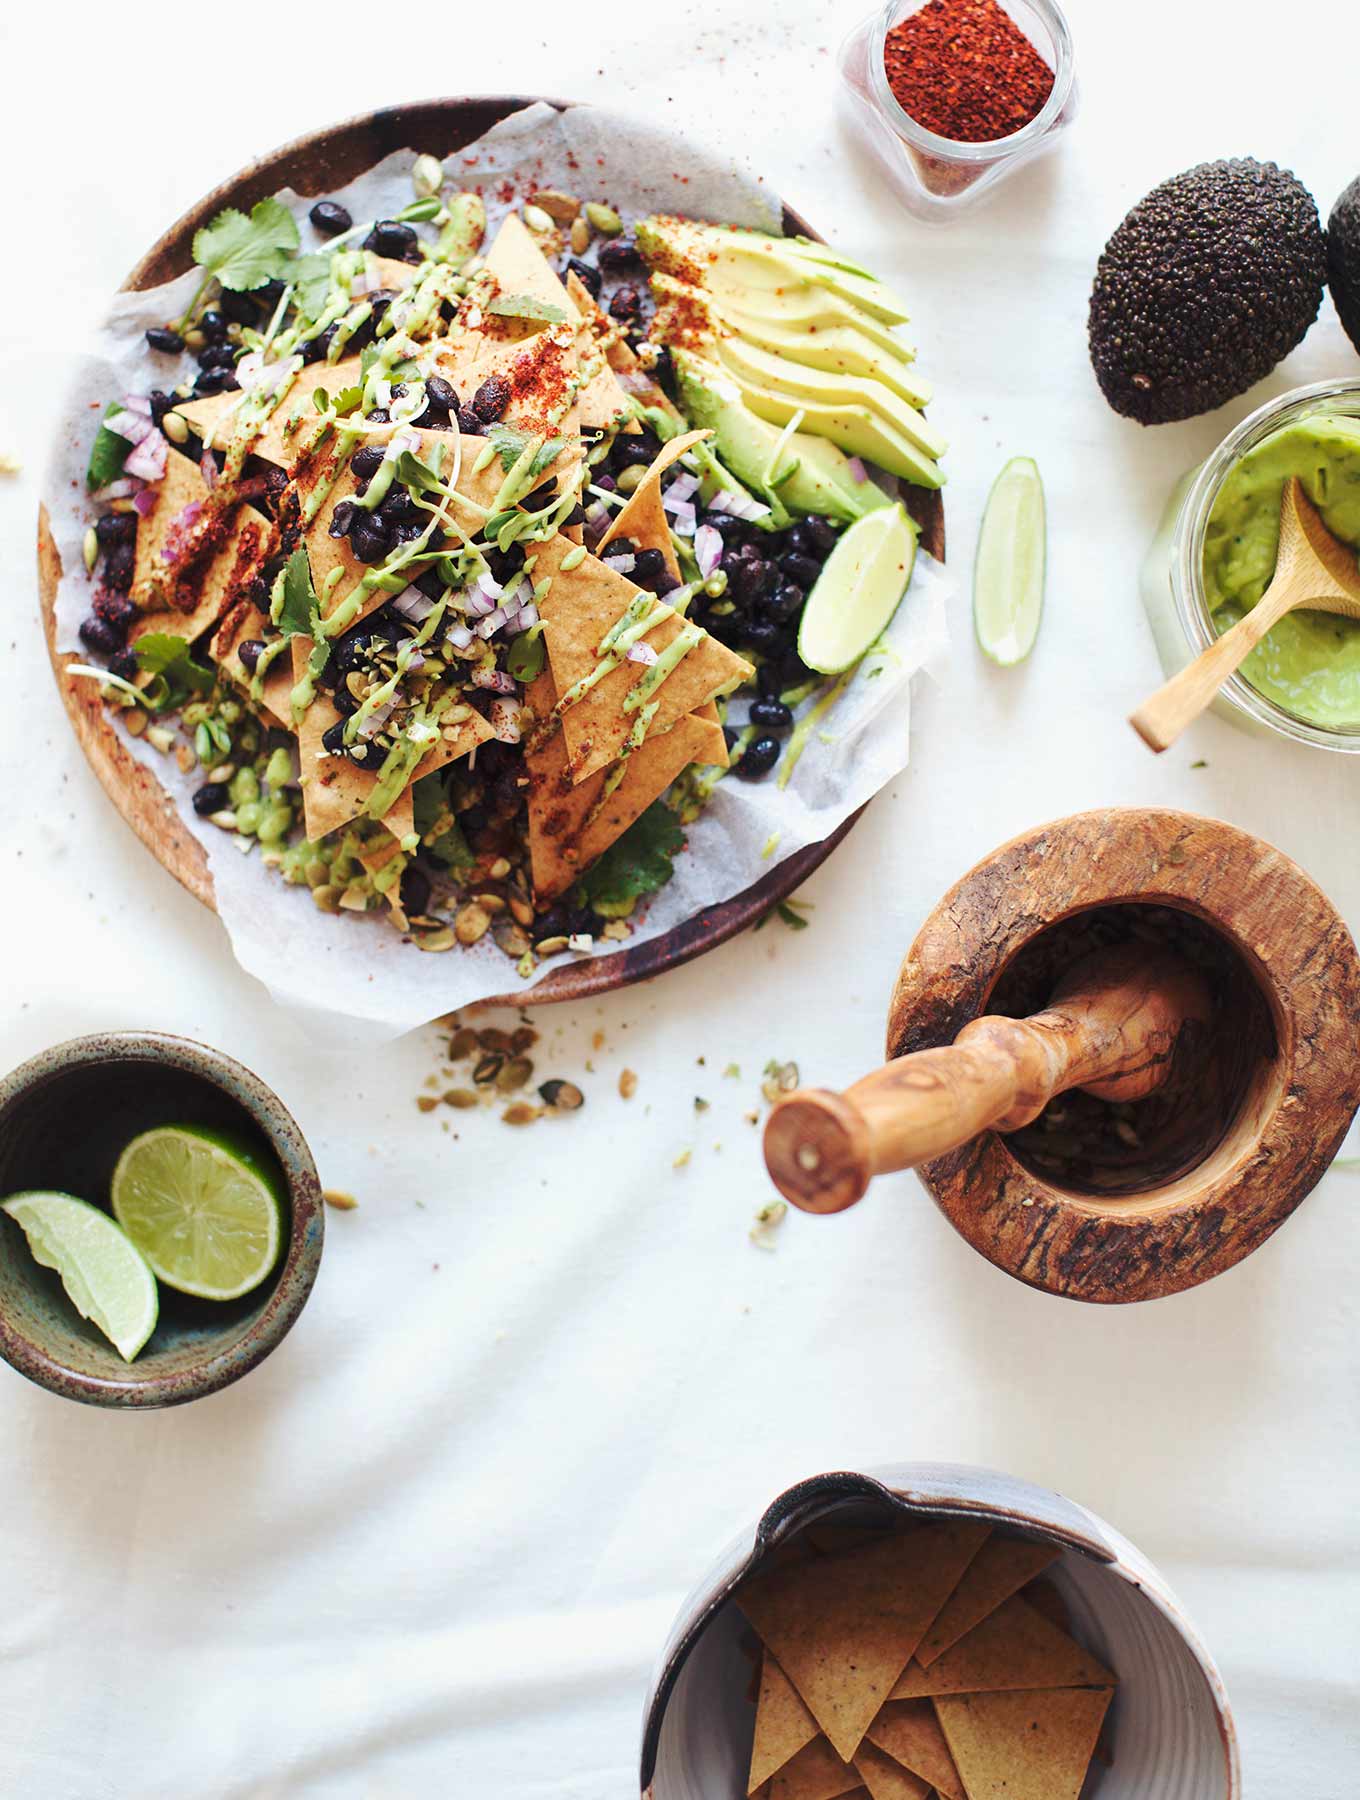
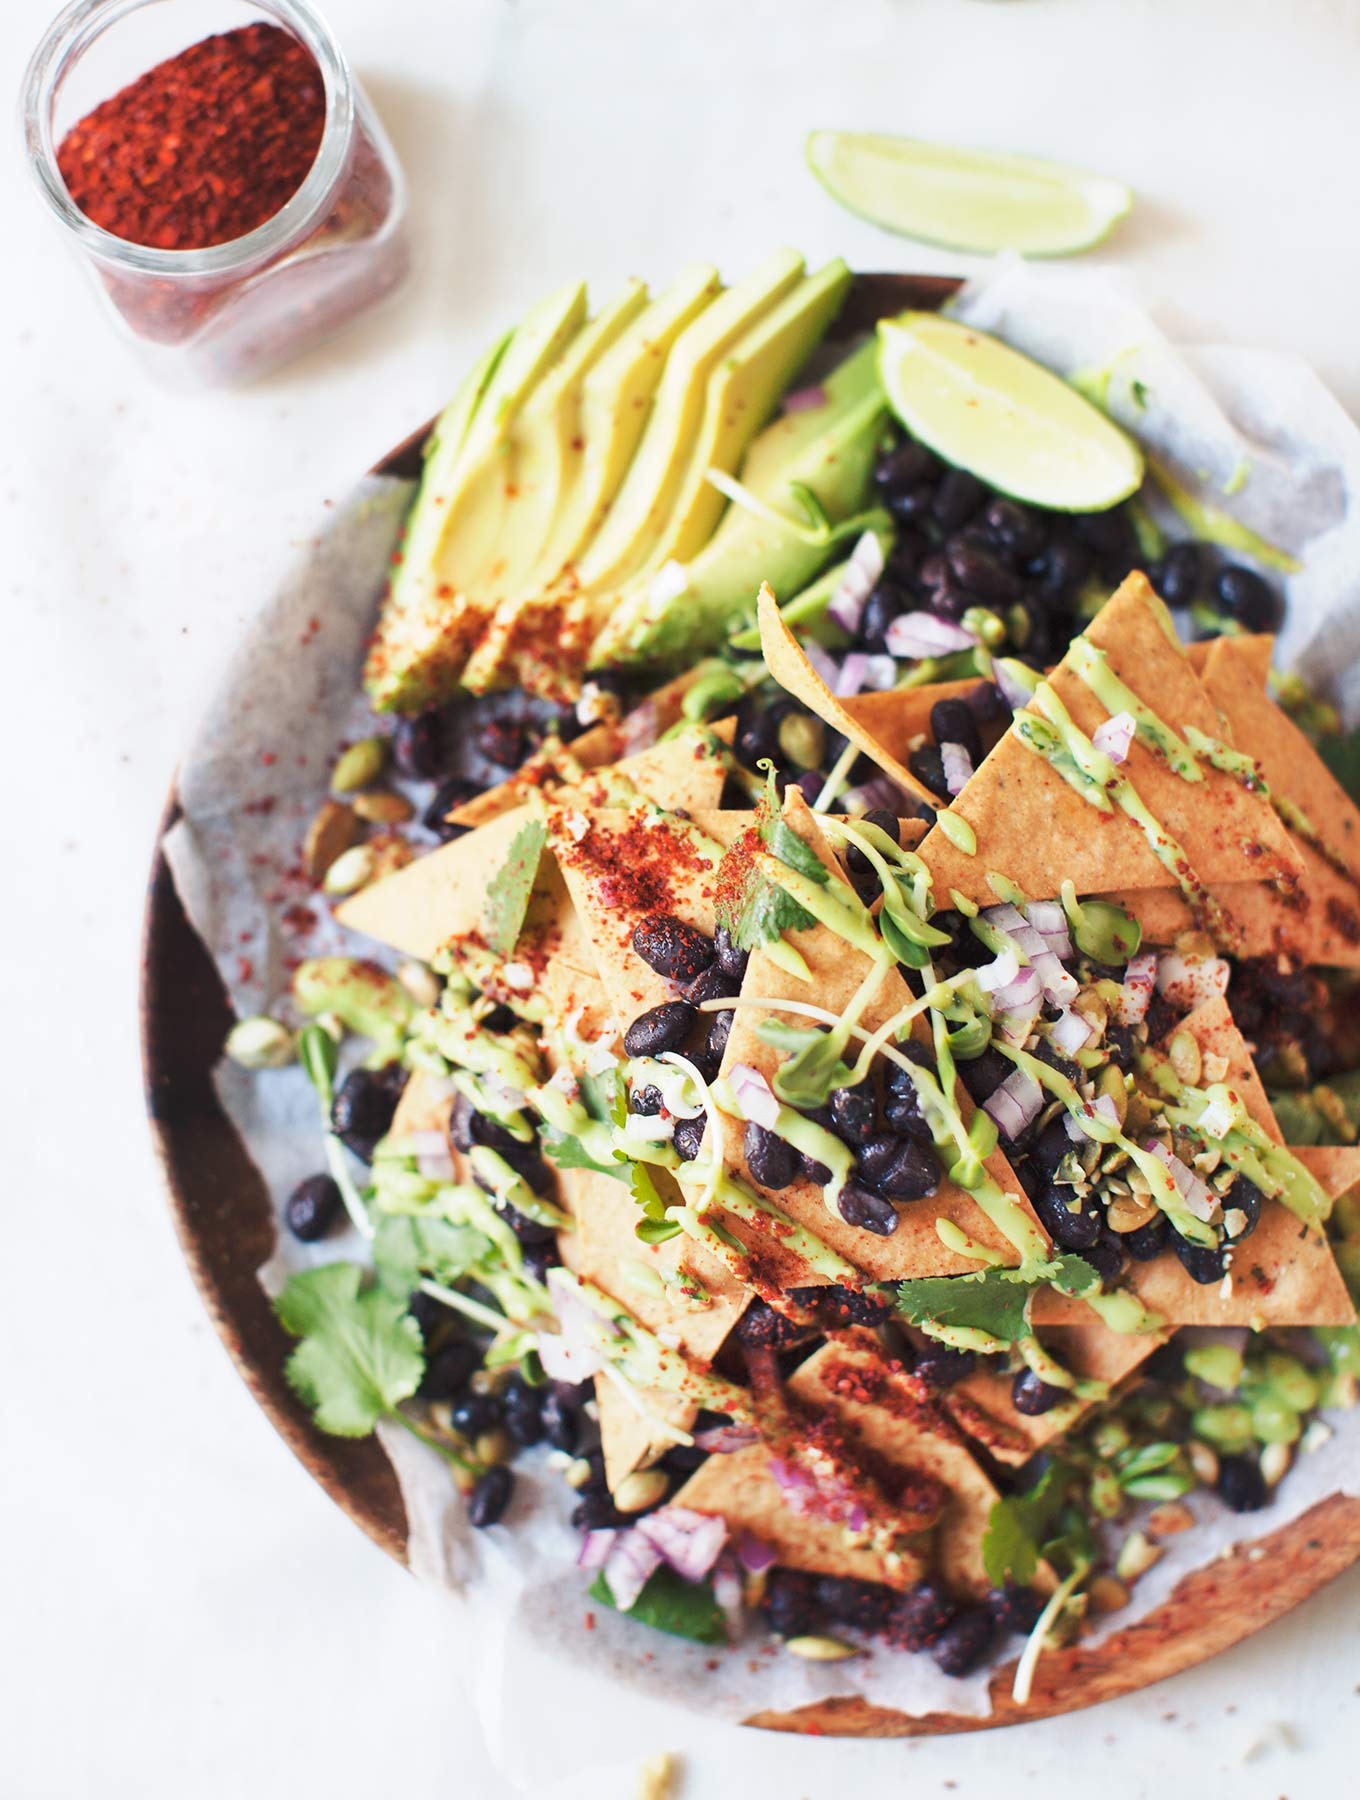
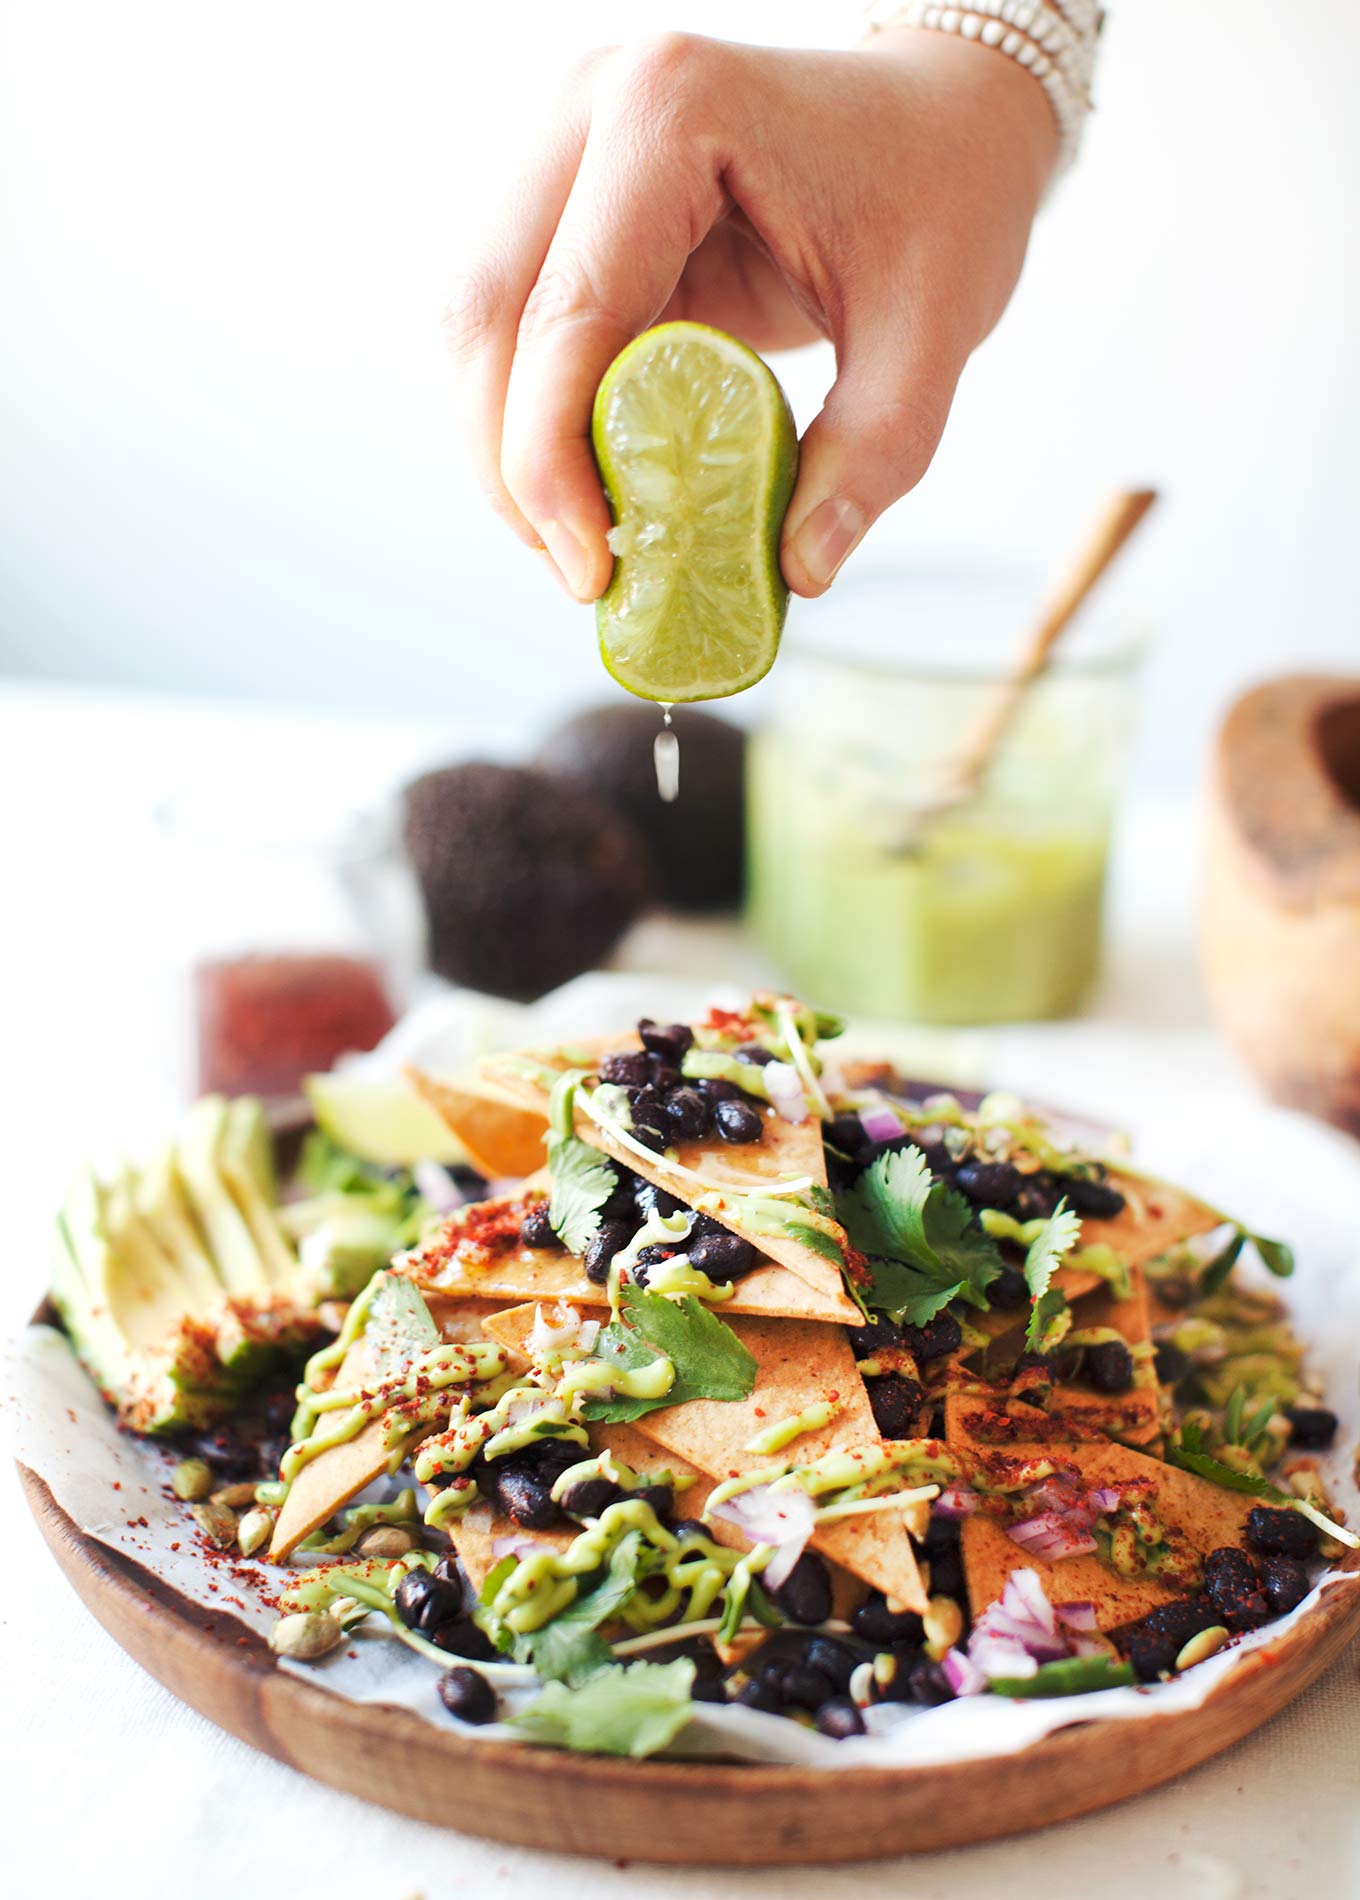
So yea, nachos. The chips kind of demanded it. And I had more legal fun making a mountain of food than you could ever imagine. Layer upon layer of black beans, lime, avocado, onion, toasted pumpkin seeds, chili…bah! And the cilantro avocado crema is soooo delicious – not essential – but a major flavour and texture bonus. You can dollop it throughout the nacho pyramid as you build, kind of like tasty spackle, or put the crema into a squeeze bottle for drizzle fun. Everyone loves drizzle fun. The plate comes together like you’re witnessing some sort of awesome miracle take place, and then you get to eat it.
And just for the record my potato chip-loving husband devoured these tortilla chips. He would like to add that he is not a convert, just appreciative.
Chickpea Tortilla Chips Makes about 50 chips
Ingredients: 2 cups / 250g chickpea flour 1 ½ tsp. fine sea salt 1 tsp. freshly cracked black pepper 1 tsp. baking powder ¼ cup / 60ml coconut oil, melted 4-6 Tbsp. warm water
Directions: 1. Sift the chickpea flour, salt, pepper and baking powder into a large mixing bowl. Add the coconut oil and mix with your hands until the dough is crumbly. Add ¼ cup / 60ml warm water and stir until the dough comes together. If the dough is not sticking together add more water, a teaspoon at a time, until it does. Do not overwork the dough.
2. Preheat oven to 350°F / 175°C.
3. Place the ball of dough onto a sheet of baking paper and flatten into a rough disc. Place another sheet of baking paper on top of the dough and using a rolling pin, roll out as thin as possible – I cannot emphasize this enough (if you don’t have large baking sheets, it may help to divide the dough in half and work in two batches). The thinner the dough, the lighter and crispier your chips will be. Remove the top layer of baking paper and score the dough into triangles. Slide the baking paper and dough onto a baking sheet and place in the oven. Bake for 10-13 minutes until the chips are golden around the edges.
4. Enjoy chips warm on a nacho plate, or once completely cool, transfer them to an airtight container where they will keep for up to two weeks.
Avocado Cilantro Crema Makes about 1½ cups
Ingredients: 1 small clove garlic 2 large, ripe avocados 2 Tbsp. freshly squeezed lime juice a couple pinches sea salt a pinch ground cayenne pepper, if desired 1 tsp. pure maple syrup water to thin, as needed 3 Tbsp. cilantro leaves, minced
Directions: 1. Place the clove of garlic in the food processor and pulse to mince.
2. Cut avocados in half, remove the pit and scoop the flesh into the food processor. Add the lime juice, salt, cayenne, maple syrup and blend on high until smooth. Add water to thin as needed, and blend. Next add the cilantro leaves and pulse just until combined. Season to taste, adding more salt or lime juice as desired. Store leftovers in an airtight glass container in the fridge for up to three days (however, fresh is best).
Nachos with Chickpea Tortilla Chips Serves 4
Ingredients: 1 batch Chickpea Tortilla Chips (about 50 chips) 1 batch Avocado Cilantro Crema 1 ½ cups / 225g black beans (about 1 can) 1 Tbsp. cold-pressed olive oil 1 lime, divided ½ ripe avocado ½ small red onion 2 Tbsp. pumpkin seeds sprouts of your choice handful cilantro crushed chili flakes for garnish
Directions: 1. Combine the black beans with the olive oil and the juice of half a lime. Stir and season to taste. Mince the red onion.
2. In a dry skillet over medium heat, toast pumpkin seeds stirring often, until they are fragrant, about 3-5 minutes. Remove form heat, let cool, and roughly chop or pound in a mortar and pestle (optional).
3. Place about one quarter of the chips on a plate. Top with the black beans, a few dollops of crema, a sprinkling of onion, pumpkin seeds, sprouts and cilantro. Repeat with another three layers of chips and toppings until you have used everything up. Garnish with half an avocado, sliced, a squeeze of half a lime and a sprinkling of crushed chili flakes. Devour immediately, rejoice!
I hope you guys dig this recipe as much as I do. These chips are going to be a new staple in my house! I can’t wait to really start playing with different flavours and add-ins – let me know if you do the same.
xo, Sarah B
Show me your chips on Instagram: #MNRchickpeatortillachips #MNRnachos
The post Chickpea Tortilla Nachos appeared first on My New Roots.
I recently read a text by Elisabeth Kirby about how our lives online sometimes can seem so perfectly edited. Luise and I have been talking a lot about that as well. In the world of blogs and instagram, it’s easy to believe that our photos are a perfect reflection of the lives we live. Please know that they are not. We are fortunate enough to work from home creating colourful vegetarian recipes that we also get to eat and take photos of. But if you zoom out from the photo there is often chaos outside the frame. Elsa and Isac building castles of sofa pillows while spilling smoothies on the white carpet, Thai take-away in front of a My Little Pony cartoon on the iPad, flour spilled all over the kitchen floor, failed recipe attempts and the inevitable fights that come from working closely together with the person you love. But also all those sweet moments of falling asleep together with the kids, cooking recipes for fun and not just for work and being silly with friends.
Our photos and recipes reflect moments of creativity that balance our otherwise quite crazy and chaotic life as parents to two children. We aim to inspire, mostly by showing how gorgeous and delicious plant based food can be – like the salad above! We will also keep reminding ourselves to share personal stories and photos but many times those parts of life are best just lived.
Okey, enough rambling, let’s move on to today’s recipe! We have created this salad in collaboration with Swedish/Italian family company Zeta (see our disclosure in the bottom of this post). They are launching a new range of organic whole grain mixes and asked for our help to develop a recipe for them. Since grains can be a little colourless, they asked for a delicious recipe that looked stunning (no pressure, right). Luise and I share a deep love for Italy and Italian flavours and we truly indulged in that while creating this salad.
The grains add a nourishing base for this salad and they are tossed in pesto for extra flavour. We add sunchokes that are roasted until buttery soft centers and mix with thinly sliced raw, crunchy chioggia beets (aka candy cane or polka beets) and radishes. Of course we threw in some mozzarella and pine nuts (because, Italy!) and added red grapes for sweetness. All in all, it’s a real beauty of a salad, it is very nourishing and tastes just as good as it looks.
The idea of mixing chioggia beets with radishes for a colourful kick is shamelessly inspired by some of the salads in Erin Irelands instagram feed (worth checking out btw!).
Mediterranean 5-grain Salad with Sunchokes, Beets & Mozzarella Serves 4–6
The recipe is also available in Swedish here.
1 bag (250 g / 1 1/2 cup) Zeta organic 5-grain mix (Farro, Barley, Kamut, Brown Rice and Oat Groats), or grains of choice 500 g / 1 lb sunchoke/jerusalem artichoke 2 chunks mozzarella di bufalo 4 polka beets (chioggia) or yellow beets, peeled 1 bunch radishes, rinsed 200 g / 7 oz red grapes, halved 1 handful pine nuts, lightly toasted 2 handfuls rucola/arugula 1 bunch fresh basil
Pesto dressing 5 tbsp green pesto 2 tbsp cold-pressed olive oil juice from 1/2 lemon
Preheat the oven to 200°C / 400°F. Rinse and brush the sunchokes (don’t bother peeling them) and cut them in 5-10 mm (1/4-inch) slices. Place the slices in a bowl, drizzle over olive oil and toss them until everything is covered in oil. Spread out the slices on a baking sheet covered with baking paper. Roast for 30-40 minutes or until soft with crispy edges. Meanwhile, cook the grains in a large sauce pan filled with salted water, following the cooking time on the package. Drain any excess water and scoop the grains back into the sauce pan. Stir together the pesto dressing and pour over the grains in the sauce pan. Make sure they are all covered and then pour the grains out onto a wide plate or salad bowl. Layer with sunchoke slices and torn mozzarella chunks. Use a mandolin (or sharp knife) to shave the polka beets and radishes very thinly and spread on top of the salad together with pine nuts, grapes, rucola/arugula and basil.
Disclosure: We wish to be as transparent as possible when it comes to sponsorships and collaborations. We have never had any ads on this site but in order to pay bills and continue doing this work that we love, we do on rare occasions accept collaborations with companies. We were compensated by Zeta for creating this recipe using some of their products. We would never work with products that we don’t believe in and their new range of whole grain-mixes felt like something that we would happily receive money to cook with, as they are all organic with short cooking times and all nutrients still intact. All words are our own and will always be. xx D&L
Of all the dinner/lunch pairings I’m sharing this month, this cauliflower wrap is my favorite. I’ve mentioned before how I love the combination of curry and cauliflower and this pizza is the best (in my book). I roast extra cauliflower for the pizza and save it to make a wrap/stuffed pita for lunch the next day. Add a little hummus (or even chickpeas) for protein and you’ve got yourself a meal. Read more and see the recipe.
The post Curried Cauliflower Wrap appeared first on Naturally Ella.