Find More Wine Products
Monthly Archives: July 2015
Juneau, Alaska

Alaska…stole my heart. Last month, Alex and I took an epic trip there as part of a family vacation; my sister and her fiancé flew in from Burma and my parents from Minnesota. We met in Juneau, my sister’s fiancé’s hometown, and spent time with his parents. Having locals as tour guides was fabulous, and is hands down my favorite way to explore a place. The houses we rented were both true gems, and the scenery — well, you’ll just have to take a look. Hiking, fishing, bird-watching, drinking coffee, spotting whales, flying over towering mountain peaks, meandering in quiet rain forests — we couldn’t have asked for more. I’ll narrate a bit, but will leave the photographs to do most of the talking. (In a separate post, I’ll cover Skagway and Glacier Bay.) Hold onto your hats.

Our first house in Juneau


Day 1 – we embark on a fishing trip with gear from our rental house and my sister’s fiancé Evan as our guide. My #1 bucket list item is to “catch a fish and eat it”, and I’m ready for this trip to fulfill my dream. (I’m a city girl through and through, so this is a big deal.)


Mainly I caught leaves and seaweed, and tangled the line. But it was beautiful.


Juneau is in a temperate rain forest, and many of the trees are covered in moss.

View from the porch of our house, on to Mendenhall Glacier


We’re at it again, this time me and my dad. No dice. But we had precious father-daughter time, which has been few and far between after I moved away from home.


Glad our rental house had rubber boots! They are all the rage in Juneau, men and women alike.

A hike through the rain forest near Mendenhall Glacier…


Spontaneous selfie! It’s not often we’re all on the same continent.


My sis and me…

Another gorgeous hike outside of Juneau…


The food was fabulous! Our favorites were The Rookery and Salt (below). Below is truffle fries, quinoa and beet salad, ensalada caprese, halibut ceviche, and a house salad with crispy chickpeas.


We toured Alaskan Brewing Company with a family friend, which was a treat! Their Smoked Porter is pretty brilliant.


After trips to Skagway and Glacier Bay (which we’ll share soon), we settled into a second house in Juneau.


We celebrated July 4 on the water…


Back to our little red house with a view…


My favorite part of the mornings: a slow cup of coffee with our Aeropress.


Our last day in Juneau was one of the most beautiful I’d seen. Another gorgeous hike, a short drive outside of Juneau…


And, my last chance at fishing. This time my sister’s fiancé and his dad showed me the ropes.


They each got a salmon. I was starting to feel discouraged…


Until…


It was just a little guy, but it still counts, right? (I’ll have bigger fish to fry on the next trip.)


The view from our deck on the last day was stunning.

I can’t wait to return to this magical part of the country. Thanks to my parents for arranging everything, to my sister for coming home, and for her fiancé’s parents for being the best tour guides we could imagine. Let us know if you have any questions about Juneau! We can provide links to the houses we rented if that is helpful.
Other Travel Posts
Arches National Park + Monument Valley, Utah
Flagstaff, Arizona
Traverse City, Michigan
Santorini, Greece
Amalfi Coast: Positano, Capri, & Ravello, Italy
Rome and Naples, Italy
Cambodia and Laos
Coconut-Cardamom Vegan Overnight Oat Parfait with Blueberry Chia Seed Jam

Food photography has been sparse in my house these days (Now, if we’re talking baby photography on iPhones, well let’s just say I’m killing it.) Lately, I only have 15-20 minutes for food photoshoots, so I’ve learned to be super quick when it comes to snapping pictures. I used to be militant about using my tripod, but I haven’t pulled it out in months. I used to give photoshoots a bit of planning before diving in, but that rarely happens anymore. It’s taken me a while to realize that my expectations of how things should be done aren’t always practical for the stage of my life that I’m in. This applies to life in general too. I’m going to do what I can and try to be a bit easier on myself. Perfectionism kills creativity. It’s also the killer of fun! If I only have 10 minutes to snap some photos, so be it. I’d rather share a little bit than nothing at all.
I started off this photoshoot using this darker background – it’s a scratched up piece of metal signage I found at an antique market last year (the front of the sign says “DO NOT ENTER”). I thought it was going to work perfectly, but I actually found it to be too moody for this recipe. It just looks too dark for the light, summery mood I was going for.


So I switched to my trusty slab of white quartz instead. It’s the surface I’ve used the most in the past year. It’s heavy as heck and I actually managed to dent the hardwood with it one day (*headsmack*). Anyway, I like this clean and fresh feel much better even though the lighting wasn’t the best because I shot at noon when the sun is overhead. The inspiration for the photo came from Ashley. She did a cool multi-jar shot with homemade milk for my cookbook. Too much fun!

In Lightroom, I made minor edits to the photo: increased clarity, exposure, whites, saturation, and removed blue and adjusted temperature. It took me about 30 seconds. There are things about the lighting I’m not super happy with and I probably blew it out too much, but oh well. Gotta pick your battles!
This is the same photo before editing…50 shades of grey!

So that’s where my head is at with photography lately. I’d love to spend more time on it again, but right now I’m rolling with doing it under a time crunch. I’m beyond excited that Ashley is shooting the photography for my next cookbook. I honestly can’t imagine doing over 100 photos again with a baby crawling at my feet (and stealing the food). You guys are going to be blown away by the photos in the next book. We’ll have to show you some sneak peeks!
Now, finally onto the food. This is my newest overnight oat parfait creation. Six to seven years later, I’m still making vegan overnight oats on the regular. I’ll often make a large batch that lasts 2-3 days in the fridge. Or sometimes I eat it all in one day because I just can’t help myself. It’s so easy, perfect for the summer, and endlessly customizable. Make it parfait-style in portable jars and you’ll have snacks for days. Toss it in your bag and run out the door. Bring one for your friend and he/she will love you even more.
If you haven’t tried overnight oats layered with chia seed jam, you really must. It’s divine. This would be great with granola on top too.


PS – Thank you for your enthusiasm regarding my 2-Day Meal Plan! I’m so thrilled by your response and hope to do another in the future.
© copyright 2015 Oh She Glows. All Rights Reserved.
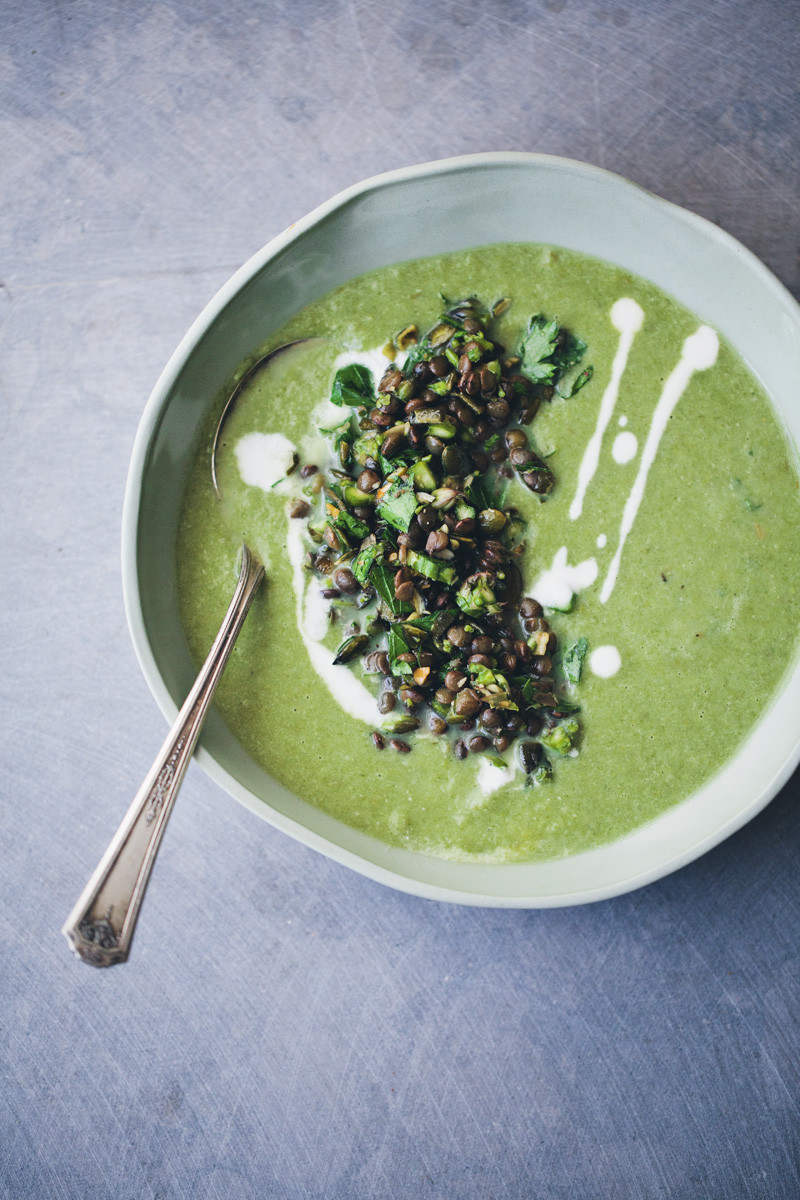
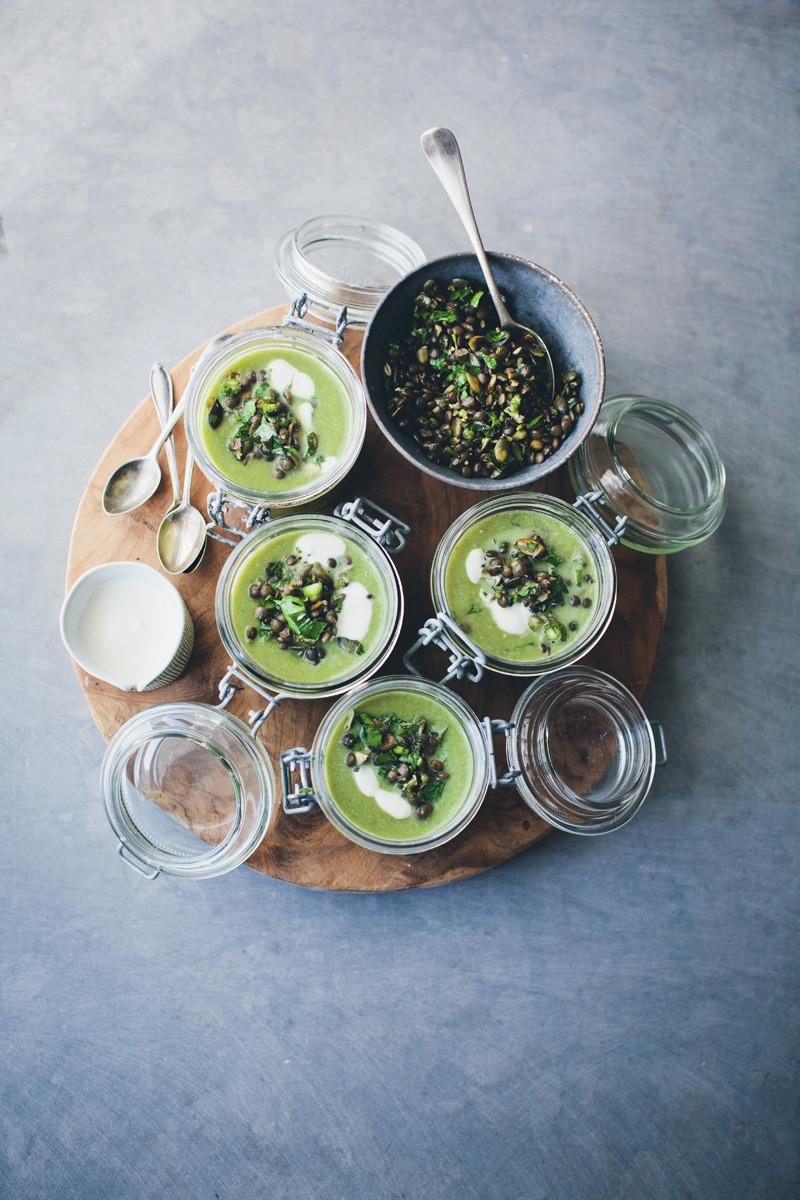
Asparagus, Fennel & Spinach Soup + Topping!
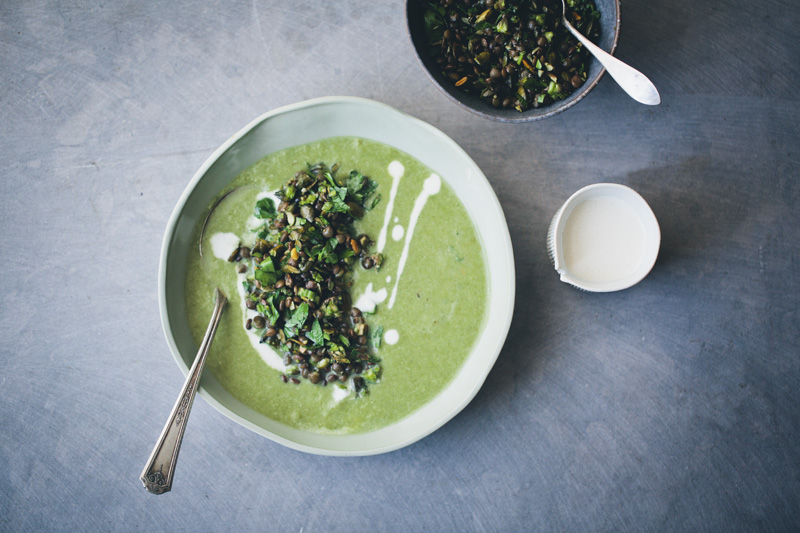
In our house, soup is rarely served without some kind of topping. It’s almost like a yin and yang thing, we start talking about soup and the conversation automatically moves on to topping suggestions. I guess it’s a pretty natural thing since we eat a lot of soup and prefer it to be a more complete meal, instead of just a starter. The toppings does not only add a different texture and flavor to the soup, but also some more stomach filling proteins. To be honest, I think we spend more time working on the toppings then on the actual soup on most occasions. It’s the same principle as we have with oatmeal toppings. They are just essential.
Here are a few of our favorite soup + topping combinations from earlier blog posts: Sweet potato and red lentil soup with aubergine and kale topping, Carrot and tomato soup with corn ceviche topping, Spinach and kale soup with tahini dressed chickpea topping.
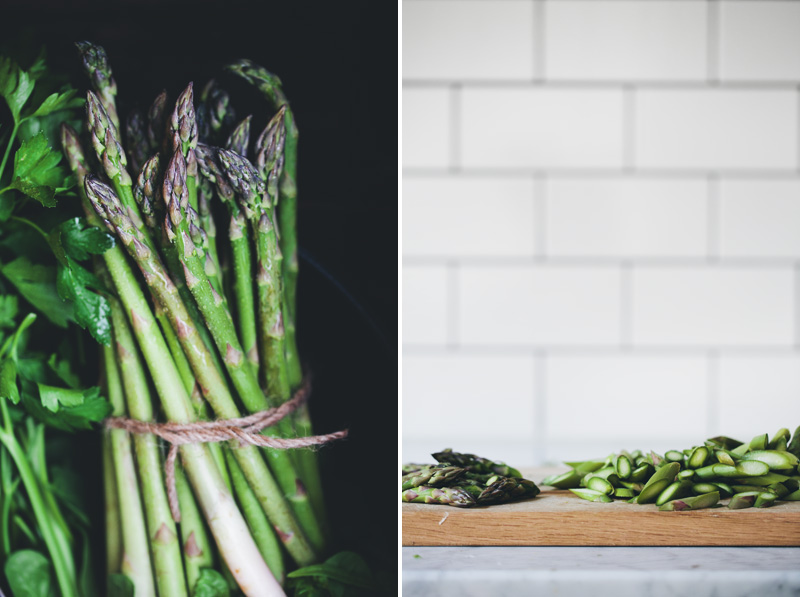
We found a huge bunch over-priced asparagus in the market the other day and for some reason decided that it was a good idea to spend our last money this month on asparagus instead of a new set of clothes for Isac. So we walked home and made soup. We went for a smooth and quite mildly flavored soup and allowed the toppings to have more punch in flavor and texture. We only chose green-ish ingredients for the topping. Yup, there we go again, choosing ingredients by color. But it actually turned out fantastic. It’s got a lot of crunch from the pumpkin seeds, flavor from parsley and the asparagus tips, richness from the lentils and sting from the chili. I ate the leftovers without the soup straight from the fridge. I’ve spent most of this post talking about the topping, but the soup is pretty good too. Quick, simple, delicious and with a clear taste of spring. If you don’t have any fennel at home, you could add a few potatoes instead, or other spring vegetables of choice.
We also made a quick cashew cream to go with the soup. We often just add a few dollops yogurt into our soup but cashew cream is a nice and rich vegan alternative. If you just remember to pre-soak the cashew nuts, the cream is done in no-time. As a side note, I just tried adding some cashew cream on top of my latest smoothie and it wasn’t bad at all.
So, go make your vegetable market guy happy and buy a bunch of asparagus. Make soup, whip up a cashew cream. And for goodness sake, don’t forget about the topping!


Asparagus, Fennel & Spinach Soup (Vegan)
Makes 4 smaller servings or 2 very large
We keep a jar of toasted pumpkin seeds in our kitchen and almost always have some cooked lentils ready in our fridge. It’s a good tip as it makes it a lot easier to create small quick meals like this.
1 pound / 450 g green asparagus
2 tbsp coconut oil or butter
6 thin spring onions or 1 yellow onion
2 cloves garlic
1 small fennel bulb (or 1/2 large)
1 large handful spinach
2 cups water or vegetable stock
1 tbsp apple cider vinegar or lemon
salt & black pepper
Lentil & Pepita Topping
The reserved raw tips from the asparagus
1 cup cooked puy lentils (1/2 cup uncooked, boiled in water for 18 minutes)
1/2 cup dry-toasted and salted pumpkin seeds / pepitas
1 large bunch flat leaf parsley
1/2 green chili, finely chopped (optional)
1 tbsp olive oil
Cashew Cream
1/2 cup cashew nuts
1/2 cup filtered water
2 tsp lemon juice
1/2 tsp sea salt
Trim the tough end off the asparagus. Cut in diagonal pieces, 1/2 inch / 1 cm thick. Save the asparagus tips for the topping. Heat oil in a large saucepan. Finely chop onion, garlic and fennel and add to the the pan and sauté for about 5 minutes or until soft. Add the asparagus, stir around and let fry on low/medium heat for a minute, then add spinach, water/stock, apple cider vinegar and season with salt and pepper. Bring to a boil and let simmer for 10-15 minutes. Meanwhile prepare the topping. Carefully pour the soup into a blender or use a hand blender to mix until smooth. Taste the soup, add more water or salt and pepper if needed.
Preparing the topping: Finely chop the asparagus tips and the parsley and place in a bowl together with the boiled lentils and the toasted pumpkin seeds. Add chili if your prefer it a little spicy. Pour over some olive oil and stir around until it’s all mixed well.
Preparing the cashew cream: Cover the cashew nuts in water and let soak for at least 3 hours or overnight. Drain, rinse and place them in a blender. Add the filtered water, lemon juice and salt and mix until completely smooth. Taste and add more salt or lemon if needed. Or water if you prefer it runnier.
Serve the soup with a generous portion of lentil topping on top and a few drizzles of cashew cream or yogurt. Enjoy!
PS. If you want some more inspiration on what to do with asparagus, check out this Spring Buckwheat Salad from last year and this Grilled Asparagus with Quinoa from two years ago.
T-fal A857S3 Specialty Nonstick 8-Inch 9.5-Inch 11-Inch Fry Pan Cookware Set, 3-Piece, Gray Review
Gourmet Chia Seed Pudding (from scratch!)

Your comments on my Kitchen Quirks story were quite hilarious. They also led to even more funny stories here at home and among our friends and family.
I got a text from a friend shortly after posting.
“I’m reading your kitchen quirks post aloud to my husband (because he is absolutely nuts about the dishwasher just like Eric is). I finish reading it to him and he goes, “Ugh, I wonder what some of Eric’s tricks are? Did he write specifics?”
There are many inquiring minds as to what Eric’s dishwashing tricks are, it seems. Eric is in the process of penning an e-guide for dishwasher enthusiasts. Ok not really, but I told him he can’t keep his secrets all to himself for ever! Plus, I need others to know what I’m going through.
When we were talking about the blog post, Eric decided to mention another one of my kitchen quirks. You know, aside from general “chaos”. Apparently, I have this annoying little habit of leaving kitchen cupboards/cabinets and drawers open while I’m baking or cooking. I’ve been doing it for years. Basically, since I started cooking.
In my eyes, leaving the drawers and cupboards open is efficient. I do it because I know I’ll probably go back to that cupboard later on in the cooking process so I see no need to close it every single time. See it’s not lazy; it’s practical! I’m all about efficiency.
One morning about 4 years ago when we were living in our previous house, I headed downstairs to the kitchen for breakfast. Eric was still upstairs getting ready for work. As I approached the kitchen I immediately noticed something was wrong…very wrong.

Every single cupboard and drawer in the entire kitchen was wide open. Just picture your own kitchen with every cupboard door open and every drawer open. It’s freaky stuff, right?
I stopped dead in my tracks at the edge of the kitchen.
“OH… MY… GOD…”
I was absolutely horrified. Of course, I immediately assumed there was some kind of weird Poltergeist shit going on. Or some evil force taking over my kitchen. Or both.
I turned on my heels and BOOKED it upstairs. There’s no way I was going to wait around for the drawers to start spontaneously slamming or something!!
Eric started laughing uncontrollably. He then confessed that he opened every cupboard and drawer before bed to play a trick on me. What kind of sick person does that?
So it’s been 4 years since his prank and I’m long overdue for retaliation. I’m thinking it’s going to have something to do with his beloved dishwasher. I’m open to your suggestions, as always.


© copyright 2015 Oh She Glows. All Rights Reserved.
Golden Sauerkraut – Wild Fermentation

Before we start this post, we want to introduce a new little feature here on the blog. We call it Homemade Whole Food Staples. Unknowingly, we actually already started it a few weeks ago, with our post about homemade nut butter. Some of you got in touch and told us that this was the first time you’ve made nut butter at home, so we realised that this could be a good opportunity for us (and you) to learn more about classic methods, recipes and pantry staples that are popular in whole food kitchens. There is nothing wrong with cutting a few corners and buying jars and cans of staples from the store, but if you want to save some money, learn what really is in those jars and get a better hum about the kitchen basics, you might find this new feature interesting. Our hope is that we can show how recipes that many find too intimidating to try at home, really isn’t complicated at all.
We are discussing sharing how to make your own vegetable stock, the ultimate pomodoro passata, mastering a sourdough and how to make homemade coconut yogurt. But we are also really interested to hear what you want us to try/share. Leave us a comment and let us know if there is something specific that you are curious to learn more about.

Today we are talking fermented vegetables. It’s one of the healthiest thing you can eat but the whole idea of food that needs 3 weeks before its ready, scares most people from even trying to prepare it. Right? But please folks, stay with us on this one. Not only are fermented/cultured vegetables on most top-lists of trendy food 2015, but a large spoonful of homemade Sauerkraut is also TRULY delicious on top of a salad or inside a sandwich. Furthermore, the natural occurring probiotics in fermented food are great for your stomach and body. The whole 3-weeks-to-prepare-issue is more like 20 minutes of active work and then 3 weeks of waiting. Best of all, we are going to show you the most natural way of doing it, without any starters at all. It’s called wild fermentation, only 2 ingredients are needed and the method has been around for hundreds of years. But you can also add a bunch of different flavourings to it, like caraway seeds, ginger, garlic, beetroot, chilli, fennel or turmeric. Does this project still sound impossible?

Here in Scandinavia, we have quite the tradition of pickling, preserving and fermenting. But weirdly enough, Luise’s and my interest for fermented vegetables actually sparked during our recent trip to Australia. Almost all the cafes we frequented had at least one salad or bowl that was topped with fermented vegetables or sauerkraut. And the health food stores there have whole isles with different brands of organic raw fermented/cultured vegetables. It didn’t take long until we were hooked. The flavours were just so fresh and the acidity added a real kick to whatever we paired it with. And in a strike of unbelievable luck, we met Vivianne on our potluck picnic in Sydney, she is one of the founders of Raw Sisterhood, a Bondi based company that makes incredibly tasty fermented vegetables, raw crackers and raw granola. She promised to teach us some of their secrets and now we get to share one of their recipes here. We made the first batch together in her house and we have continued making it now when we are home. They call this version Golden Goodness and it’s basically wild fermented cabbage and carrots flavoured with turmeric and garlic
Before we get on to the recipe, we wanted to let Brenda and Viv from Raw Sisterhood explain the magic behind Wild Fermentation and healthy bacterias:
Why wild fermentation: Wild fermentation is a natural process in which we provide the perfect environment for nature to do its thing, so no starter is needed. All fresh fruits and vegetables contain enzymes and bacteria (lacto bacilli) which allows them to break down (ripen). As fruits and veggies ripen they go through an enzymatic process, essentially they digest themselves. When foods go off or rot, they have been exposed to oxygen. In a wild ferment, we allow the vegetables to digest themselves, in an oxygen free environment. The lacto bacilli in the vegetables, eats the naturally occurring sugars and then produces lactic acid and more lacto bacilli….and the cycle continues.
Why eat healthy bacteria: Lactic acids can kill many strains of parasite and many other pathogens in the body purifying the intestines. Fermented veggies increase the healthy flora in the intestinal tract by creating the type of environment for them to flourish in. Increases nutrient values in the vegetables especially vitamin C. The high fiber content in cultured vegetables help to clean the digestive system, removing undigested food and unwanted toxins. Fermented foods also facilitate the break down and assimilation of proteins.
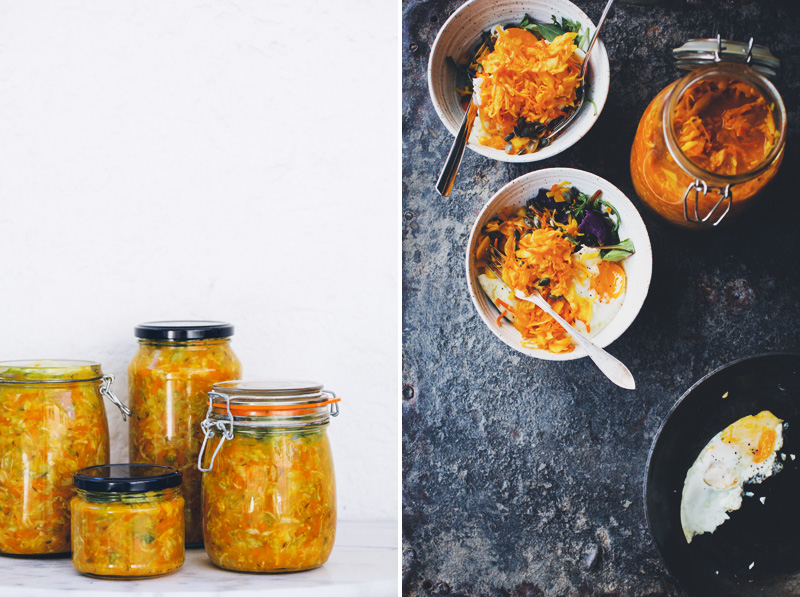
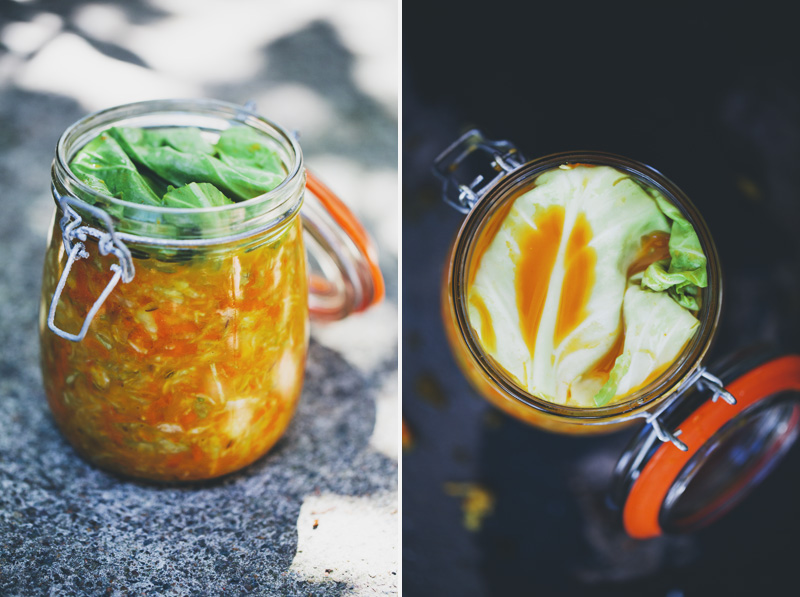
Golden Sauerkraut – Wild Fermented Cabbage, Carrot & Turmeric
Makes about 2 huge jars.
You can easily half this recipe if you prefer. Be sure to sterilise your jars before your start.
2 green cabbages (3 kg) Save some of the outer layers of the cabbage for packaging on the top
800 g / 7 cups carrots (6 medium size carrots) or beetroot
15 g / 1,5 tbsp grated ginger
15 g / 1,5 tbsp minced garlic
15 g / 1 tbsp fresh grated turmeric (optional)
30 g / 3 tbsp ground turmeric
5 g / 1 tbsp caraway seeds
5 g / 1 tbsp fennel seeds
2 tbsp / 30 g himalayan sea salt (optional, you can do it without salt, but it speeds up the process)
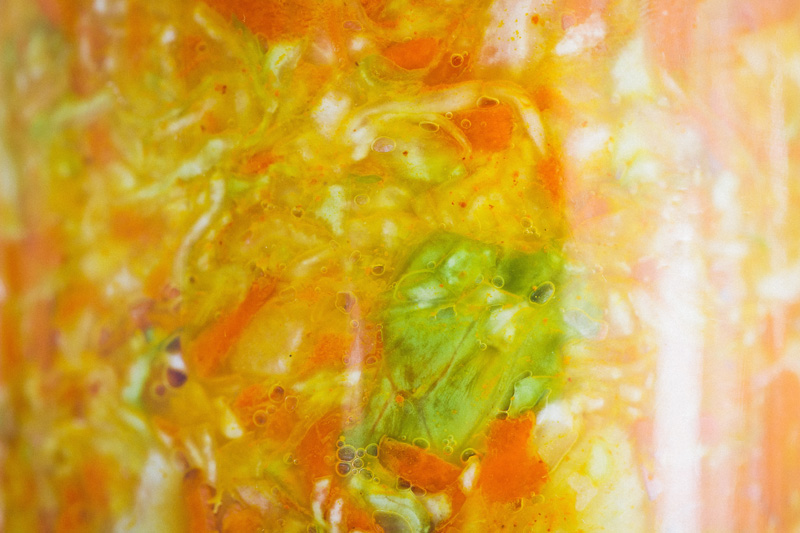
Wash the cabbage and scrub the carrots, then finely slice the cabbage and grate the carrots. Or use a food processor with a fine slicer attachment for the cabbage and rough grating attachment for the carrots. Place all ingredients in large mixing bowl. Use your hands (you might want to wear rubber gloves to prevent your hands to get stained by the turmeric) to mix and massage until it starts to get soft and juicy. The vegetables should release quite a lot of juice, if not, just add some more salt. Use a spoon or a tong to spoon the mixture into 2 large clean jars. Pack it really tight to leave out all air, keep packing until the jar is full of veggies and the veggies are covered in juice (important). Leave some space at the top to place a whole folded cabbage leave on top, this is to prevent any oxidation. Close with an air-tight lid. During the fermentation process the veggies will expand and the liquid will try to come out, we put our jars in a bowl or a plastic bag for any juice that might drip from the sides. Leave the jars to ferment in room temperature for 2-4 weeks (depending on room temperature), 3 weeks is usually perfect. When ready, it should be softly textured but not mushy and have a fresh, spicy and acidic flavour. Discard the cabbage leave at the top and store the jars in the fridge. We usually divide the fermented vegetables in smaller jars and hand out to friends and family or keep it in the fridge.
Tip:
• If your veggies are stinky and leaky, then place the jars in a bowl and place everything in a plastic bag and close it. Then place in a cupboard and drain the water after about 3 days.
• If the top is discolored or has a bit mould, don’t be alarmed just remove it and wipe around or just change the jars.
• Use organic vegetables for fermenting and don’t wash or scrub to much, it can destroy the natural enzymes on the vegetables.
Zojirushi BB-PAC20 Home Bakery Virtuoso Breadmaker with Gluten Free Menu setting Review
Related Bread Machine Products
My Cookbook + a Bonus Pack of Recipes

Dear friends!
It’s hard to believe that in just a few short weeks my cookbook, My New Roots: Inspired Plant Based Recipes for Every Season will be landing in stores, your homes and hands. Bah! Pretty exciting stuff. I know the wait has been long, but we’re nearly there. Your support and unabashed enthusiasm for this project has filled me up and fueled me these past months while I waited with knots in my stomach just to see it, and I can say with great relief and pride that I am thrilled with how it’s turned out. Now I have my fingers crossed (and toes and arms and legs and eyes) that you feel the same way.
Here is a trailer for the book – and clips from the year that I made it.
So to tell you a little more without giving too much away…
The book opens with the techniques and processes I use in my kitchen every day, which form the foundation of all plant-based cooking: how to cook beans and grains and how to make nut and seed butters are just a few examples. With detailed yet easy to follow, step-by-step instructions, you’ll master these simple methods in no time and be well-equipped to cook the recipes from the book as well as have the confidence to be creative on your own.
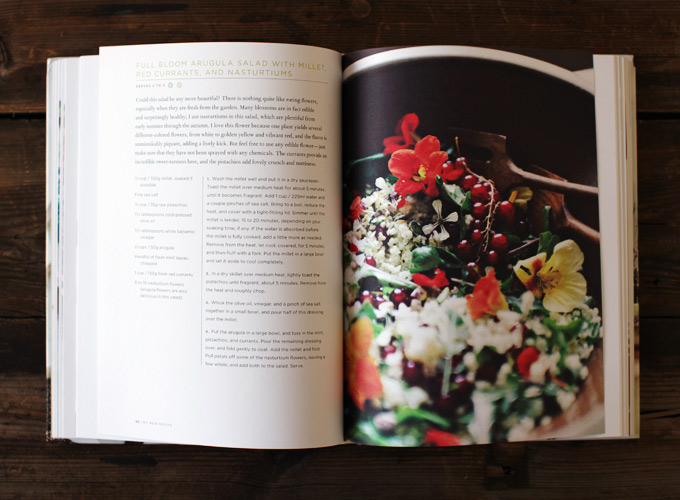
The recipes follow, with 100 all-new, never-before-seen recipes with a couple of your favourites from the blog, just because I thought you’d appreciate them in print. Some of my favourite recipes are Savoury Spring Hand Pies, Raw Cashew Yogurt with Maple and Blackberry, Grain-Free Hemp Tabbouleh, Sparkling Mint Melonade, Apricot Rhubarb Clafoutis, Sunflower Sesame Seed Brittle, Trippy Tie-Dye Soup, Vanilla Rose Apple Cider, Chunky Banana Bread Granola, and Raw Mint Chip Ice Cream Sandwiches. All of the recipes are vegetarian, most of them vegan, and many of them gluten-free. I have some stellar raw recipes that go beyond just salad, hearty breakfasts, meals to take to school, the office, and road trips. Beautiful drinks to quench your thirst, soups and dips and sandwiches. Simple family fare, and meals to impress your best guests.
The book is laid out in seasons, five in fact, which you will learn more about once you read it. I wrote the recipes and photographed in “real time”, as the weeks rolled through the year, inspired by what was around me, growing in the garden, available at the market, and the dishes reflect this. When I look through the pages, the photographs pull me back to the places I was, the slant of daylight, temperature of the air, who I was with in the kitchen. It is, very much like the blog, a diary of sorts: a collection of more than just food, but moods and memories.
As we are counting down to the book’s launch, I’ve put together a bonus pack of six exclusive recipes not in the cookbook (plus two that are, for fun) for all of you who want to preorder to the book, and also for those that already have. It’s easy: pre-order the book from your retailer of choice, here, and then go to this page, insert your purchase order (PO number), personal information and you can download the Bonus Pack PDF immediately. No matter where you live in the world or where you are buying / have bought the book, you can get the bonus pack!
This book represents so many things for me. After eight and half years (!!!) of blogging, it seems like the natural next step to become three-dimensional, to enter the world as a published author. I am very proud of my journey, and this book is a culmination of that. I truly never imagined that I would be sitting here, cradling this collection of recipes from my heart, holding it out for you to take. But it feels right. And now is the time. Thank you for making this possible and for taking this journey with me.
Now let’s go cook.
In love and gratitude,
Sarah B.
#MNRcookbook
PREORDER and BONUS PACK QUESTIONS ANSWERED
1. You can download the bonus pack from anywhere in the world that you ordered the book from. Here is the link: http://app.snapapp.com/MyNewRoots
2. You can download the bonus pack anytime. That means if you ordered the book five weeks ago, or five minutes ago. There is no time limit, the offer will not expire until the book is officially released on March 31st. Here is the link: http://app.snapapp.com/MyNewRoots
3. If you live in Australia or New Zealand you can order the book from here:
https://www.dymocks.com.au/
http://www.bookworld.com.au/
http://www.booktopia.com.au/
http://www.readings.com.au/
4. If you are in any other country not listed, check your country’s online book vendors and you will also be able to download the bonus pack.
5. The bonus pack is a PDF (a digital file). It is NOT an extra book that will be sent to you in the mail. If you want a hard copy of the recipes, simply download the bonus pack and print the document.
Salted Almond Butter Freezer Fudge + Everyday Detox Cookbook


My friend and fellow blogger, Megan Gilmore, from the popular blog Detoxinista just launched her first cookbook this week, Everyday Detox: 100 Easy Recipes to Remove Toxins, Promote Gut Health, and Lose Weight Naturally. I was lucky to be able to review this cookbook before it went to print and I’ve been eagerly anticipating the hard copy on my doorstep. Just like on her blog, the recipes in her debut cookbook are unfussy, whole foods based, and feature short ingredient lists. I’ve been a fan of Megan’s for years and I’ve always admired her ability to take a handful of simple, whole foods ingredients and turn them into something practical for everyday life. While Megan doesn’t ascribe to any particular dietary label, she creates many vegan, paleo, vegetarian, and gluten-free recipes. About 75% of the recipes in Everyday Detox are vegan or can be made vegan by swapping out the sweetener or leaving out the cheese. All of the recipes are gluten-free. There are around 50 gorgeous photos shot by Nicole Franzen.
The book’s chapters include: 1) An easy approach to detoxing; 2) stocking your detox-friendly kitchen; 3) liquid nourishment; 4) morning favorites; 5) salads, dressings & sides; 6) soups, sandwiches & wraps; 7) casseroles & comfort foods; 8) sweet treats; and 9) back to basics.
Detox-based cookbooks tend to make me think of hard-core fad diets and cleanses, but thankfully Megan’s approach is much less drastic. She encourages you to practice daily healthy habits and believes in eating whole foods (ie., unprocessed, refined-sugar free, chemical additive free) on a day to day basis – making a lifestyle change – rather than teetering on the extremes and cyclic nature of dieting. Megan doesn’t believe in calorie counting because she says it “doesn’t take into account the quality of foods we’re consuming nor the body’s ability to digest natural foods versus processed ones.” Instead of looking at the calorie count on a label, she says to ask yourself a few questions: Where does the food come from? Is it in its natural state? How many ingredients does it contain and do you recognize those ingredients? Better yet, she says, select foods with no label at all. I love that last tip. The recipes in Everyday Detox are also based on the principles of food-combining and how food-combining can impact digestion (which is something I admit that I’m not overly motivated to follow), but whether you want to learn more about food-combining or not, the recipes can be enjoyed simply because they are healthful and delicious.
Today, I’m happy to share a recipe from her cookbook for all of the almond butter lovers out there! I couldn’t help myself and added a homemade chocolate topping and Maldon sea salt flakes. It was a hit with our friends!


I also tried out the Strawberry Basil Blast smoothie a few times. I change it up a bit using half the avocado and lemon juice. It’s also good without the fresh basil (I don’t always have it handy because I love to kill me a basil plant), but I do recommend trying the basil version first. I’ve made a cherry-basil combo in the past and it really is awesome in a smoothie! This smoothie will be on heavy rotation throughout the summer.

Some other recipes on my must-try list include: Raw Falafel Wraps, Enchilada Stuffed Cabbage Rolls, and “Beef” and Broccoli.
Thanks to Megan for letting me share this almond butter fudge recipe today. Be sure to check out Everyday Detox which is hot off the press this week!
© copyright 2015 Oh She Glows. All Rights Reserved.